
Everything, Tutorials, Wood
A Workbench For Every Craft

Mar
And your grandmother could build it. It takes 8 hours, it costs $111 and it needs a bare minimum of tools to complete. These are all things that ring quite nicely in my ears – and they are all reasons why I decided to build this workbench. Everything I do requires a vast amount of table space, some projects require a vice, others – a drill press. PlusI always have a need for shelving for bulky storage and plenty of room in the back for storing handy tools. This tutorial is all about the nuances in building such a workbench – I initially started it one late tuesday afternoon, only to realize I didn’t have all of the right hardware…another trip back to the store. The next day I realized I didn’t have all of the right pieces of wood…another trip back to the store. Then I realized some of the hardware I bought was not the right type…another trip back to the store. All in all I took over eight (damn) trips to the store to build this bench. God forbid you fall into the same trap – I intend to save you all of that frustration and make it simple, give you all of the details – up front. The checklist of things you will need…before you begin. First off, let’s be fair – give yourself a weekend to put this thing together. When you are building by hand, take it slow – measure things out, double check, take a step back and make sure you are in fact building a right side and a left side…and not two left sides.
1. Overview
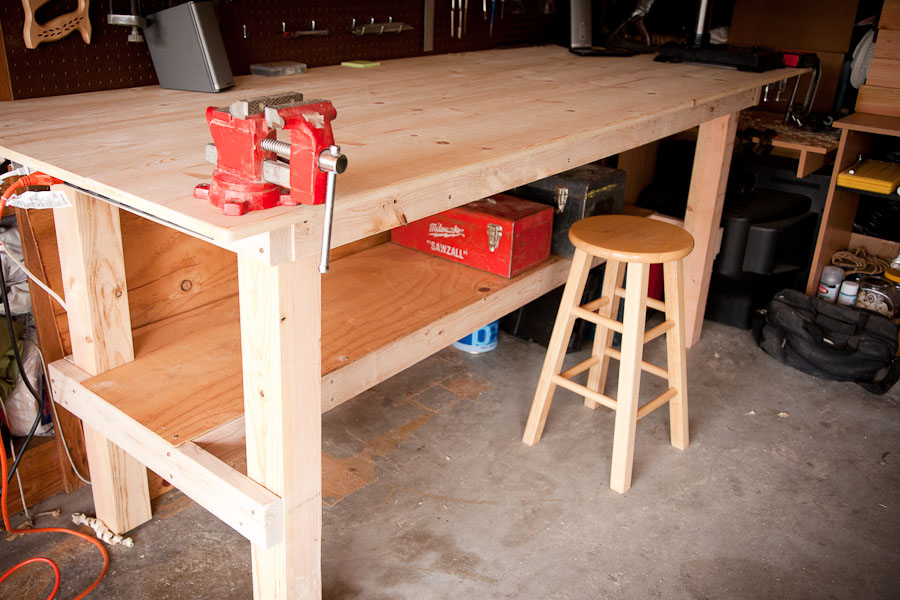
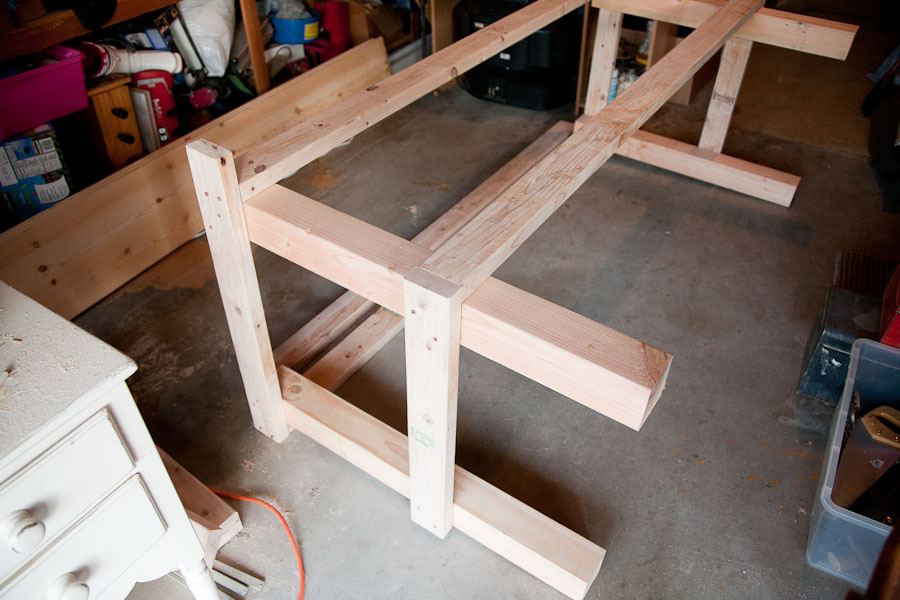
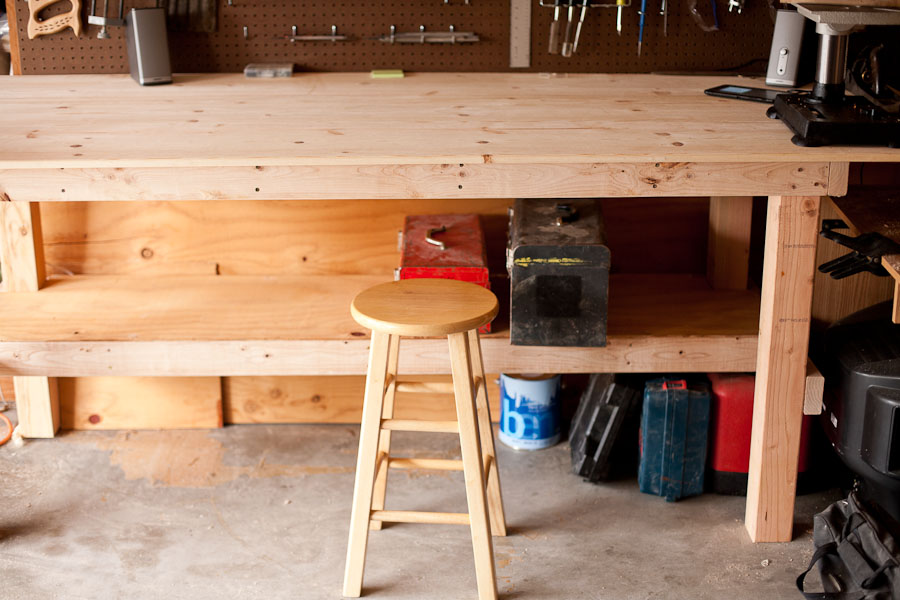
Here is what the final outcome of the table will look like:

The wood and hardware needed are described below, along with a cut list and dimensional drawing.
2. The Wood Needed
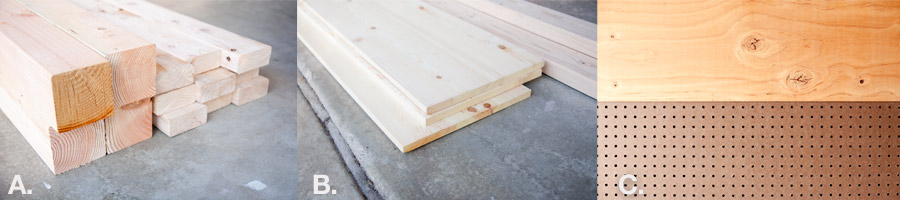
To build the frame of the table get 8 pieces of 2×4 of kiln dried whitewood (pine) studs that measure 8 feet long, then get 2 pieces of 8 foot 4×4 ‘green’ douglas fir ( Image A shows these pieces, the 4x4s have already been cut). For the table top, it is up to you. It will depend on what you use the bench for, but most people wont need expensive hardwood like maple. I went with 3 pieces of 21/32 inch x 12 inches x 8 feet of pine (Image B). This is pine that has been glued together, then planed to a nice smooth and thin piece of wood. It works well for wide surfaces, is smooth, and is fairly cheap. For the bottom shelf get a sheet of thin plywood, something cheap – as you don’t need it to look great, just hold things. An 8 foot long piece that is around 20″ wide will do. As an extra item – I got an 8′ x 4′ piece of pegboard to install behind the table to hold tools and everything else (Image C).
3. The Hardware Needed
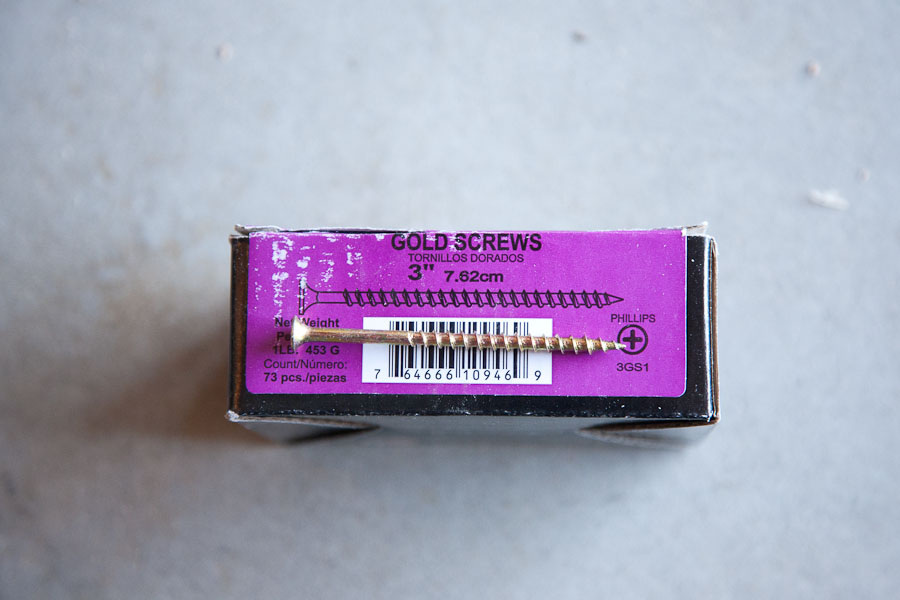
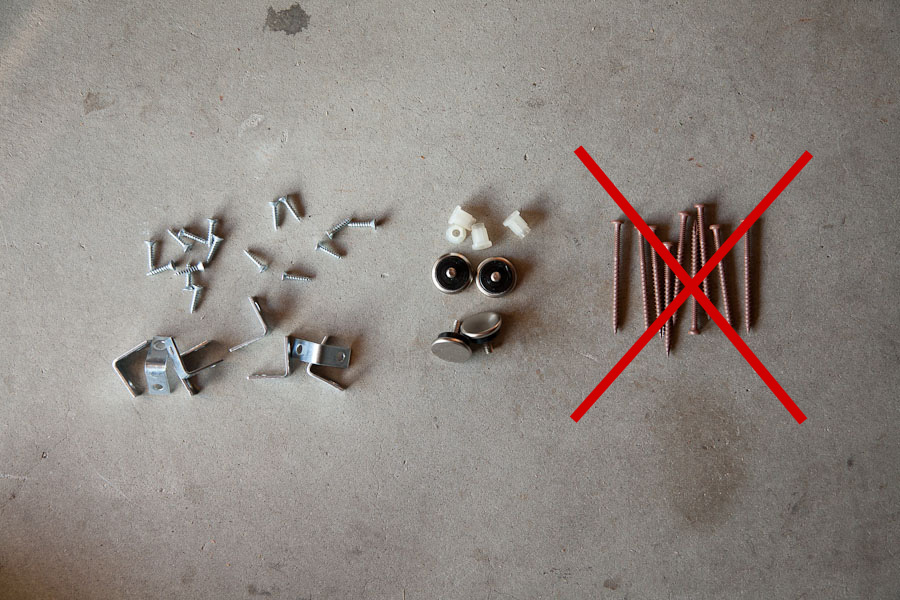
There is very little hardware you will need for the workbench – just box of 3 inch deck screws, 18 “L” brackets to fasten on the table top planks (get another 18 screws that are half the size as the ones that come in the L bracket package), and up to four adjustable feet to level out the legs of the table (I used just one).
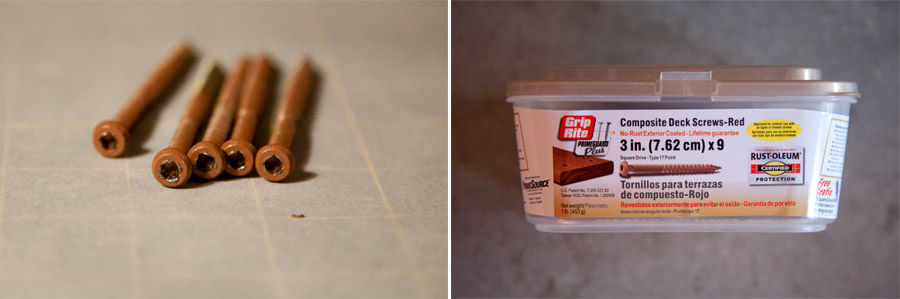
Just make sure not to get any screw called a “Composite Deck Screw” with a square head as seen in the above image. You will have an aneurism trying to get these crappy things into the wood without stripping half of them, unscrewing them, re-screwing them, unscrewing them and finally throwing them out.
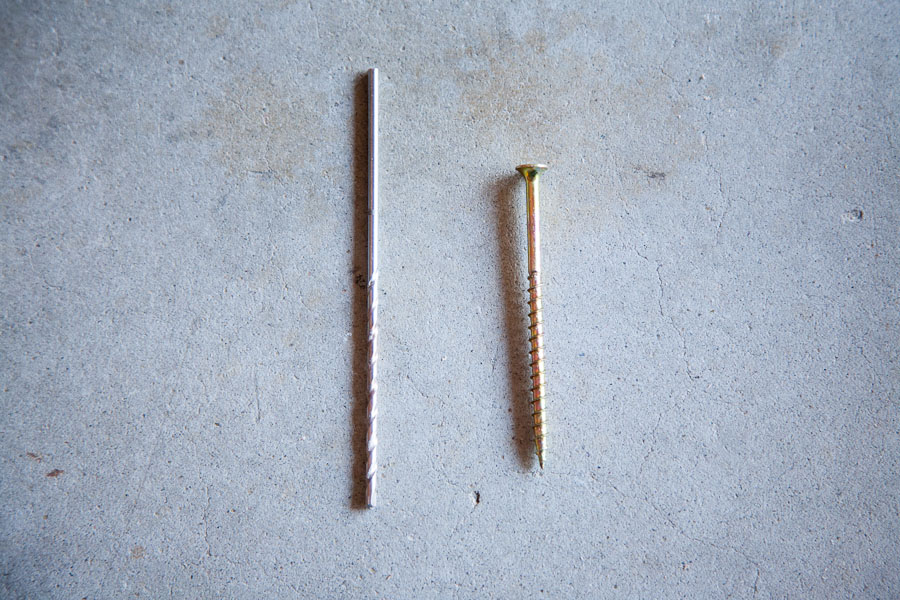
Above is the aftermath of what I went through for the first 3 hours of the build. Bad choice. The best choice is to use regular Phillips head wood screws and pre-drill your holes with a 7/64 drill bit that is long enough to make a 3 inch hole.
3. The Tools Used
While it is handy to have a few powertools at your disposal (table saw, chop saw, belt sander) it is entirely possible and actually quite easy to build this workbench with hand tools only…with the exception of a drill.
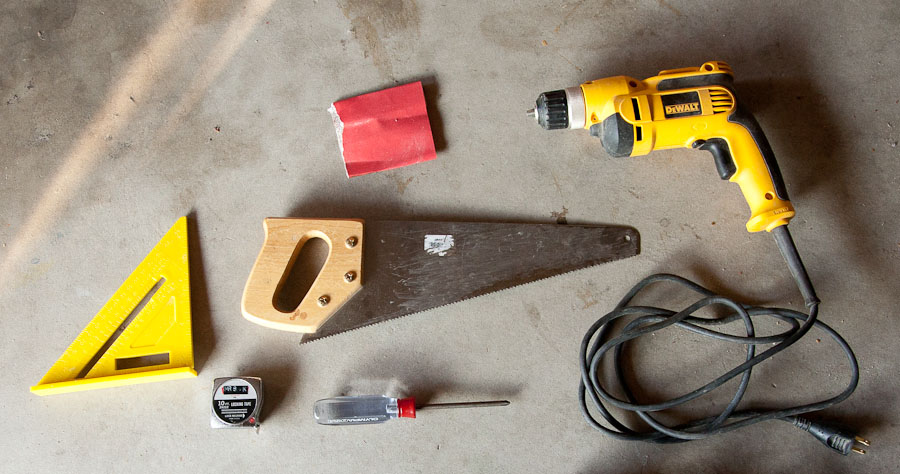
The above tools are all it takes. A square to draw perpendicular cut lines on your wood, tape measure, saw, screwdriver, sand paper, and a drill.
Like this post so far?
I spend most of my free time creating tutorials like this to help those like yourself get into leatherwork and woodworking, or get better at it. If you'd like to support my efforts, consider checking out my handmade leather goods shop and purchasing a gift for yourself or a loved one. It's readers like you that help keep a small U.S. business like mine going strong, so -thank you!
3. Measure, Cut, Assemble
The first step is to take a look at the cut list provided here and shown below.
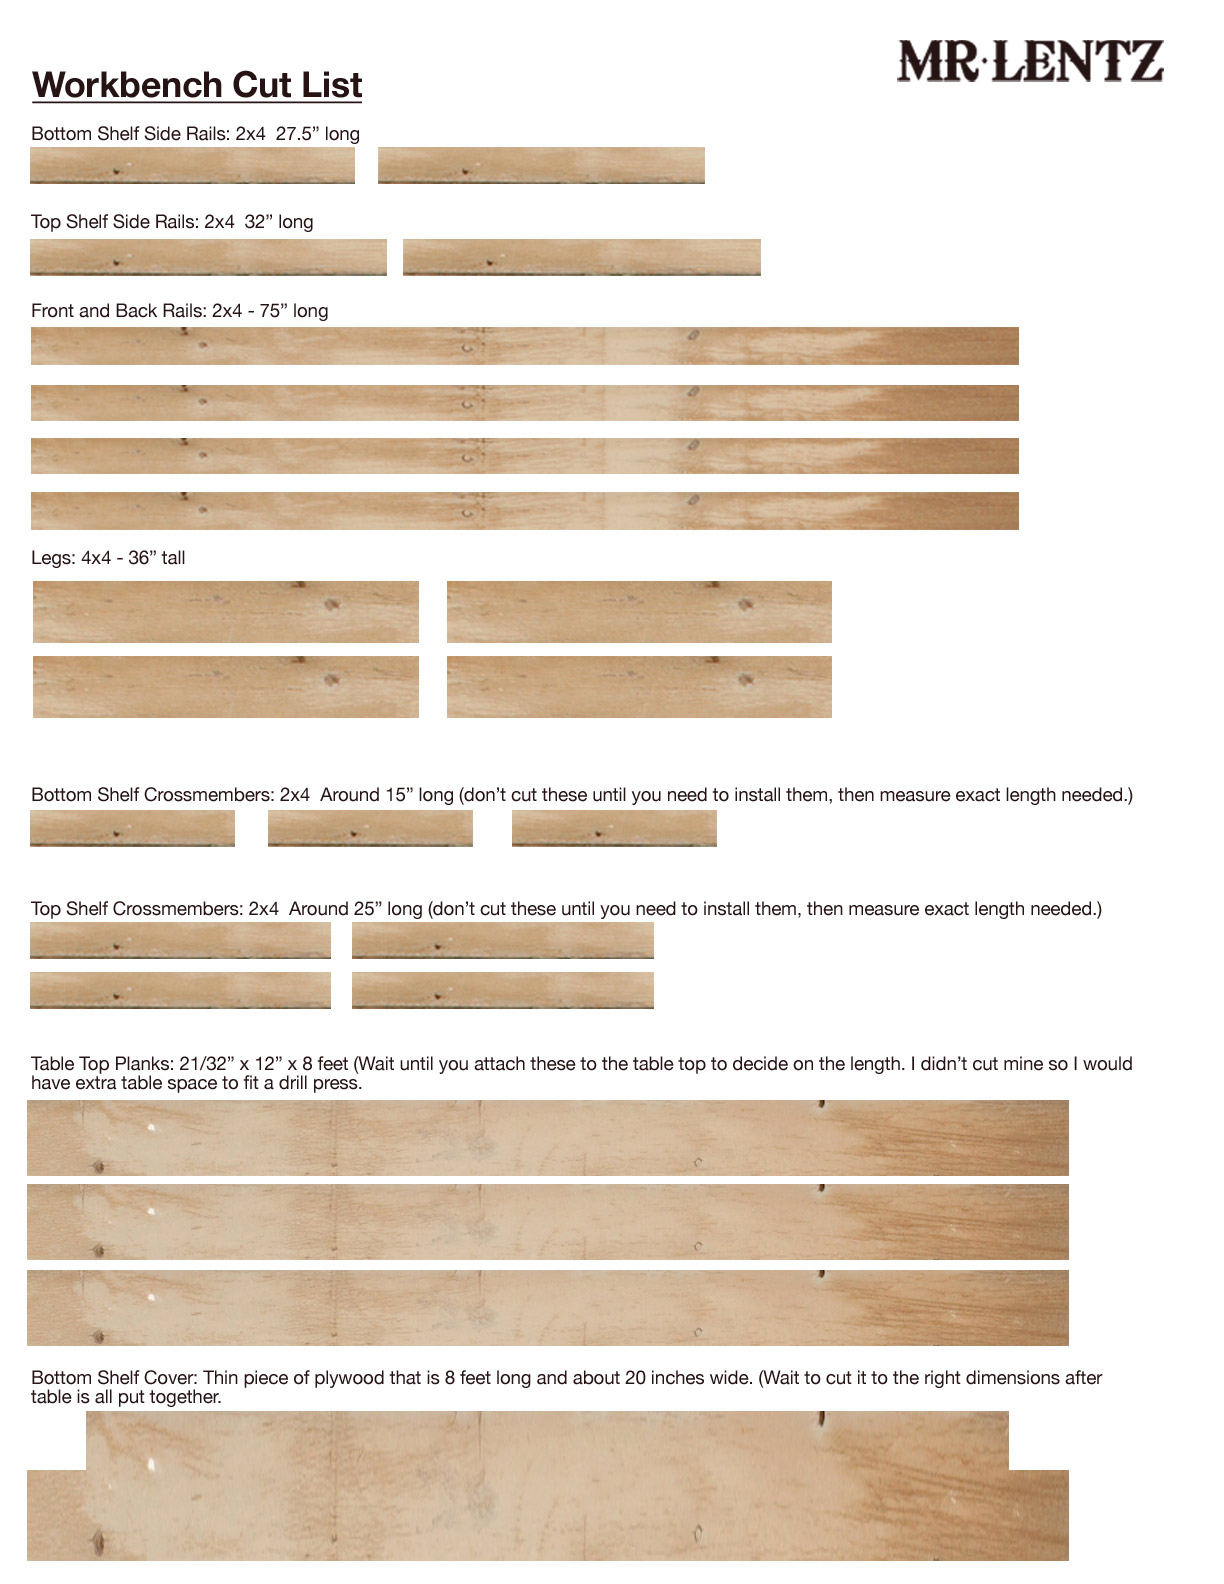
This list shows what pieces of wood to cut at what lengths, and how many pieces. This is the entire cut list for this project. One note on the cut list that I screwed up royally…make sure to wait on cutting the upper and lower shelf crossmembers only after you have assembled the table up to that point. This is simply because the width of the table will undoubtedly change by the time it is all screwed together. I accidentally pre-cut them and they ended up too short, so I had to cut into a new piece of wood and use the rest as scrap for another project.
The next step is to take a look at the diagram of the table provided here and shown below.
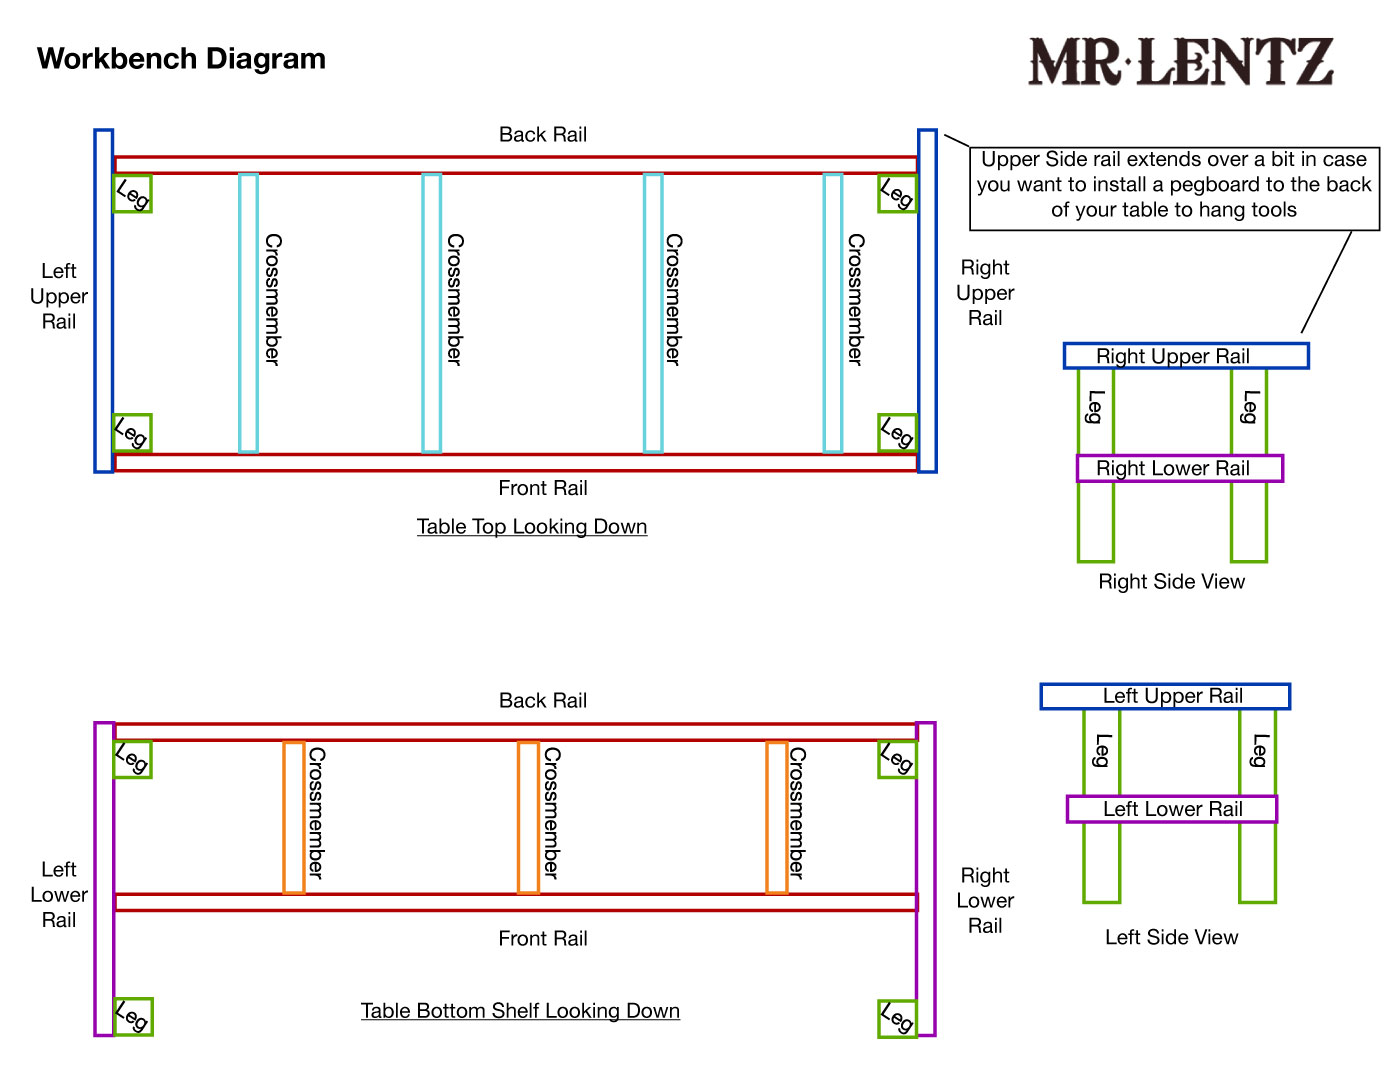
This diagram shows the breakdown of the table and how it fits together. Notice the simple detail that the side rails on the top extend beyond the front of the table legs so they can join the front rail. The top side rails go a bit further beyond the back legs to give you room for an option to attach a pegboard to the bench to hold your tools. I opted to cover the entire space with table top and put my pegboard on the wall behind the table.
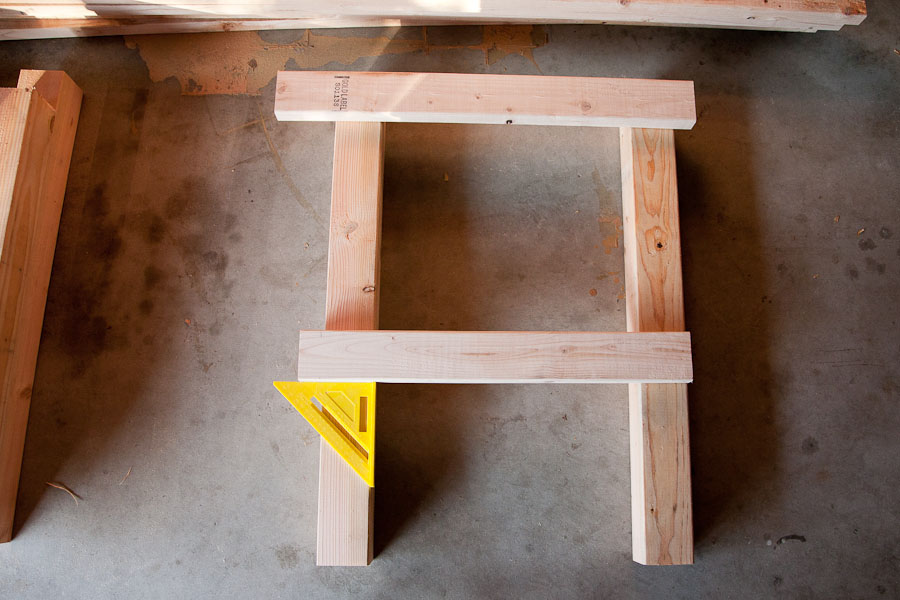
Lay the legs down and place the top and bottom side rails as shown. For the top side rail leave an overhang on the right side just large enough for you to attach it to the top front rail, or about 2 inches. Do the same for the bottom side rail, but leave the overhang on the left side only. Use a square to make sure the rails are intersecting the legs at perpendicular angles. The height of the bottom rail is up to you, mine is around 1.25 feet up, this will allow me to store things under the bottom shelf as well.
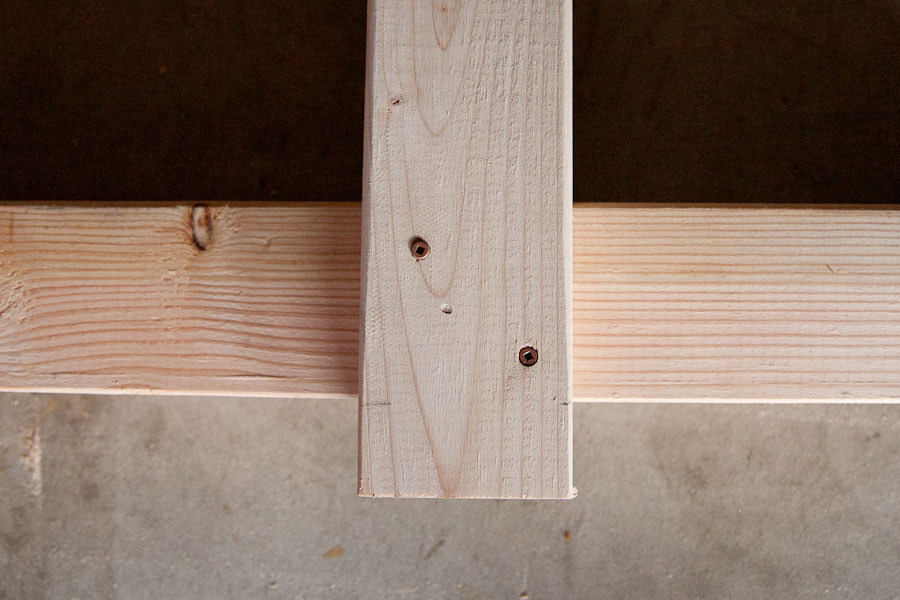
Pre-drill your holes to prevent the wood from splitting close to the edge and screw two screws into each rail where it intersects a leg. Keep using the square to make sure everything is lining up. Go slow, small mistakes here make big ones later, as in – wobbly table. Once the left side is complete, build the right side…not identically – but mirrored. This way you don’t end up with two lefts.

Once each side is built, lay each side down with legs in the air. The side rails should be on the outside. Place the front and back top rails into place.
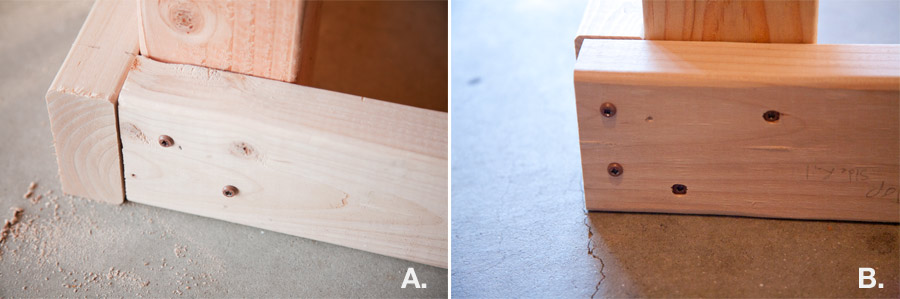
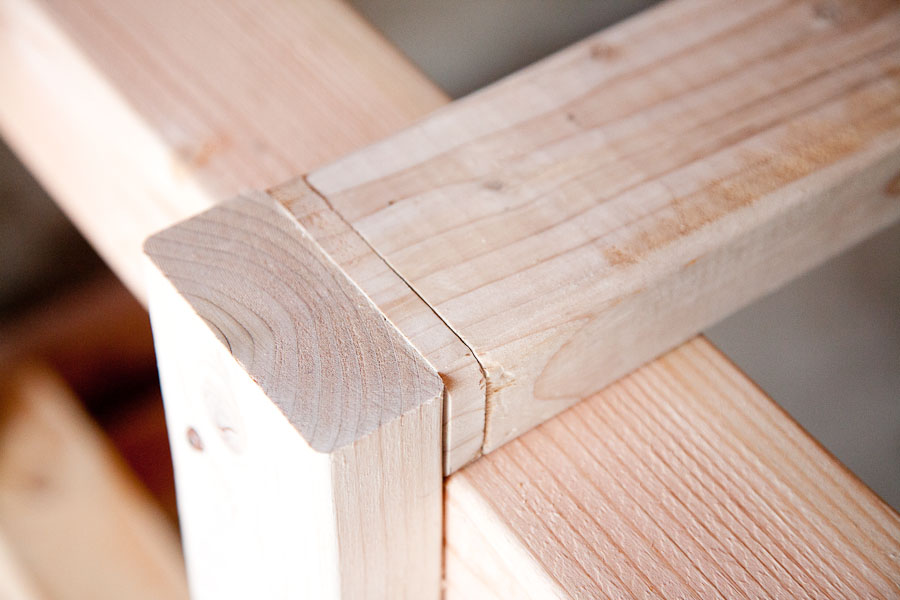
Pre-drill and screw in the front and back rails into the legs taking care that the top of the legs align with the top of the rails (Image A). Then pre-drill and screw the side rails to the front and back rails (Image B, two screws on left side)
Flip the table so the front side is on the floor. Place the lower shelf back rail in position.
At this point you may realize that the lower shelf back rail might not be cut to the right length. Somewhere in the midst of measuring, cutting, drilling, screwing and cursing, your piece doesn’t match up. Take a breath. This is quite normal in the world of handmade. The key is not to let it frustrate you – look at it as another challenge that you need to overcome. In this case my piece was short – which is worse than being long – so I cut another small piece of wood to fit the gap, wedged it in there, and went on my way. Continue to pre-drill, and screw the rail into the legs and the side rails.
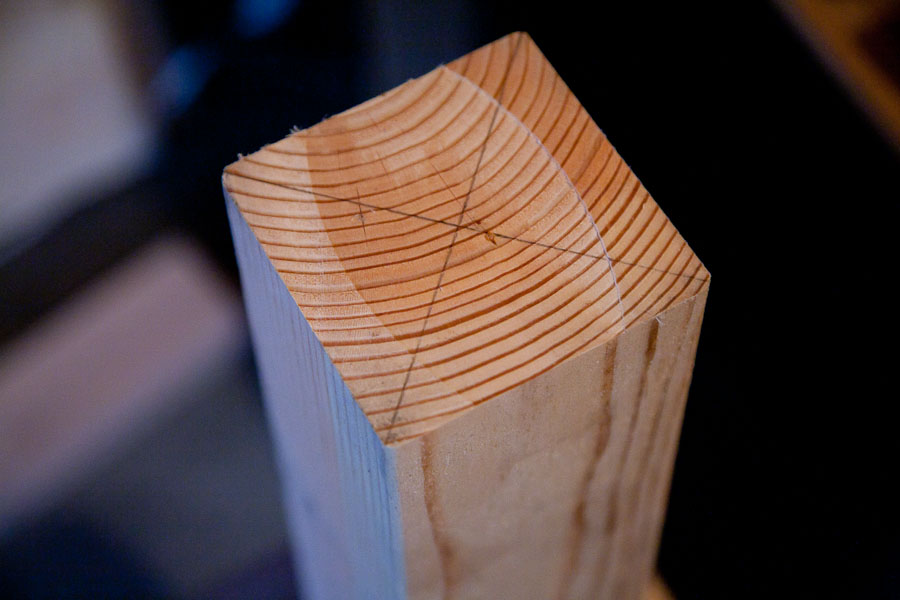
Flip the table right side up and check for wobble. If there is a wobble, it means everything is going perfectly. Locate the leg that is shorter, then flip the table upside down. Draw a line from corner to corner on the short leg and drill a hole to install your adjustable leg. There are a lot of different versions of these out there, so yours may actually screw into the side of the leg instead.

Flip the table right side up and place the bottom shelf front rail into position about a hair under 15 inches from the back rail. In the photo above you can see I used a tool box and scrap wood to help hold the rail at the right height. Do what you can to make life easy. Then pre-drill and screw the bottom front rail into the side rails.

Next, on the top of the table measure out the first top crossmember a hair longer than will fit between the front and back rail, cut the first one. Place the first crossmember into position according to the diagram, you may need a mallet or your fist to lightly pound it into place. Repeat that step for each top crossmember, carefully cutting each to the correct size so it can wedge right into place. Exact placement of these is not crucial, they are just there to support your table top.
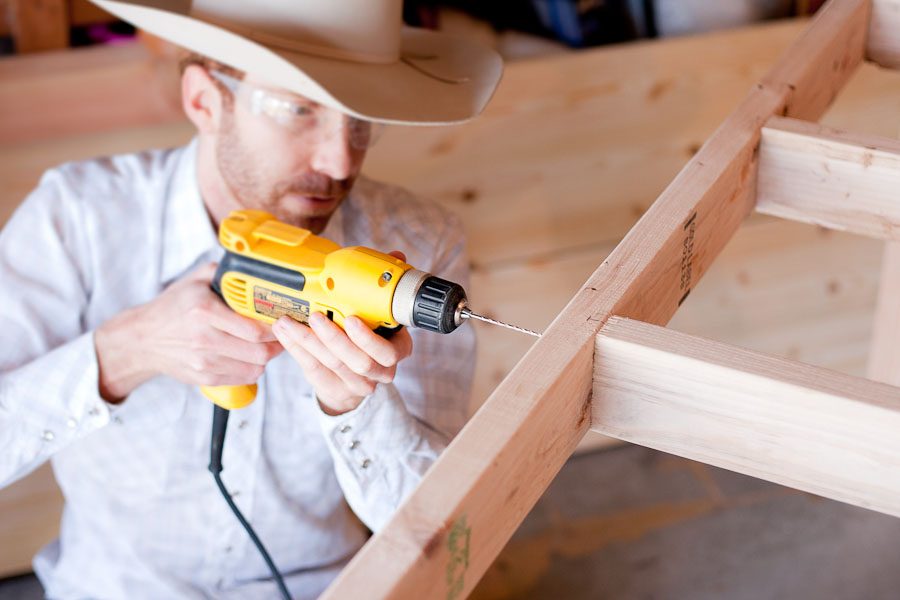
Next, slap on your cowboy hat, protective eyewear, and pearl button shirt and start pre-drilling the holes to screw into the top crossmembers.
Once finished with the top, repeat the same steps for the bottom crossmembers.
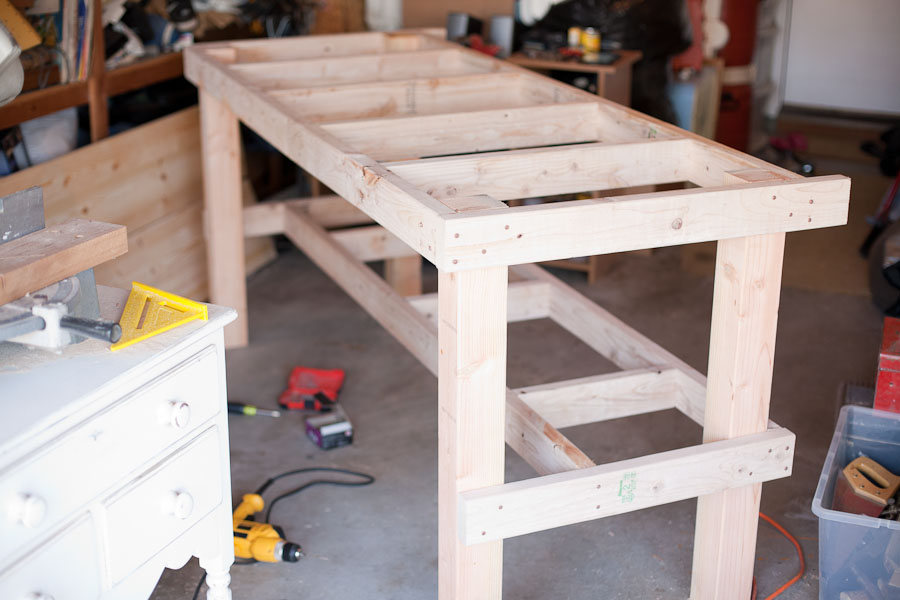
Hopefully the workbench looks something like the above image. If not, it will probably still work, and in the worst case you can always use it for a massive desert bonfire with your friends.
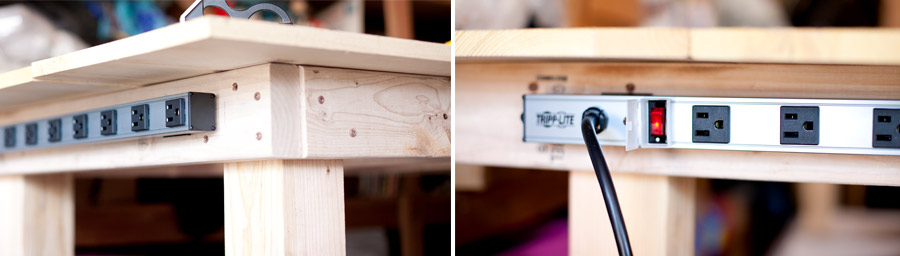
At this point I took a break and decided to install a power strip onto the side of the table, even though it wasn’t quite finished yet. The power strip will be very handy for my drill, soldering iron, boombox, dremel and any other small hand held power tool.

Lay your table top planks on top of the table and decide if you need to cut the length down. I decided not to – leaving them at 8 feet since I needed a little extra room at one end to hold a drill press.

When you lay the boards down, make sure to leave a few millimeters of space between each plank. Wood will expand and contract depending on the humidity level and, indirectly, the air temperature. Thus you will want to give it some space between planks so that it wont push up against itself and warp the wood, or even tear itself out of the fasteners you are about to install. If you build this workbench during a cold dry winter day and don’t leave adequate space, you may find that during your hot and humid summer – the top will have developed large bends. I am estimating a few millimeters in my case, but I guess I will see what happens. Certain types of wood have been known to expand up to several inches in the right conditions.

Using the L brackets shown above I placed two on each end of the plank under the table and two more to hold down the middle of the plank. In the left image you can see two sizes of screws. I bought smaller ones to attach into the plank itself so they wouldn’t go through the top of the table. The longer screws will go into the side rails.
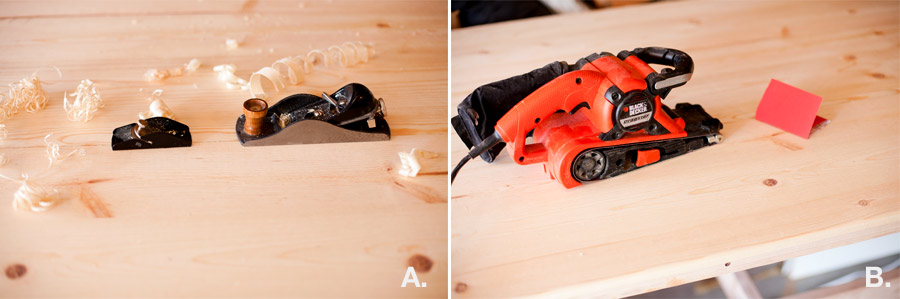
Now we’re on the home stretch. The tools shown above are optional, but if you have them – things will go more quickly. Image A shows two planers. I use the mini one on the left to help shave off wood on the edge of the table to give it a nice round curve. The planer on the right is to help even out the height of edges where planks meet. You can just as easily hand sand those areas as well. Image B shows a belt sander that makes sanding everything smooth a lot quicker. I used it on all of the front edges that I might bump into – but again – you can just as easily hand sand it all.
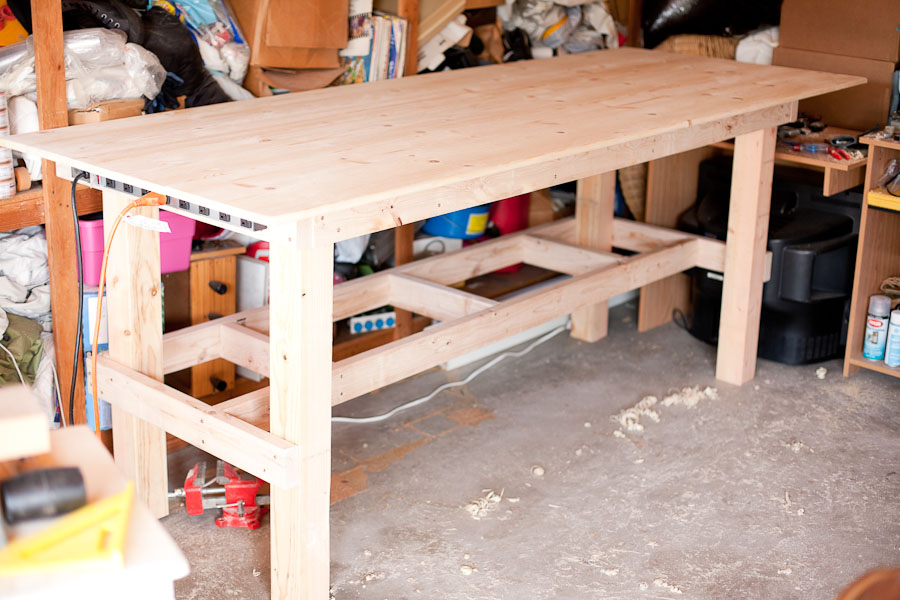
The workbench should look like this, and hopefully the backdrop of your workshop looks a bit different. Fortunately none of that stuff in the background is mine – and I can easily cover it up with my pegboard.


The last step is to cut the lower shelf from your plywood sheet. I had an 8 foot x 4 foot sheet handy, so I used a tablesaw to cut it down to the right width – however, if you buy yours at any big hardware store, they will happily cut it to any size you need. Once you get the width right by measuring the lower shelf rails – measure out the space where the board will fit against the legs and cut them out. Slap that sucker on the lower shelf, pre-drill it, screw it, and call it a day. Your workbench is done.
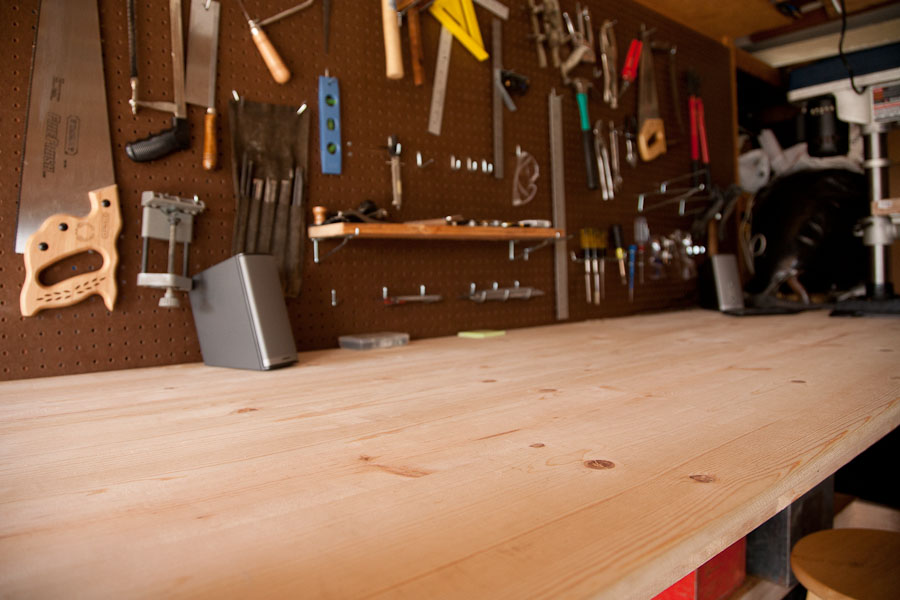
This table provides a nice solid wide area for projects. It makes it so much easier to work on things when you can spread out. As an extra step and to make finding tools even easier I installed the pegboard to the wall behind my workbench. I hope this tutorial helped you out and inspires you to create space of your own to be creative. This tutorial was inspired by one found here, but it has been altered a bit and presented a bit more clearly.
If you have any questions on the build I can answer them in the comments section. Good luck!
READER'S FAVORITESVIEW ALL


Nice bench Mr. Lentz!!!!
My son and I have this table built. We are wondering how the top side rails being extended allows you to attach the pegboard to the top of the workbench. Do you have a drawing for this?
Hi Mary, I am so glad you and your son built this table. In my version I attached the pegboard to the wall behind the table since I knew I may be sawing or hamering and I didn’t want all of my tools hanging to be moving with each motion. To do this you just need to attach the pegboard to a thin 1 inch think frame running around the edges of the back of the pegboard, then attach the frame to the wall. This allowsx there to be space between the pegboard and the wall so that the pegs will fit into the holes without hitting the wall. If you decide you would like to attach the pegboard to the table, here is the original tutorial that will show how that is done : http://www.dmroth.com/woodworking/workbench/workbench_album/photos/photo_22.html
Basically build a frame around the pegboard with the bottom part having extended legs. The legs then attach to the table with a few screws on either side. Personally I would attach it to the wall for stability, so lean towards that path if you can! Good luck!
Did you take into consideration the direction the planks might cup if you are not putting a finish on the table?
The part of me that loves overkill would buy hanger clips used to deck building to support the cross beams…but that is just me. :p
Hi Ben – no, I certainly didn’t! However after about 8 months of use the table top is still flat as can be. This could be because of my location in a drier climate in the Southwest. Generally if you are going to install a tabletop to a workbench like this it is recommended that you use a solid sheet like plywood, instead of individual boards. Please share any info you have on cupping in case others will benefit! Thanks!
Mr. Lentz,
I like what you are doing here. Teaching others to build. Ben was correct in his questioning. The “arch” of the grain that you can see in the end grain of your wood should be reversed every other board (one arch facing down and the next one up…) to prevent cupping down the line. This is done so that when the wood reacts to climate the forces in each piece act in reverse of each other. Also those composite screws you were using in the beginning are not made for lumber they are specifically made for composite decking and have outdoor coatings which make them a nightmare to drive without an impact. I would personally recommend using a spax screw, they are a bit pricer but use and included Torx bit and beginners will spend less time stripping screws or having the Phillips bit jump out.
-coop
Thanks for that insight Coop! Yes if I had only known that fact about composite screws earlier! Live and learn!
FWIW, if you have an impact driver (basically a drill-like screw driver that hammers as well) those square head screws work MUCH better.
Nice tip Jason!
Made it this weekend, definitely a solid bench! I would recommend though, clamping/glueing top together. Don’t want gaps on your workspace. If you plan to do “heavy” work I’d recommend a different material for the top. I built it with the “ledge” on the back for the peg board but instead of a peg board, it made a perfect spot to attach a “backsplash” so things don’t roll off the back and good place to mount my power strip.
Additionally, I finished the top with a poly to help protect it, it’s only an inch thick so you’ll want to protect it as much as you can.
Thanks for the plans! it was a fun project and having the list of materials made it a breeze.
Hey – glad you found this an easy project, and thanks for the tips!
Pingback: 8 Cool DIY Craft Room Furniture | Decorating Ideas
I just made this, thank you for the tutorial.
Cheers,
Jurgen
I have been looking for a work bench design that dresses some leather work specific needs. I like the idea of having the lower shelf recessed so that I can sit if I feel like it. I was also curious how sturdy this was. I have a downstairs neighbor and am hoping it can handle the pounding I can lay to it- for rivet work and other such things. I was wondering about whether a rubber mat underneath it would reduce noise. Thanks for the post, I think I’m going to make this next weekend.
I am getting all the materials to do this today! This has been bookmarked for a few months now, and I am very excited! Will let you know how it goes.
Hi Krystle – sounds good – let me know if you have any trouble.
the square head screws are called Robertson. they come in 2 sizes the number 2 is most common and found on all electric boxes, the plugs are number 1. the deck screws that you build with pressure treated wood are all square headed screwdrivers. they also have bits for electric drills battery operated also. the square end last a lot longer than phillips bits. we are in canada and they are as common as pocket lint. i was at harbor freight in maine and there was not a square screwdriver to be found.. our store that is similar to harbor freight is called princess auto. website is princessauto.ca and i was wondering about the pegboard my hooks always fall out so i use heavier plywood and nails..
there is also a larger robertsons #3 however they are for larger screws and are not all that common, at least i dont run into them much…
Just built except for the top…….haven’t decide on material yet. Lower shelf is strong enough to stand on. The entire bench is solid as a rock.
Yep – this is a pretty sturdy table considering it’s all screwed into place! Fairly easy to build too.
Plan worked great. Thanks much.
Great – thanks Mike!
I have made this twice, so thanks for posting. I made it first time about 5 years ago. I recently moved and did not bring the workbench with me. I just finished building a 2nd time. I made a couple of modifications. I put the 2×4’s together using a Kregs Jib and pocket holes. I used Kregs Jib for shelf and table top, so these are strongly held down two the supporting 2×4’s. This means no worries about the table top bowing. Only place I used regular screws was connect 4×4’s to rails.
Hey Martin, glad you found this tutorial helpful. Yes it is an easy build – and it sounds like you made some nice modifications with the Kreg Jig. I bet yours looks a bit nicer than mine!
This was such a fun build! Thank you so much for posting this! Obviously lumber was cheaper when you put this online, now the table will be around $200. Which is still a steal. I did use self drilling screws which probably sped up the process, I built the table in 4.5 hours. (Including sawing the 2×4 s and the 4x4s by hand). Sturdy, square and level, great table!
Thanks for the comment and good to hear you enjoyed the build. Yes, lumber was a bit cheaper back then, although it is still not too bad when you compare buying a new table. Plus you can customize the length etc on your own build. I am still using mine today going on 10+ years now.
I was looking for a workbench to build like this but this one looks better! It’s tomorrow’s project and i’m sure it will go great. Thank you for the plans