
Everything, Leather, Tutorials
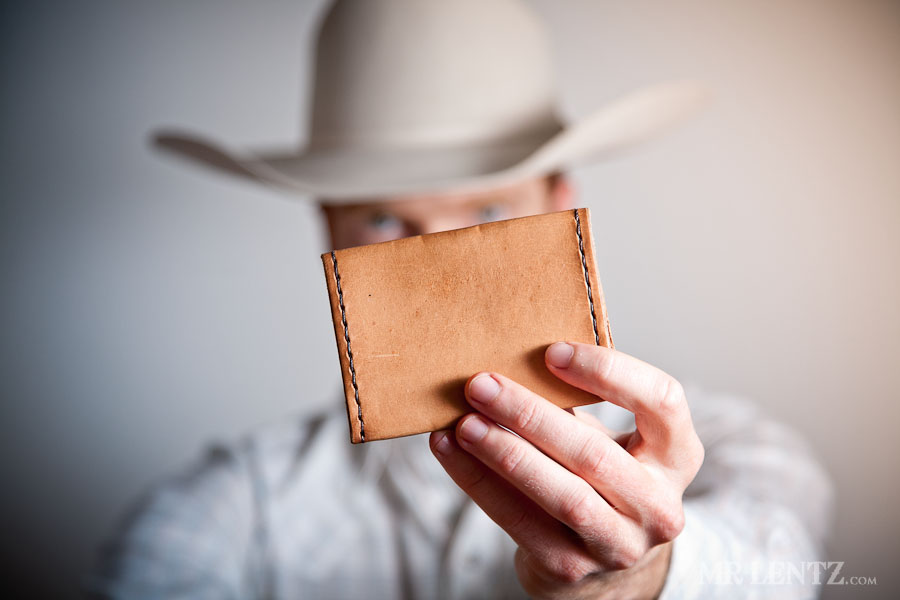
How to Make a Leather Wallet
Nov

It is quite possibly the simplest form of wallets. Though make no mistake, it still takes a few steps and a couple of tricks to get it looking just right. In this tutorial I have photographed every step in making this leather wallet from figuring out the dimensions, to preparing the edges, dyeing, and hand stitching. If you have been following along in the past month or two you may have seen my leather belt tutorial as well, it’s worth checking out after you stitch this little guy together. Since this is a fairly long post (~ 100 photos), I am going to jump right to it. Give yourself almost 2 hours if this is your first project.

Above are all the essential tools required for this wallet. From left to right: Steel ruler, wax pencil, rolling cutter, edge creaser, stitching groove cutter, edge beveler size 0, 6 diamond shaped hole punch, scissors, two hand sewing needles, waxed thread, stitching pony (I built this one myself, but you can buy them online pre-made). Up top I have a rubber pounding mat to absorb the punch later on.

The type of leather I am using is called vegetable tanned. It is a type of tanning that allows me to work with the leather, mark it, and dye it. I chose a scrap 3-4 oz. piece that measured more towards the 3 oz. side – meaning it’s a bit skinny.
Like this post so far?
I spend most of my free time creating tutorials like this to help those like yourself get into leatherwork and woodworking, or get better at it. If you'd like to support my efforts, consider checking out my handmade leather goods shop and purchasing a gift for yourself or a loved one. It's readers like you that help keep a small U.S. business like mine going strong, so -thank you!

The first thing you will need to do is create your pattern, I already have mine set up, but let’s take a look at how to make one for this wallet. First – grab some posterboard and measure out a rectangle 9.5 inches long and 4.25 inches wide.

[envira-gallery id=”56382″]

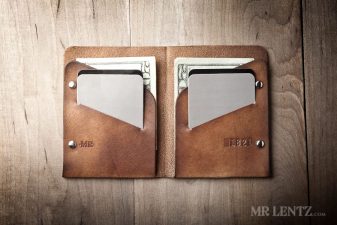
Then measure and mark the two fold lines. The distance between them needs to be 7.75 inches in order for a dollar bill to fit in with the card and only be folded once. To cut the angles as I have – use the photo as reference for marking the lines, but don’t take off too much! We need enough leather to grab the cards when it is all stitched up.


Lay your template down on the leather and mark up the leather. I try to minimally mark the leather only where I know that I will need reference points. This keeps the wax pencil from getting everywhere.


I cut out the leather with my rolling cutter and steel ruler.

Lay the leather flesh side up (that’s the rough side) and mark the fold lines.

Then wet the entire length of the fold with a little bit of water. Not much water is needed – this just ‘cases’ the leather and allows it to be formed and hold its shape when you bend it.


Go ahead and bend both sides straight across. I also use a lightweight mallet to help pound down the fold.

Next we need to prep the grain side of the leather (smooth side) for edge marking. Wet the grain side very lightly, covering the entire piece. If you only wet certain sections – that area of leather will actually be slightly darker once everything dries.

Run the edge marking tool down both short ends of the leather, starting and stopping about 1/4 inch from the edge. I like adding this accent to give the piece a tiny bit of extra detail.

In order to give ourselves a good straight reference line for stitching…as well as help sink the stitching into the leather thus protecting it – we need to use a stitching groove cutter. Set yours so the middle of the hole to the inside edge of the cylinder is about 4mm.

In the photo above you can see that I started and stopped the groove just after the fold we made previously. Whatever is above the fold will be on the inside of the wallet…and with the groove – it is sometimes hard to get it to line up with the stitches on the inside, so I end it short.


The edge beveler is a great tool – and for quite a while I was using the wrong one! I recently purchased the smallest size I could find from Weaver Leather Supply, a size 0. This is a perfect size for thin leathers such as our 3-4 oz.

The edge beveler takes off the corner edge and helps the appearance of rounding it. In general, these small touches go a long way to getting your leather work to look really nice – so it’s worth the effort.


Next I re-wet the grain side in preparation for stamping my logo and the unique maker number.


Before taking the piece out to dye and condition it, you need to punch the stitching holes. I have tried several methods and this is the one that is by far the easiest and quickest and least likely to draw blood. If you are interested – there are quite a few tutorials on how to hand-stitch and punch the holes at the same time, but I would recommend my method for now.

Follow the groove and punch across, make sure to fold the leather at the folds. After each punch, line up the last hole made with the first prong – this will ensure proper spacing.

Sometimes you need to fudge the end to make the last hole fit.

Be careful when you punch through with the folded leather – that you don’t let the punch cut the edge of the folded piece beneath. Basically creating a half-hole on the edge which looks like a tear.

Next you can optionally dye your leather. I like to use all-natural handmade dyes I make myself. In this case I am using walnut husks that have soaked in water. It helps to darken the leather a bit more.

If you dyed your leather, and even if you didn’t, you should make sure that piece is completely dry before moving on to the conditioning stage. If you don’t, and there’s a wet spot, that spot will not soak in the oil evenly and will make your piece look like a cow pie. To speed things up I use a heat gun, held at a distance or the leather will shrink.

Once completely dry, rub on some extra virgin olive oil onto the grain side (smooth side) only. When I was first starting out I oiled the flesh side as well and the result is that the piece will soak up way too much oil and get a bit soggy very quickly. With a couple of light coats on the grain side you should be fine. This helps give the leather some life, since the tanning process, wetting/casing, cutting, folding, dyeing …all takes the natural oils out of the leather. You will quickly see a nice change once the oil is applied – colors come to life and the leather will become more supple.

Next I usually add on a mixture of beeswax and walnut oil. This further conditions the leather, adds a bit of water resistance and makes things look even better.


The wax can be applied on both sides, and should be for that matter.


To smooth out the edges of the leather, slick them, and make them look well finished – I use a coco bolo leather burnisher made for the drill press. It is basically a shaped piece of smooth wood with grooves in it that you can push your leather up against while the drill press is on and it will slick and burnish everything. In my case I also taped on a cutting of old jeans. This helps quicken the process and does a better job…though I would recommend white canvas instead if you have it. Above I am applying a very small amount of water while the drill is on. Only a touch is necessary. If you don’t have access to one of these you can do it by hand as well. Just grab some canvas or jeans , very very lightly dampen them, then rub them against the edges very quickly. It will take a while, but you will get the same effect.

Next just hold your piece up to the burnisher with the drill press on and apply pressure. The pressure will create heat which helps to burnish the edges. At this point I only burnish the tops of the inner flaps. Later as a last step once everything is stitched up, I will burnish around all of the edges.

Next place your piece into the stitching pony like the above shot. If you don’t have one, it will be a bit tricky to stitch, but I have done it in the past! You can try using some clamps and pieces of wood too.


Line your stitching holes about 1/4 of an inch above the edge. Ok – you may have noticed a mistake here…I started stitching before dyeing! Make sure to dye it first. That way you don’t have to spend 30 minutes undoing your mistake.

Grab your waxed thread, two needles and some scissors and cut out one piece measuring two arms length worth of thread.

First thread through the needle hole.

Then pierce the thread with the needle leaving about 3 inches from the end.

Then pull the pierced end up the needle.

Pull on both ends to tighten. Then repeat this for the other side of the thread, so that you have two needles connected to one piece of thread. This is necessary to do the saddle stitch, which is a great stitch for a wallet as it locks each pass in place. If one part of the thread were to break, the others would still hold it together.

Starting on the right, pass the needle through the first hole. I find starting into the grain side gives the thread a better look when finished.

Pull both needles so that equal amounts of thread are on each side. Then pass the left needle back through the same hole on the right side, basically repeating the first step. Pull it tight. This will give you a loop of thread around the end, which is really just for looks.

Next take the right needle and put it into the second hole.

Hold the left needle like so behind the right needle as it passes through the hole.

Grab both needles in the left hand, and thread in the right.

Pull down on the thread that just passed through the hole, at the same time rotate your left hand so the second needle can be pushed through the same hole.

It is important to hold the thread down so you don’t puncture it with the needle. If that happens…stitching will stop almost immediately.

As the second needle is going through the hole, lift up on the right side thread you were holding from needle 1.

And wrap it around the back of needle 2.
 Pull needle 2 through the hole.


Tighten both ends of the thread. That completes your first saddle stitch.

Now make a bunch more and once you get to the end, see below.


At the end – you will be basically doing everything in reverse. Stitching over your last stitches to hold them in place. First, you need to loop around the end, just as you did at the front of the wallet.

Pass the fet needle around the end and through the last hole.


Tighten it.

Then do the saddle stitch in reverse…or spin the pony around it’s much easier!


Make 2 to 3 reverse saddle stitches.

Then take the needle on the right and just push it through the next hole to get it on the inside for tying off.


To tie off each thread – just pass it under a stitch…

Then drop the needle through the hole created by the thread.

Tighten.
And snip, with a little room. It is recommended that you also use a soldering iron to burn the thread edge and keep it from unraveling, I haven’t found this necessary yet though.

If you made the exact same stitch, identically each time, this is what it should look like.

To help the wallet fold into the correct shape, go ahead and fold it backwards and wet the edge with a touch of water.

Then line it up and fold it on the correct side, pinch it or use a mallet to hammer into place.

Not so bad? You just made a nice, thin, durable, and minimal hand stitched wallet.


 If you have read this far and don’t feel like making this wallet…you can buy it instead. Get it in my online shop.
READER'S FAVORITESVIEW ALL


really nifty!
thanx for sharing.
Love the part about saddle stitch. Thank you for sharing!
C – definitely look on Youtube if you need an even more detailed version of how to saddle stitch. There are tons of videos on it out there.
Super sweet!!!! Thanks for sharing! I have limited wifi, so I can’t watch videos…so THANNNNKKK you for all the pics!!! So appreciate it! Awesome tutorial!!! More, more, more!!! 😉
Thanks again!
This tutorial is so great. Where did you get your custom leather stamp from?
Thanks Scott! Check out this guy for some good options on custom leather stamps: https://www.etsy.com/shop/LWleatherworks?ref=l2-shopheader-name
Awesome, thanks! I’m trying to decide between a heat embosser and a stamp. I like the size of the rivets on your Wild Bill wallet, I’ve yet to find some that small! Care to share where you get yours from?
Scott- I had to make this choice a while back too. It depends on two things – how fast do you need to do it (quantity) and how prominent do you need your logo? I decided on a stamp because I wanted something quick, easy to use, and not as prominent. As much as us makers would like to see our logos huge on everything, I am pretty sure customers would rather it be small and inconspicuous.
As for the rivets try TandyLeatherFactory.com they are the mini double cap rivets. Though beware that they are really only made for the thinnest of leather – like two 2-3 ounce pieces together.
Great, thanks for all the info! I go to Tandy Leather to get my 8.5″ x 11″ sheets of vegetable leather for wallet-making but can’t seem to find a full vegetable tanned shoulder/hide of 2-3 oz leather. Do you typically get your leather from Tandy?
Scott – no problem! I would recommend buying full sides when you can. If you are going to be making a bunch of things this is a much better deal. I used to buy from Tandy until I decided a while back to up the quality and consistency of my leather. Since I go through a lot – I now buy direct from a tannery. That’s a great step if you go into biz making things, but if you are just having some fun and learning, I’d stick with Tandy for the time being. Be on the lookout for sales each month – they usually have good discounts on the lower grade leather.
I’m about to start my first wallet project. And first ever leather project. I’m taking pictures along the way and will DEFINITLY use your tutorial as I go because it’s the best I’ve seen. Thank you so much! By the way I’m using leather salvaged from an old pair of work boots I have. I might learn some hard lessons, but it’s my “test project”. I’m excited. :^)
Paul – Way to go! Using salvaged leather is a great (and inexpensive) way to learn. Plus it creates a piece with some memories built in.
Hi Mr Lentz.
What is the different between Edge creaser and Stitching groove cutter?
are they have the same function to make a line pattern for stitching?
Thank you
Ah – an edge creaser is used more for making lines in leather, while a stitching groove cutter is really for cutting a straight groove along an edge that you will then later punch holes into with a stitching awl. The stitching groove helps to sink the stitch into the leather to help protect the thread while also giving reference to you for a straight line.
Hey Mr Lentz,
Thanks for sharing this!
What size punch do you use? And where would you recommend purchasing it from?
Thanks!
Hi Ido – I would get a rotary punch, it is more versatile and has several sizes in one. Try your local Tandy Leather store or google it.
I really admire this.
Hi Mr.Lentz
Thanks for sharing this. I make leather bags myself but your way to do this is so fantastic and also your tools. In my city I never seen like your tools, so good for you and again tahnks …
thank you for sharing your ideas.
Thank you for this tutorial! I just sat down for the afternoon and made a super little magenta leather wallet with blue stitching, using thread I waxed myself. It looks lovely, and now I feel I can go on to more complicated projects! Thanks ever so 🙂
Hi Gabbie – glad I could help get you started!
Thank you for sharing this information with us, it will be of great help 2 me.
Can you please tell me the name of the scissors you have pictured/used in the tutorial?
Hi L – Those scissors are regular sewing scissors. I did this tutorial a while back so I now use an updated version that is for dress makers. It has one edge with a very fine serration. This helps grip the leather while cutting.
Awesome tutorial, i got a lot of tips in this post. Good jobs Mr. Lentz.
Thanks Angki, glad I could help!
Pingback: How To Build Super Slim Wallet | petsloseweight.com
Hey Mr. Lentz!
Beautiful leather work, absolutely breath taking.
Can I ask what is the spacing between your chisel prongs. I have a small spacing currently and it makes for tight messy stitches. I would appreciate knowing where you picked up your hole chisel!
Thanks Mary! I actually bought that tool a while back at Tandy Leather Factory. It’s a pro tool that comes with a removeable head so you can use all different types of spacing and number of prongs. It is very handy!
Hello!
I’m looking to buy a smaller edge beveler than the one I currently own, and the one from Weaver Supply looks perfect. I can’t seem to locate it on their website though! Do you know what the exact title of the product is?
Thanks!
Alyssa
Hi Alyssa – yeah their website is a bit hard to navigate sometimes. I am not sure what the exact title is though.
Hi Mr. Lentz,
I was wondering, I can’t seem to find your tutorial on how to clean the wallet! I remember reading it but I can’t find it anymore. I have two of yours and I would like to start cleaning one of them.
Can you post the link?
Thanks,
Ali
Hi Ali – I am not sure that I have a post on that. I do have one on how to condition it by rubbing in some of my Spiff N’ Shine. Check out that page here: https://www.mrlentz.com/shopping/how-to-condition-leather/
Hey Mr. Lentz,
I have a couple questions! First does the Beeswax and Walnut Oil mixture leave a sticky residue on the leather? Also where did you get your walnut oil?
Hi Tyler, no – no sticky residue at all! Trade secrets 😉
I enjoyed your detailed tutorial! I’m taking a leather crafting class offered by Tandy Leather & was directed to your website by someone in the class. I love your work and my wallet, inspired by your tutorial, is currently in progress.
Hi Gwendolyn, I am very happy to hear that! Feel free to send over a pic of the wallet when you are done.
Pingback: Project – Sunday Wallets |
Hello, I am really enjoying and learning a lot from your tutorials! Can I ask where/what tannery you purchase your leather from?
Hi Jessee – thanks! I am glad you are learning a lot – I consider my sources kind of a trade secret, but if you want some cheaper leather to begin with the best place is eBay, then possibly your Tandy Leather shop. Good Luck!
What size spacing for stitching chisels would you recommend for general bag work? 6 prong or 4 prong?
Hi Brian – it honestly wont make too much of a difference and will come down to personal preference. The tighter the stitch – the more refined it tends to look and you get that nice pronounced diagonal stitch.