

Oct
It’s an item most of us wear every day, and it’s also one worth considering making yourself. In this leather belt tutorial I take you through my entire process, step by step, with very detailed photos and explanations. With only a few simple tools and a cutting of leather, you can make your own leather belt in no time at all…well maybe an hour or two with some practice. Let’s jump on into it:

First you are going to want to figure out the belt size needed. The easiest way to do this is to take a belt you already own, put it on, cinch it to your favorite belt hole, and measure all the way around. In this tutorial, I am going to start from the ground skin up. To do this – you must measure around the hips where your belt would actually sit, with the measuring tape against the skin. Record that measurement and save it for later on.

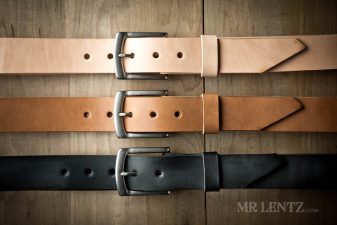
In my belt making toolset I use the following from left to right: Rolling razor, straight edge ruler (the longer the better), skiver, strap hole punch (1 inch long), edge beveler (size 3), strap cutter, hole puncher, belt tip cutter (or scissors), and on top the tape measure. As for materials – any long piece of 8-9 oz vegetable tanned leather will do (this is the type you can dye and really work with). Oh – and you will want to pick out your belt buckle (wideness will determine belt wideness), and your method of securing the belt buckle and belt loop. You can use line 20 snaps as I have done for a removable belt buckle, or rivet everything in place for a permanent fixture.
Like this post so far?
I spend most of my free time creating tutorials like this to help those like yourself get into leatherwork and woodworking, or get better at it. If you'd like to support my efforts, consider checking out my handmade leather goods shop and purchasing a gift for yourself or a loved one. It's readers like you that help keep a small U.S. business like mine going strong, so -thank you!

Now we need to create a straight edge on the leather to rest the strap cutter against. Lay your leather out flat, mark a long straight line on one side, about 45 inches for waists that measure 32 inches. Add an inch for each inch bigger of waist size. Cut down that straight line with your razor.
 At each end of your cut, make a perpendicular cut – this will allow the strap cutter to enter and exit the leather.
On your strap cutter – first set the thickness knob so that the 8-9 oz leather will fit through it. Then set the width to your liking. On my belts I make them all 1 1/4 inch wide, this fits the particular belt buckle that I include with them.

Press the straight edge side of the leather against the strap cutter and slowly feed the leather into the cutter. Always make sure the side of the leather is pressed against the cutter as this will make for a nice parallel cut. Once the leather comes out the other end of the cutter, grab it with your free hand and help pull it, while also pulling the cutter towards you. Take this step nice and slow. Every time I have tried to speed things up – I ended up with a long piece of cut leather that varied in width and was unusable. When you screw up a belt – that’s quite a bit of unusable leather!

Laid out are my hardware options. On the left I have line 20 snaps for a removable buckle, in the center are rivets if you prefer permanence, and an antiqued classic metal buckle.

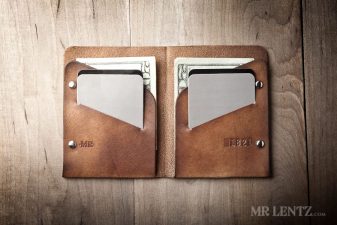
Now that the length of leather has been cut out, it’s time to mark the placement of holes on the tail end. For this step it is easiest to use an existing belt for reference, or just refer to the photo above for general placement. The longer hole is where the fold occurs and where the buckle rod sticks out.

[envira-gallery id=”56382″]


I used 5/64 for the snap holes.


Go ahead and punch out the holes, and shape the tail end.

In order for the tail end to fold over itself and snap together to hold the buckle and loop – I have skived off about half of the thickness starting just above the top hole.

I skive dry. Go slow, and make shallow cuts. Another option is to use a belt sander to grind off the thickness – this is a great way to get an even skive, but you run the risk of getting the leather ‘fuzzies’ that will need to be sliced off with a razor.

Fold the skived leather end over itself with the buckle in place. Now we can measure the actual length of the belt. Start at the tip of the buckle …

… and measure 3 inches beyond the skin measurement you took previously. In this case – I measured the skin at 31.5 inches, so I would then make a mark at 34.5 inches. This is the spot where the center hole will go on the belt.

For these belt holes I used 9/64 .

Punch that hole.

Make two more holes on either end of the center hole at one inch apart. This allows for some breathing room at thanksgiving, and some tightening up during your new year’s resolution workout.

About 4 inches beyond the last hole, make a mark. This will be the tip of the belt.


I use a special punch to cut out the tip of the belt so that it is uniform every time. However – this step can easily be done with a razor or leather scissors.
Every time I make a belt I pretty much always forget to cut out the belt loop. It’s like a mini belt within the belt, meant to hold the tip close to your body. To make it – I adjust my strap cutter to 1/2 an inch….

…grab your scrap leather you just cut from the belt tip, and feed it into the cutter.

The belt loop needs to be skived so that it can easily bend around the belt and hold it securely. Skive it to half its thickness.


To figure out the correct length for the belt loop insert it like the picture above.
Then make a mark at a point that allows the loop to overlap by 1/2 an inch.

I like to rivet my belt loops together for lasting durability, you can hand-stitch it, but I would avoid that method as they seem to fall apart with heavy use.

Now that the belt is cut out – it’s time to bevel the edges to give it a more refined look gentler feel. First – lightly dampen the entire length.

Then glide your beveler along all top edges at a 45 degree angle.

At this point I punch my maker’s mark into the leather. Above you can see my jury rigged stamp.

Wanting to be discreet – I place my logo on the back of the tail end, no shameless advertising here.
On to the dyeing stage. I recommend using all natural vegetable based dyes. The environment will love you, so will your skin. I get to work without using gloves, because everything I apply is hand made and non-toxic.

Rub on a nice coat of dye, in my case I use a hand made mixture of walnut husks and water.

To speed up the drying process I use a heat gun. The fact is – you need the leather to be very dry before applying your oil, or the oil will absorb in some places but not in others, causing a blotchy look.
I use extra virgin olive oil to help bring life back to the leather. Leather needs oil after being worked as it tends to dry out and become stiff.

Apply a nice even coat across the belt. 8-9 oz leather can handle a few coats, but never try to add a ton all at once, as the leather will soak it up and create a dark splotch that will feel greasy. Go slow and use thin coats. On the back side I tend not to add any oil, simply because the leather absorbs it at a much higher rate back there. This makes it hard to apply evenly and not get that splotchy look. Stick with the top for now.

Extra virgin olive oil darkens the leather, keep this in mind when you are considering the color you want to end up with.
Next, I immediately apply a nice coat of walnut oil and beeswax. This helps preserve the leather, make it slightly water resistant, and adds a bit more flexibility to the belt. I apply this to both sides of the leather.

The beeswax tends to get caught in the holes, just poke back through them with a file or stick.

To get the edges looking nice, they need to be slicked down and burnished. To help with this process I add all natural gum tragacanth – a sap taken from Middle Eastern legumes and used in baking as a thickening agent.

Apply a thin coat along the edges of the belt.
Another aid I acquired for edge slicking and burnishing is my handy cocobolo wood burnisher. It’s basically a a piece of wood shaped with different groove sizes that can be attached into your drill press.

When turned on, the burnisher spins at a high rate of speed – you then apply the edges of your belt to is and it slicks and burnishes the edges. This tool is not necessary to get the job done however, the other option is to grab a piece of canvas and start rubbing the edge down briskly until you feel it heat up. Let’s be honest though – that’s a whole hell of a lot of work for a belt, so if you can afford a tool like this, it will be worth its weight in gold.

Above you can see the edge of the belt with a slight glisten from being slicked. If you want a high quality product with a nice handmade touch – then beveling and slicking your work is the way to go.

It’s time to put the snaps on. I like to keep things simple – so silver generally goes with everything. Above is an assortment of line 20 snaps, a good size for this project.


To set your snaps in place, you can use a snap setting kit from Tandy Leather, it is an affordable way to set snap every so often, but it is also slightly hard to not screw it up every once in a while. And when you eventually screw up your 100th snap and have to figure out how to wrench it off your leather…you end up buying a handy little press like the one above. This little guy has interchangeable pieces for setting snaps, rivets, grommets, and punching holes. And it does it perfectly every time. If you do choose to rivet the belt together then make sure you put the buckle and belt loop in place first!

Ahhh, there ain’t nothing like good shiny silver on a beautiful brown belt.

P.S. don’t forget your belt loop. I riveted it together with micro double sided rivets.

And there you have it, a classic leather belt.

If you enjoyed this post, please don’t hesitate to share it around the interwebs or Facebook. Plus, consider subscribing to my free newsletter where I mail out even more tutorials, tips, inspiration and all around good news in the workshop


READER'S FAVORITESVIEW ALL


Great tutorial! Thanks a lot for the very detail pictorial instructions! 🙂
My pleasure Onel – let me know if you have any questions about it
Can you tell me where I can get a snap setter tool like the one you have. I have messed up snaps many times and I would like to invest in one of these as well. Great tutorial. I am so glad I found your site. New favorite. 🙂
Hi Caity – I purchased mine at my local Tandy Leather store. They have a website too: http://www.tandyleatherfactory.com
Sometimes they go on sale. When I was researching different ways to set snaps – there was a cheaper option as well called the Pres-N-Snap: http://www.sailrite.com/Pres-N-Snap-Fastener-Tool
just make sure it will fit the size snaps you are using.
Hey, Mr. Lentz I didn´t understand what machine did you recommend to set the snaps on leather (To set your snaps in place, you can use a snap setting kit from Tandy Leather, it is an affordable way to set snap every so often, but it is also slightly hard to not screw it up every once in a while. And when you eventually screw up your 100th snap and have to figure out how to wrench it off your leather…you end up buying a handy little press like the one above. This little guy has interchangeable pieces for setting snaps, rivets, grommets, and punching holes. And it does it perfectly every time.) in the description you speak about a little machine don´t appears to me that it’s the red one of the pictures, correct?
Hi Pedro – Yes indeed, that’s the Tandy Hand Press. You can find similar versions on ebay for probably a bit less that what they sell. Make sure to buy the’dies’ for the specific application you are using it for. For example ligne 20 snaps, studs, etc…
Hello Mr Lentz, my name is Joey was wondering if teach this craft to people or can recommend we’re I can find someone to give basic lessons.
Hi Joey, I would try looking on your local craigslist for anyone who teaches the craft, other than that, most leatherworkers just learn as they go – making mistakes in the process. good luck!
Oh I know tandy. I get my supplies from there as well. Just found that press. I am in love. I would rather invest in that instead of buying the cheaper one and having to upgrade later on. Thank you so much. But if I am correct, I still have to buy the setter for the snaps, rivets and eyelets?
Caity – That was my same thought too – it pays to invest a little more and get the higher quality tool. It has definitely helped make things much easier in the workshop! As for the addons to the press – yes, unfortunately you have to buy these all separate.In hindsight – the most useful for me that I use all the time are the small double capped rivet setter and the line 20 snap setter.
I will have to invest in this one day. I just opened a shop on etsy (leather unleashed) and i am getting back into it. I took a class in college and slowly I am making new things. I learn as I go.
Nice write up!! Where is a good place to purchase suitable leather for belt making!! (like a whole sheet)
Thanks Scott – for the hobby leatherworker a good place to start is Tandy Leather. They have shops scattered across the U.S. What you want is a side of leather if you are going to make a ton of belts. Otherwise you can buy strips there (significantly marked up). Once you get into leatherworking a bit more you may want to look into some U.S. tanneries for higher quality and more consistent leather. Good luck!
Get tutorial! I’m excited to try it. Besides Tandy, where would you suggest looking for unique, quality buckles?
Thanks Greg! You know I have not ventured out too much into the realm of belts and buckles, so I may not be of much help there. I do know that I have searched this before and there are a handful of manufacturers in the U.S.
I’m floored by this tutorial! Thank you. I have a question: I’d like to use belts as bag handles, but I don’t want to risk sewing it in the seams. Is it safe to skive the finished belt ends to half its size and then stitch through it along with the fabric? Won’t the leather belt break?
Hi Laurie, I am not sure I understand the question entirely. Leather is pretty strong even when it is thin. However, stitching leather to fabric – you just need to keep in mind that it is a point of stress and may require double duty and extra passes.
Pingback: How to make a Leather Wallet | Mr. Lentz
Very well documented and detailed video. Thanks a lot and god bless you all.
Pingback: Taking a look back at 2013 | Mr. Lentz
This is a great tutorial indeed. one can’t appreciate the pics more
Thanks so much for this – great details! I do have a question though. I’d like to add grommets for the buckle holes. I don’t understand grommet sizing. What size grommets should I use for 9oz leather with 1/4″ or 5/8″ hole id?
Hi Maureen – You will definitely need the longer barreled ones. A good place to start is Springfield Leather Company. They sell a lot of intro type hardware and you should definitely call them up as they can help get you exactly the right size. They also have the ability to order Tandy Leather supplies if they don’t have their own brands in stock.
This is a great demonstration. Would you be able to estimate how long it should take to complete this project?
Julie – It really depends on the person and skill level, as well as the tools you have available. For the average person with beginning skills it could take a couple of hours.
I posted here yesterday about following your directions to make a belt for my grandson’s tenth birthday and ended up making two belts, since he wanted a black belt I also made him a brown belt that was less dyed and more leather. Anyway, even though his gifts of video games and gift cards were more in keeping with his age level, I received the best comment from his grandpa (my ex) who said that those darn belts should be considered heirlooms! Thanks again for the inspiration!
That’s wonderful! Send me a photo of them if you get the chance.
That is a great demonstration you showed over there of making a leather belt but i want one that shows how to make the buckle
i you have one.
Erick – If I knew how to work with metal I would certainly figure that out. But for now I am a woodworker / leather craftsman.
Hey! Awesome tutorial. I’m curious, what ‘kind’ of leather should one use for the belt? I know you said vegetable tanned. But I don’t see that as an option on the site. Any preference?
http://www.tandyleatherfactory.com/en-usd/home/department/leather/leather.aspx
Thank you sir!
Jake
Hi Jake – Any of the ‘Tooling Sides’ are also vegetable tanned leather. If you get a chance, head into their shop as it’s a great place for beginners to get some help.
Hi Mr. Lentz, thank you for this beautiful and very easy-to-understand tutorial! My fiance has been wanting to learn how to do leather craft for years, and I’m hoping to surprise him with the tools and materials for this project as a gift. I wanted to ask, do you think the oblong strap hole punch is necessary, or would it be possible to cut the hole for the belt buckle by hand? (Also, if you have any other suggestions for good beginner projects, I’d love to hear them!)
Thanks again, and beautiful work–the finished product is just stunning!
Do you need to put beeswax on after the dye and oil. Also where is the best place to buy a rivet machine, looks handy. Thank you. Rick
Thank you very much for the nice and easy tutorial. Now I have to try it. Wish me good luck haha!
You are welcome! Good luck!
Thanks for the tutorial. Which do you do first, dye then add the olive oil, or do the olive oil then dye. The steps in picture look like you dyed first then add oi,, however, the belt blank looked to be not yet dyed.
Thanks, Sully
Hi Jim – I usually dye first, then dry a bit, then add the oil. With leatherworking – it is a constantly evolving practice, so right now I would wait until the final step to oil it up. I don’t use straight olive oil anymore, but a mixture of olive oil, beeswax and another ingredient in my Spiff N’ Shine. This oils and waxes at the same time.
Absolutely excellent tutorial…. makes it all look very possible. Any chance of a YouTube version?
Thank you for taking the time to make such a detailed tutorial!
I’ve been making belts for a little while, and this is the first tutorial I’ve seen that actually talks about the lengths of leather / hole placement in terms of the person’s waist size. I’ve been trying to figure out a good rule of thumb, and came up with (waist + 12″) for my raw leather, which is close to yours, but I don’t have that much data to go on.
Drop me an email next time you’re heading to Portland if you’d like to come over and forge a buckle! (I got into making belts by way of blacksmithing belt buckles.)
Kindly let me know how can i start my won business in India!
Pingback: DIY: Leather Dual Camera Harness for $70 | Holdfast Moneymaker style - DIY Photography
Pingback: How to Make Your Own Moneymaker-style Leather Dual Camera Harness for Just $70
I really enjoyed the blog post, made me wanna take up apprenticeship in leathery…Nice work Mr. Lentz and very inspiring too
Thanks Oupa!
Pingback: 文艺风来袭!自制双肩相机背带_辅助器材-FotoGeeker
Pingback: 文艺风来袭!自制双肩相机背带 — 卡玛网
I love your work, I own a clothing company & i’m interested in going into leather goods. Your tutorial helped a whole bunch.
Look out for some of my work in the near future.
Club Diamonds JA is the name of our brand. Look us up.
Thank you!
City jail teacher now, lugged leather horse gear and rode in the Sierras then. Time to get back to my leather roots. Your belt tutorial is perfect. Look forward to future leather-working info.
Thanks.
Glad I could help Allison!
Pingback: DIY Clothes for Men DIY Projects & Creative Crafts – How To Make Everything Homemade - DIY Projects & Creative Crafts – How To Make Everything Homemade
I was just wondering how long the tip of the belt should be after going through the belt buckle. I recently got two new belts. They look similar to the length that you show but, on my dressier jeans they do not reach the first belt loop. Should the belt be long enough to go through the loop on the dressy jeans. How do I fix the problem so the tail that is approximately 2 to 2 and 1/2 inches is supported?
Thank you.
could you make a replacement belt for me?
If not, do you know who would?
Did you sand the belt to make the surface more smooth?
Hi Rock – no – this is a natural vegetable tanned hide. It is Full-Grain so there is no sanding.
Thanks,MR.LENTZ. I definably found the help in increasing my knowledge in leather work. I have read through and got the high knowledge, i write this with two main aims;
1.to give thanks for your good tutorial
2.to as for the guidance about leather work
FROM TANZANIA,EAST AFRICA,AFRICA
sorry sir,
spelling error ITS TO ASK FOR THE GUIDE, NOT TO AS FOR THE GUIDE
Hi,
I can not see the pictures.
Thanks
Thanks!!! For some reason, a lot of the pictures from this website are no longer appearing on my browser.
Can you see if they are showing up for you? Maybe something went wrong with the server?
I got a large piece of python skin and i’d like to try and make a belt.
Best
Danny
Hi – I just tested it in different browsers and an iPod and all is working well. Might just be a slow server, try again a bit later perhaps?
What size rivets are bein used in your leather belts as for embellishments? I’m trying to make my husband a belt that clashes with his wallet chain and having difficulty finding the perfect size rivet..thanks so much in advance..
Hi Nina, Rivet size is very dependent on the thickness of leather being used as well as how many layers. Your best bet is to buy a few sizes and just experiment. There are a whole range of rivets out there to try. On my belts I am actually using s snap so that the buckle is interchangeable. Good luck!
Pingback: Leather day and a tutorial – jumpringjenny
Great tutorial. Planning to make a belt for my daughter. This tutorial will give me a great start. Thanks!!!
Hello
Thanks for you lesson on belt making. I was a cobbler and worked with leather 20 years. I actually like theleatherguy.org, because you get to see your hide because they photograph evryone. It helps when your purchasing because you get to see any imperfections or blemishes.
I’ll be checking out future posts.
Thanks
Hi Jon,glad you like the post. the truth is – leather is best bought in person until you can fully trust your supplier. Just looking at a photo of a hide doesn’t really do it much justice. There are a lot of imperfections that can’t be seen until close inspection.
nice one.
Great Tutorial I work with Boy Scouts We do our own summer camp every year . I never knew a good method for measuring the length for the boys . Now I will have a starting point,The younger boys will need more holes on the end and the older boys more centered up. Thanks
@ Charlie – that’s great! I do have a few fun projects on here. The best way to measure a belt is literally just to measure one you already use. You can even trace it on your leather so that things end up fitting right.
Thank you very much for your detailed instructions… really appreciated
Hello Mr Lentz. I just recently started (after seeing this tutorial) my first leather project, which is a leather belt! Anything else besides those oils u can use? what is a wide space of choices? That would be nice. I was needing something to DO instead of do school and read all day…. I ain’t a gamer kid. i had to use other tools for lack of a few others, therefore mine doesn’t look half as good. it’s decent. i ain’t done yet. Thank u soooo much for ur whole website! So inspiring!
Glad I could help SW. Actually I definitely urge you to experiment with different oils to see the effect on the leather,how soft it makes it, color changes, and if it lasts. I have known people to use varying things from coconut oil, all the way to used car oil (though I don’t recommend it as it smells!) – That was from an old leatherworker down in Argentina. The only thing to keep in mind is the acidity of the oil and the potential for it to break the fibers down over time, versus rejuvenate them. Some oils can go rancid as well. Hope your belt project goes well!
Mr. Lentz, great tutorial and great teacher you are! I enjoyed every bit of the teaching. But two questions Mr Lentz, are there no machinery to produce in commercial quantity? And what quality of leather gives durable belt?
Hi Gbazi – thanks! Yes there are companies that produce belts in mass quantities with machinery. I cut each one out by hand though so it takes a bit longer to make. Only the best quality of leather give the most durable belt – try Vegetable Tanned or even Latigo. Higher grades are more consistent and the leather tends to have less markings/scratches/ etc..
Mr Lentz,
Thanks for the well explained tutorial. I’m making my first belt this weekend but have had issues with dye transferring to my clothes. How do you keep that from happening?
Hi JP, well I got tired of that same problem early on. That’s why I chose to make my own dyes from scratch. I can’t give out the details on that part however I can say that a black can be achieved simply by marinating steel wool in white vinegar for a week or two.
Hi there! Johan from South Africa here. Thanks for a great tutorial. I want to start leatherworking and am really excited about it. Regards. Johan
I saw a man punching holes in leather. He used beeswax to help the tool go through better. Is there anything better than beeswax for this?
Thanks,
GGene
Hi Gene – that’s what I would use if you are having difficulty. It works to reduce the friction against the metal.
VERY well executed and helpful instructional, Mr. Lentz. I’m finding a lot more 3/4″ bag punches available than the 1″ punches. Is that gonna make a huge difference? Thanks.
Thanks Benjamin, the only difference is the 3//4 inch punch may restrict how far the buckle’s tongue will move. You can always punch once, move the punch overlapping the last and punch out the extra distance.
Would it be possible to use Bick 4 leather conditioner instead of olive oil? It’s one a nice job of keeping my shoes the same light tan and I’m worried about darkening of the leather. Thanks for the help and great tutorial.
Tim – I’m not sure what that conditioner is. Oils will typically darken leather a bit, so if you are unsure, test it out on a small portion first.
I would like to create my own leather finish using beeswax and some type of natural oil similar to what you have done with beeswax and walnut oil. Is there a ratio of wax to oil we should be looking to use for a leather finish? Thank you, your tutorial has been helpful in determining what resources I need to make belts that will stand the test of time.
Hi Tim – well honestly, the best advice I can give here is to start experimenting on your own with different ratios. The reality is that there are a number of variations you can use depending on the leather and what item you are making. Each batch could be very specific to what you are making.
Good stuff. Thanks
Hey Mr.Lentz,
I am starting to make some belts. Elsewhere I have seen that one should measure the belt for length from the fold not at the start of the buckle. Also I read you add 3 inches to measured waist. I am just wondering why you do it this way.
Thank you for sharing your craft
Hi Noah – where you measure an old belt depends on the maker’s eventual size equation. You could do it either way, but will need to adjust your own internal equation to fit that properly. For the waist measurement +3 inches, basically that has to do with clothing increasing an inch or two on the circumference of a person’s waist. How much – varies from person to person, so measuring an old belt is best. Cheers!
Excellent tutorials
Hey Mr. Lentz!
Thanks for the greta tutorial. Any chance you could update the tutorial to include links to the tools? There are so many out there I’m not sure what to trust! (sorry in case I missed any links in your responses)
Thanks again!
Hi Louis – Actually I should probably update the tutorial to reflect more current techniques I use with belts. That might not happen for a bit though. You can find intro quality tools at Tandy Leather. I highly recommend starting with intro tools simply because you may inevitably mess them up in some way. For example – it’s better to mess up sharpening a cheaper knife than a really expensive one that may be harder to fix. Higher end tools can be found on sites other than the big online marketplaces – Weaver is a good source for some higher quality tools.
Great tutorial such detail thanks – a real basic ? Where do you purchase your leather and determine it
quality
Thanks – if you are looking for entry level leather you can find that on some ebay leather shops or Tandy Leather store.
hi there!
thats a beautiful belt, i really wanna try this but where do you buy the leather?
Thanks in advance!
Hi Shira – for small projects for the hobby leatherworker I recommend Tandy Leather or ebay. You can usually get just the amount you need for the project this way. Good luck!
Thank you for another insightful and educational tutorial! I love the practical tips and hacks that set it apart from theoretical textbook lessons. But one thing I’ve always wondered – how do you ensure your belt holes are in a straight line? Without painstakingly measuring from the edge for each one. One would logically consider drawing a line down the centreline of the belt, but that would leave the pen/pencil mark to clean up later…
Hi Dennis – One simple method is to measure the first and last hole and make a dot for each. Then align your ruler to both and just make dots every inch in between. You can also make a template out of cardboard to use over and over, or you can buy a self-centering tool from a leather tool supplier. Thanks!
Thank you Mr. Lentz, that’s a great idea actually!