
Everything, Leather, Tutorials
How to Make a Western Leather Holster
Jun

Consider this a practical and quick how-to guide on how to make a western style leather holster. I have trimmed down all the steps to only those necessary to make this a simple and fast weekend project. I’ve written several other tutorials over the years, so if you like this one – you can see the others over here. This is a fairly simple project and you will learn basic template skills, leather cutting, leather finishing, and stitching.
There are many ways to make a western holster, certainly ones that are quite a bit more precise as what I’m about to show you. However I realized after going through a bunch of those long and detailed posts, it kinda took the fun out of making the holster and made it a bit stressful. So – what I’ve done here is kind of took the key points and made them into an easy to follow guide to setting up your template.
If you would like to see the current holsters I make in the shop, and possibly buy one for yourself – check out all holster options here.
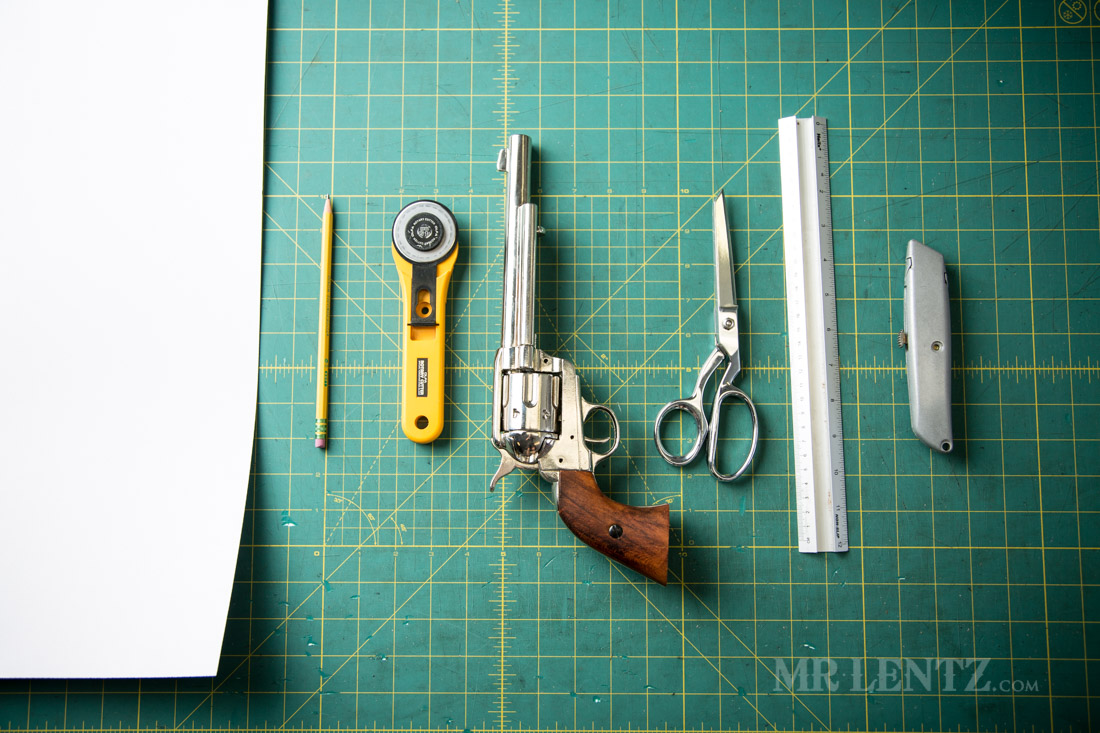
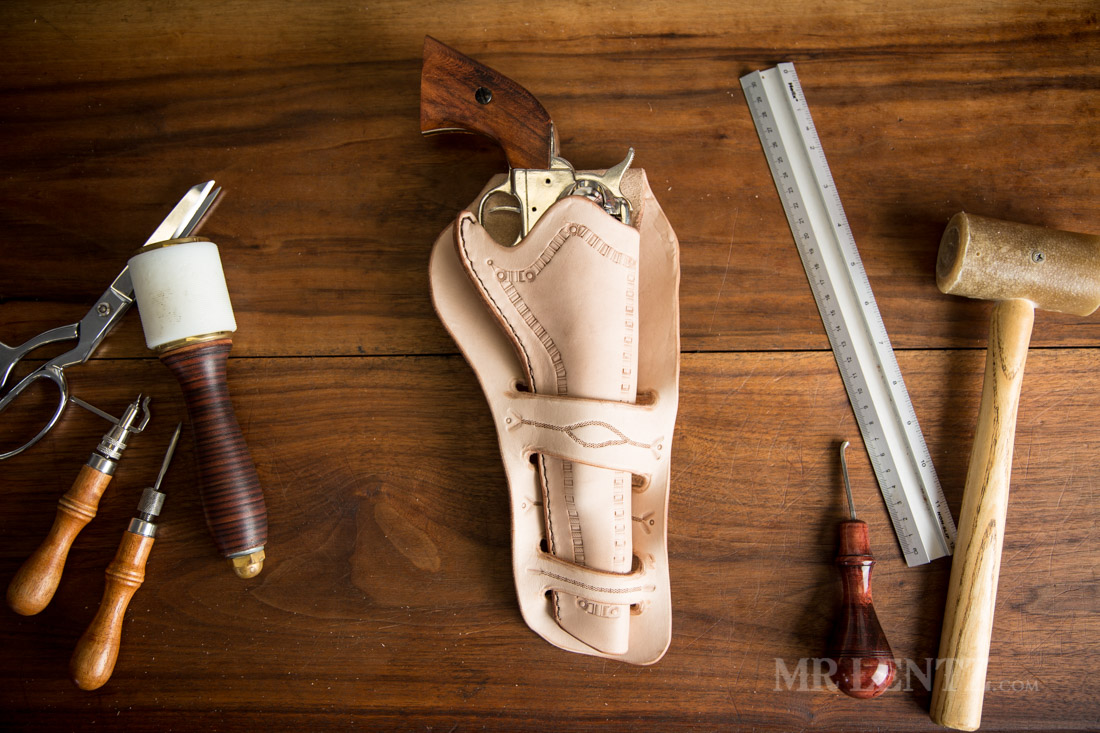
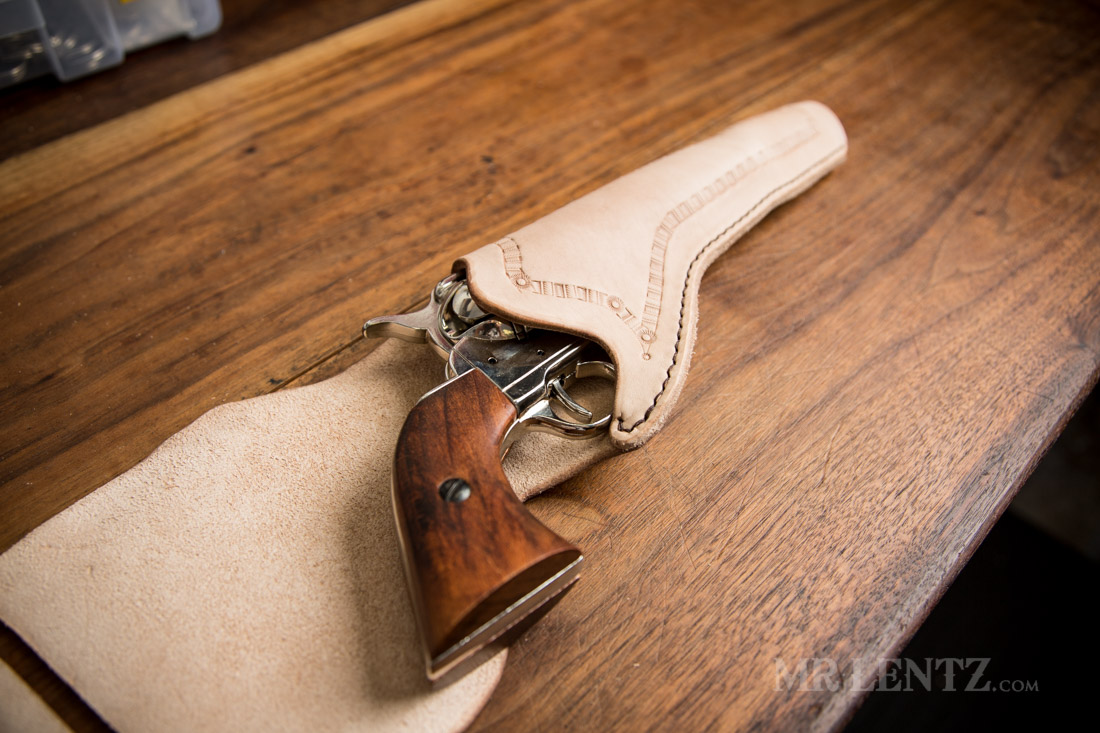
First let’s start with the necessary tools for the job. Now assuming you are putting a gun in this holster…you might want to get your gun first. Mine’s a replica 1873 Cavalry Single Action Revolver, it’s a non-firing type, which makes this projects a bit, um safer perhaps?
Basic tools needed from left to right:
- Poster board for the template
- Pencil
- Rolling blade with a larger diameter
- Gun
- Sharp Scissors or leather shears
- Metal ruler
- Razor blade
In the image above, I decided later on that you don’t actually need all of these items, so I will note that below:
- Leather glue (not needed)
- Clips (not needed)
- Stitch line creaser
- Stitch wheel (not needed if you have the next tool)
- 4 Pronged diamond punch awl
- Mallet
- Waxed thread
- Two leather needles – these have a blunt tip
- Stitching pony – to hold your piece while stitching
That’s about all that is needed if you want to do a crude job of getting this holster made, but if you want a more refined look, checkout the next set of tools:
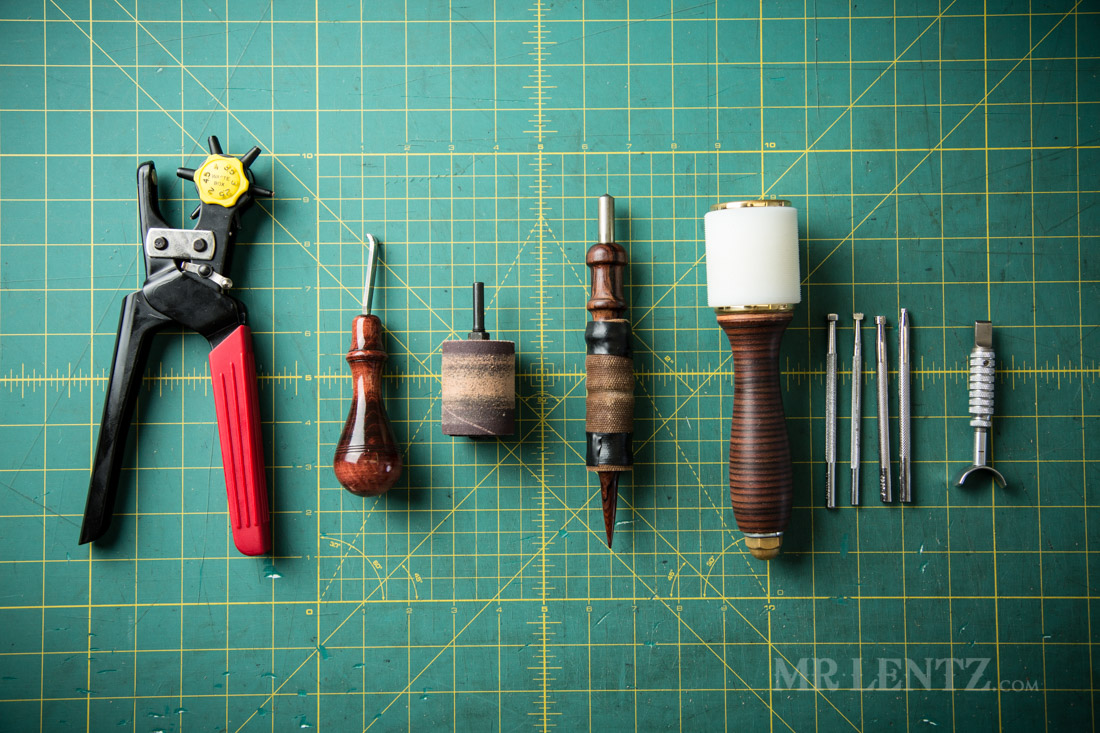
- Hole puncher, or hole punch set – helps cut out tight corners with thick leather
- Edge beveler size 2 – rounds the edge of the piece to look more finished
- Drum sander – helps even out uneven cutting
- Cocobolo wood burnisher with a bit of waxed canvas taped on – make burnishing and polishing your edges a breeze
- Weighted mallet – used to hit the stamping tools
- A few random leather stamping design tools – just for looks really
- Swivel knife – carves designs or reference lines into the leather before stamping it
As well you will need some leather. I recommend Full-Grain Vegetable-Tanned leather at about 9 – 10oz. thickness. Leather dye is also optional if you want to darken the leather – though this will also happen naturally over time with sun exposure and exposure to oils and use. Also, get a cup or so of olive oil, or a good leather conditioner. I sell some that I make in the shop, but I only make it in small quantities. As well – a few paper towels and a sponge.
Like this post so far?
I spend most of my free time creating tutorials like this to help those like yourself get into leatherwork and woodworking, or get better at it. If you'd like to support my efforts, consider checking out my handmade leather goods shop and purchasing a gift for yourself or a loved one. It's readers like you that help keep a small U.S. business like mine going strong, so -thank you!
PART 1: The Template
First grab your posterboard paper. Actually…first – empty your gun out and make sure there are no bullets in it or the chamber, etc… My gun happens to be a non-firing replica, so I’m fairly safe there, unless I drop it on my toe. It’s fairly heavy!
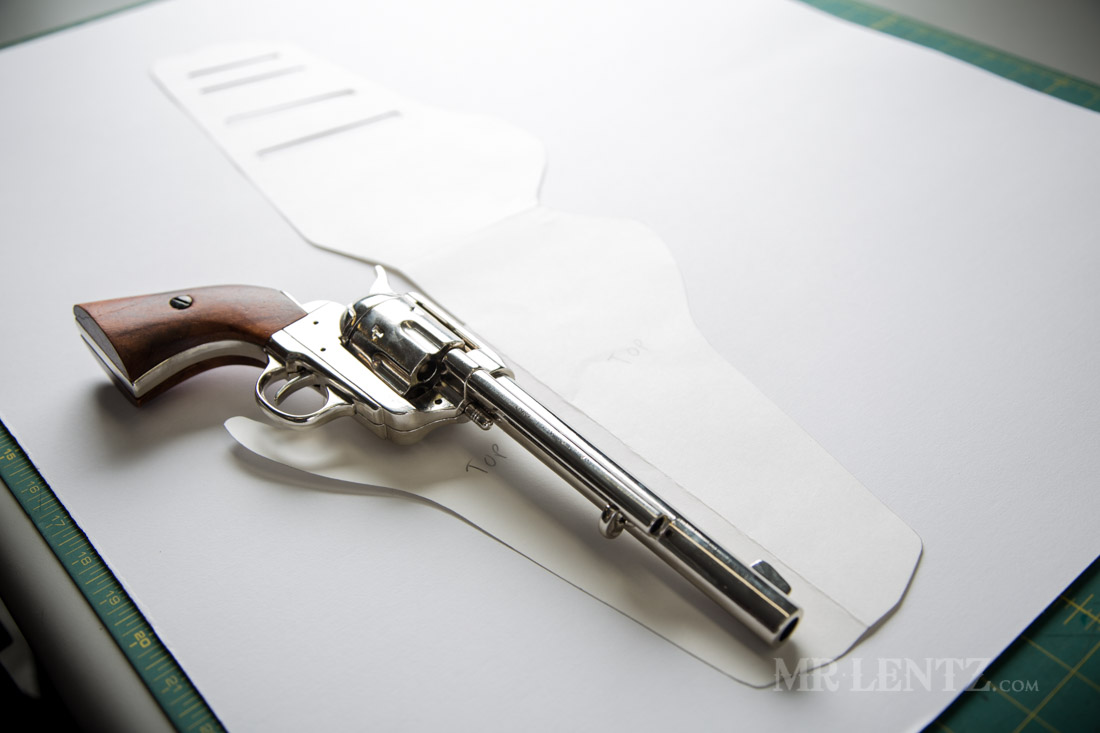
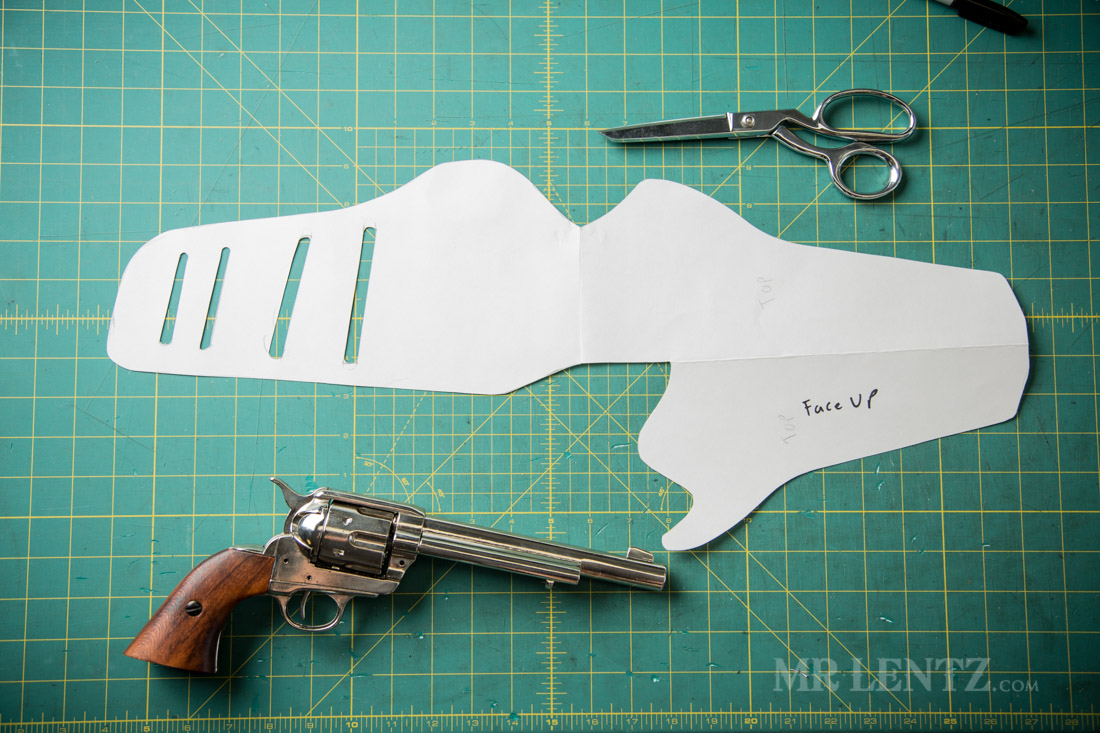
Place the unloaded gun in the lower right quarter of the paper (this tutorial is set up for a right handed holster just FYI). As you can see in the photo I show the end pattern we are going to create, so you have an idea of where we are headed.
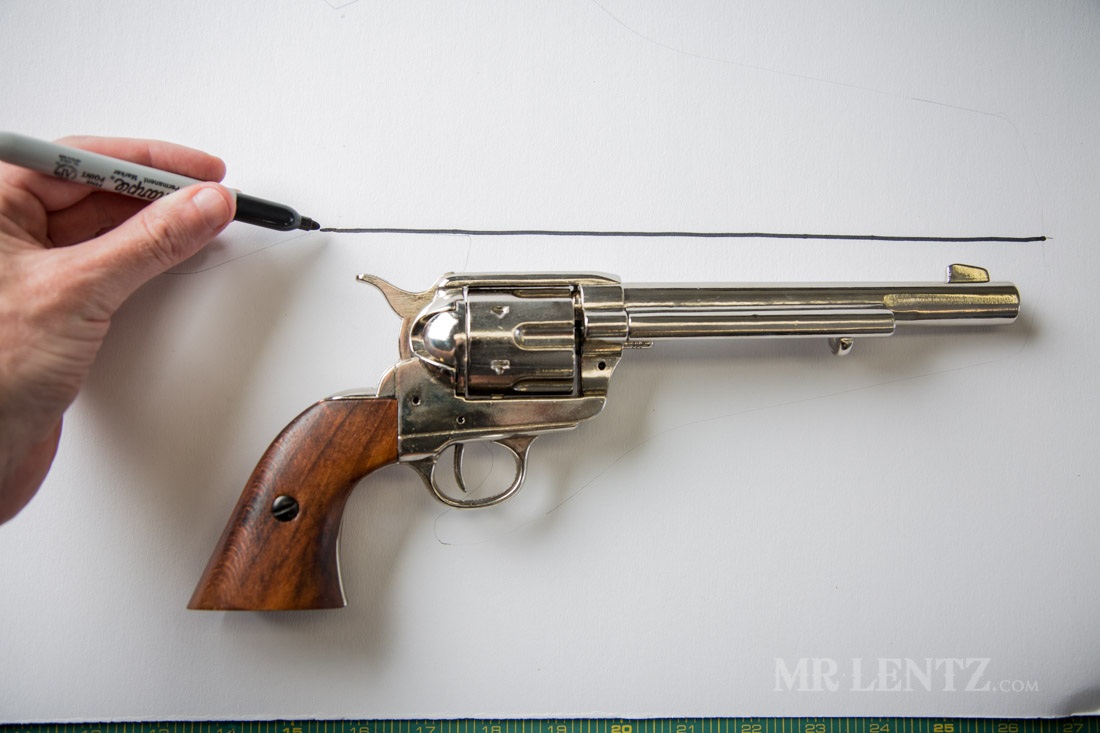
Make a line parallel to the barrel of the gun about 3/4″ above the barrel, go past the tip of the barrel about 3/4″ and end it right about where the curve of the handle starts to go down. This line will become the fold line in a few minutes – that way we can duplicate the shape like a butterfly wing so it matches up when the stitching takes place.
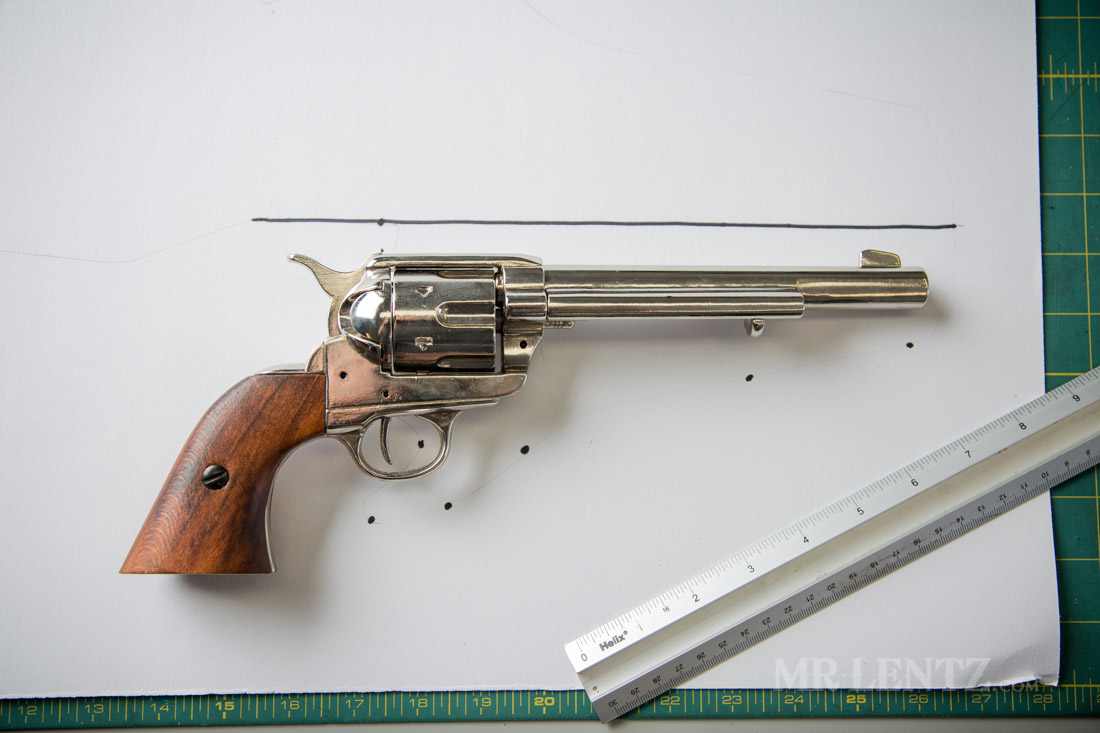
Now make marks 1/2″ below any significant protrusions on the gun. From right to left I started with the barrel tip, the bullet ejector, the start of the body of the gun (i’m sure there’s an actual name for that, chime in if you know it!), beginning of the trigger guard, the end of the trigger guard. I also put a dot just in the middle of the trigger area slightly forward, and a random dot at the top of the gun where the cylinder ends just for reference.
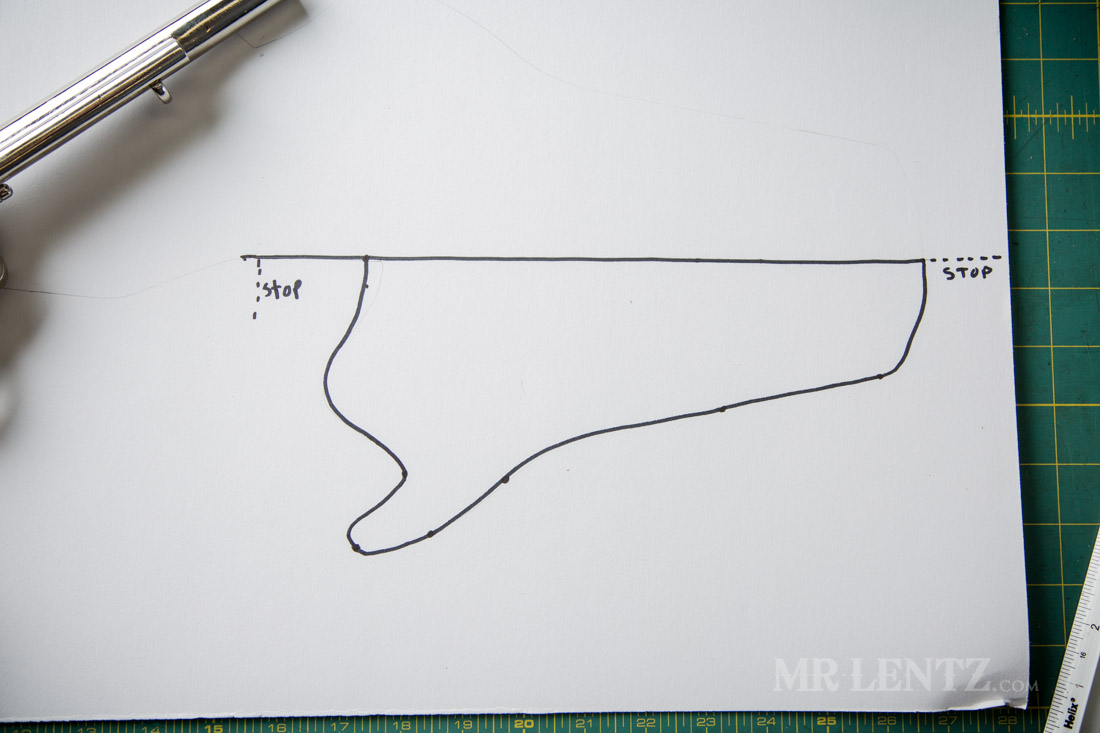
Here’s where you get a bit of artistic freedom. The dots I just made are a reference for where the edge of the holster should be for a decent fit – different types of guns may differ of course, so if yours is slimmer than a revolver, you may want to tighten it a bit. Anyhow – go ahead and trace a shape along those lines connecting the dots.
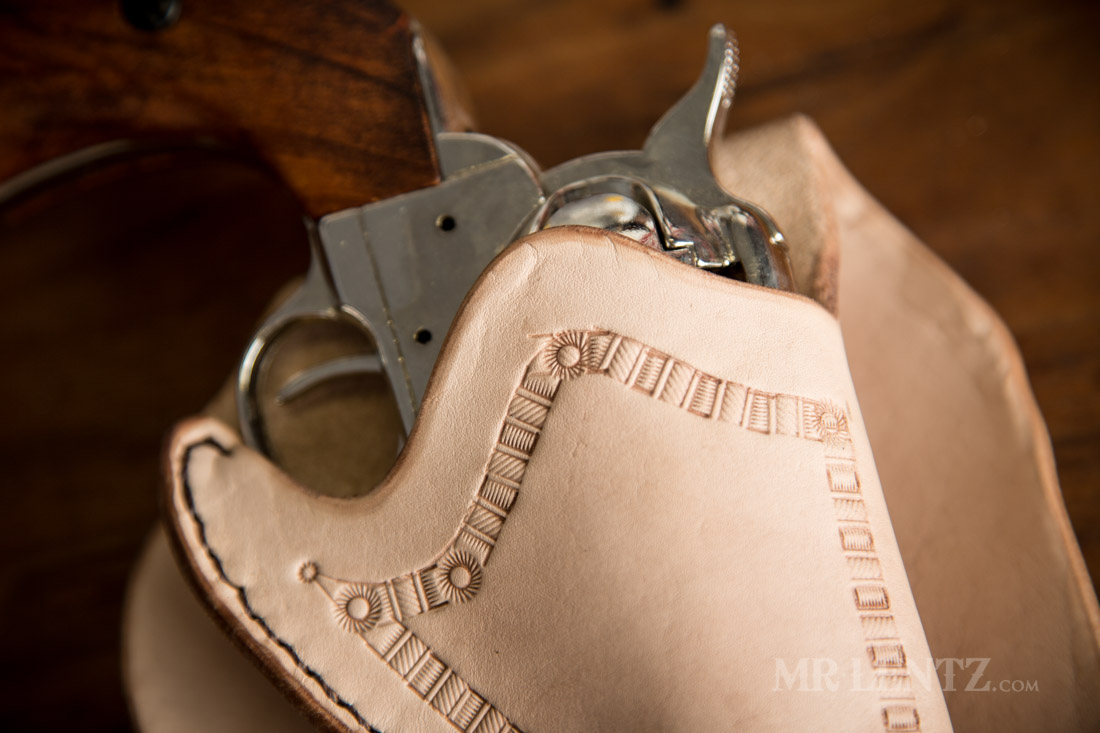
Now the top part of the holster can be eyeballed – I put in a curve to cover the rest of the cylinder area, but backing off a bit by the time it reaches the hammer. The idea being that you don’t want anything touching the hammer in case it has a triggering effect when sliding the pistol back into the holster.
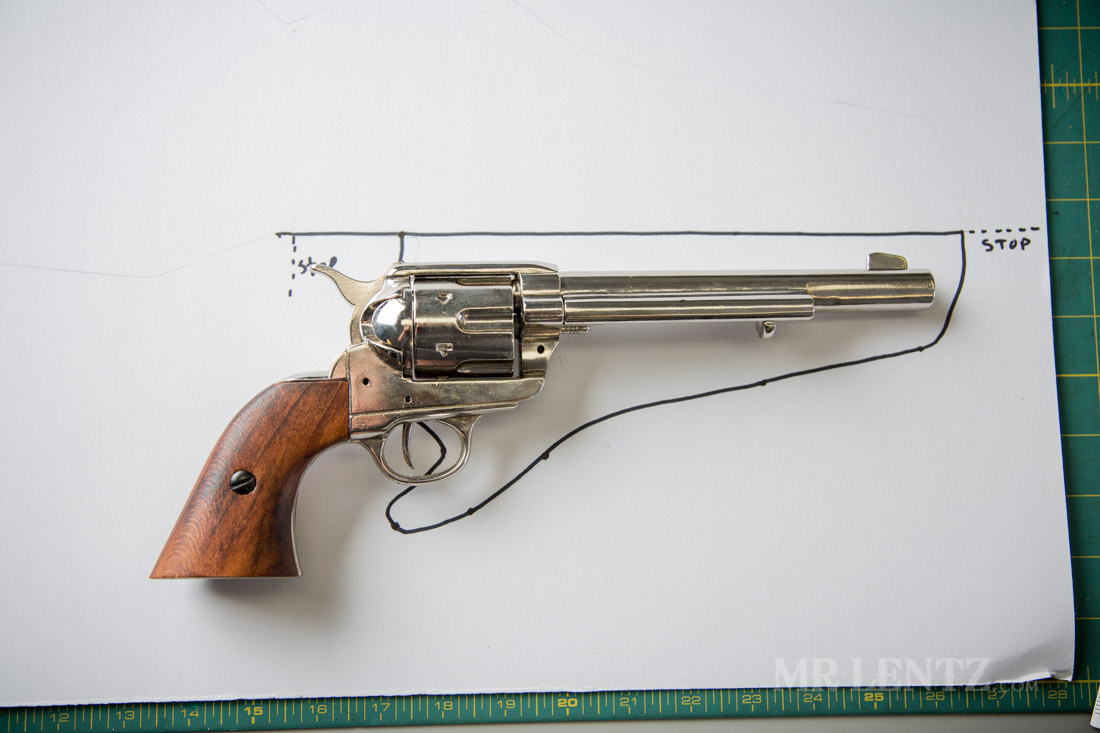
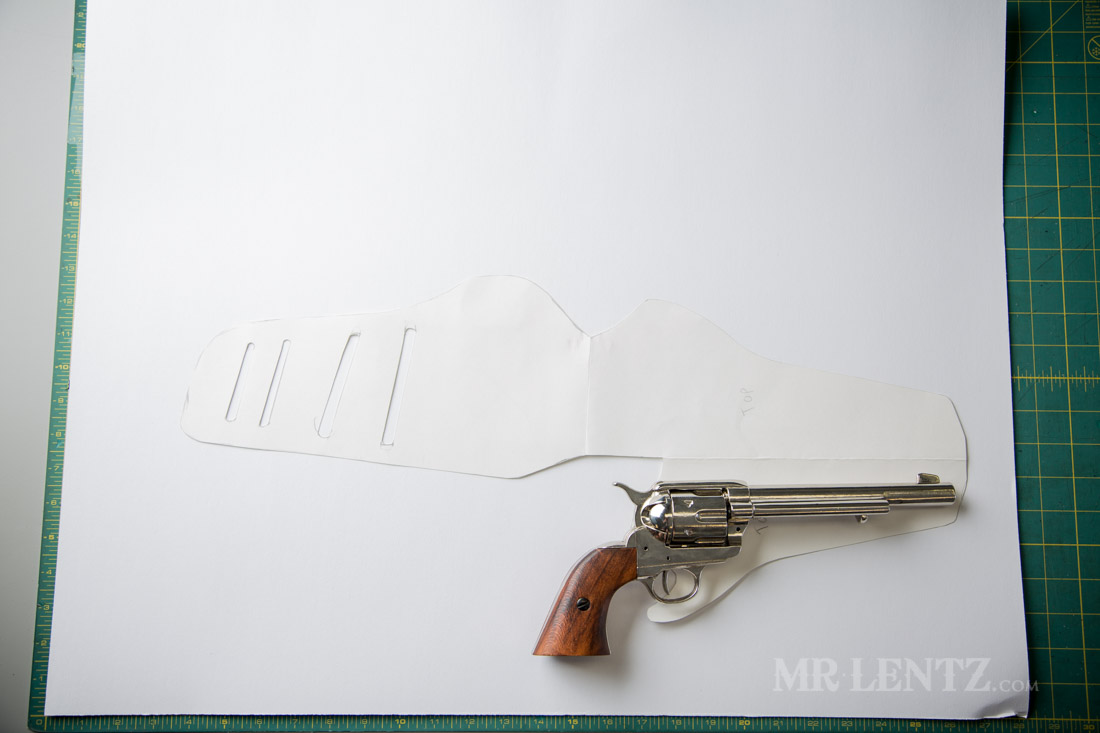
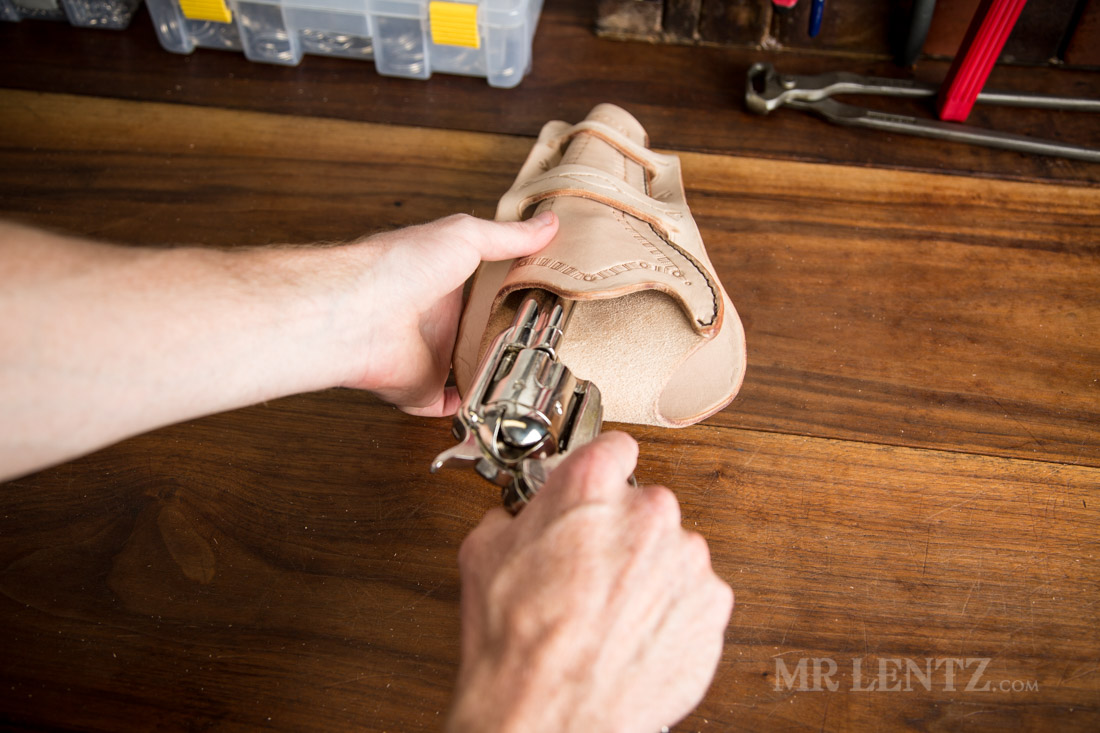
Put the gun back on top of the template and see how it’s looking.
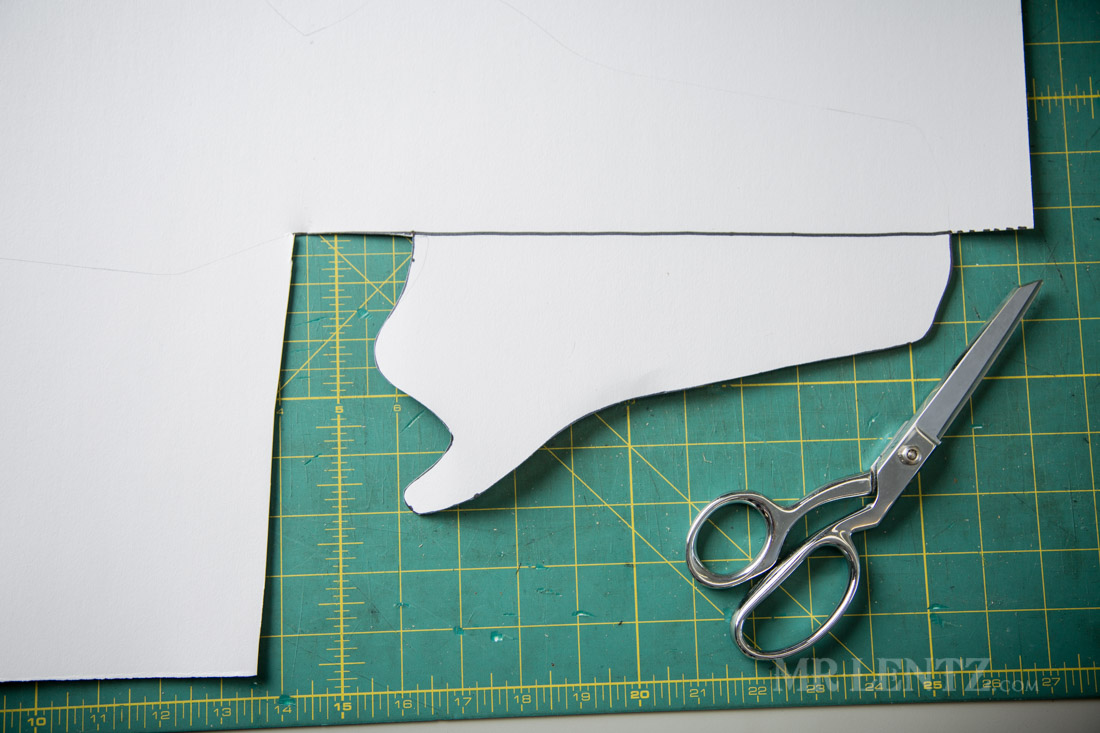
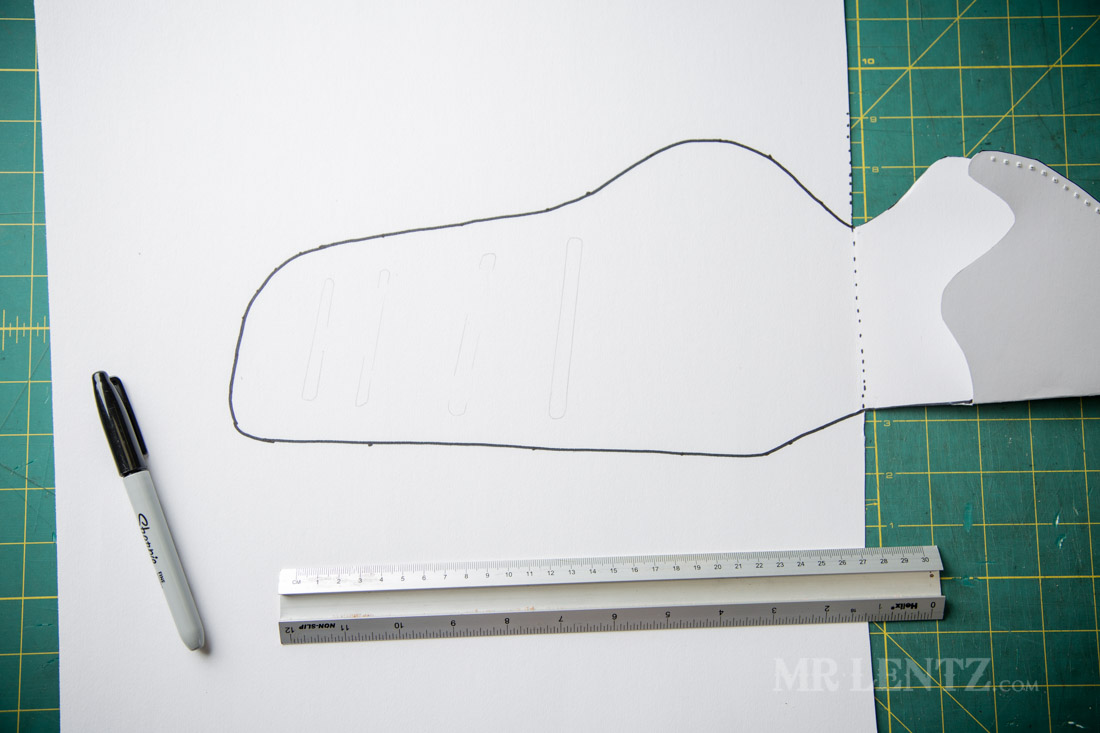
Next I only partially cut out what I just drew, then I am going to fold it along that line we made earlier.
Continuing on you might notice a few extra marks, holes and what not in my photos – I realized I had included some steps that weren’t actually necessary, so just disregard anything I don’t actually point out!
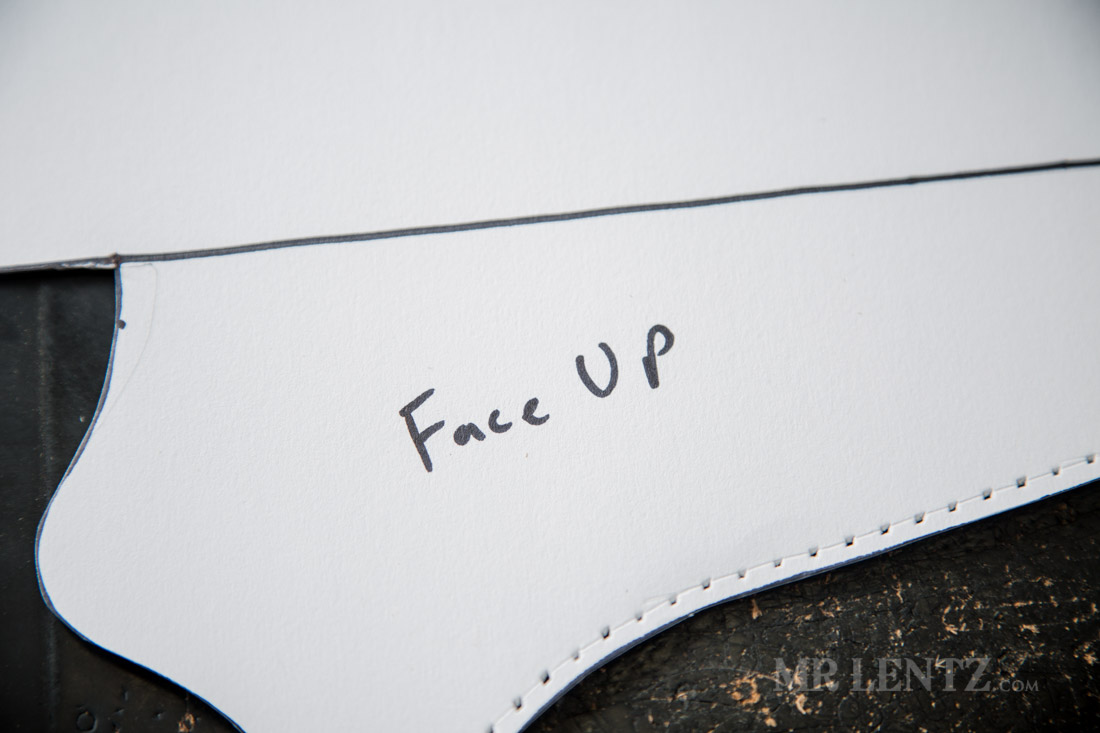
Ok – now’s where I save you from making a giant mistake later on down the line. Go ahead and write ‘Face Up’ on the outline. This means it’s the top of the template and should always face up when tracing onto the leather. There was a 50/50 chance of me getting that right the first time I made the holster, but as luck would have it I unfortunately traced everything upside down, resulting in a left handed holster. Of course now that I am sitting here thinking about it, that wouldn’t really have been such a big mistake since I intend to eventually make a double holstered belt.
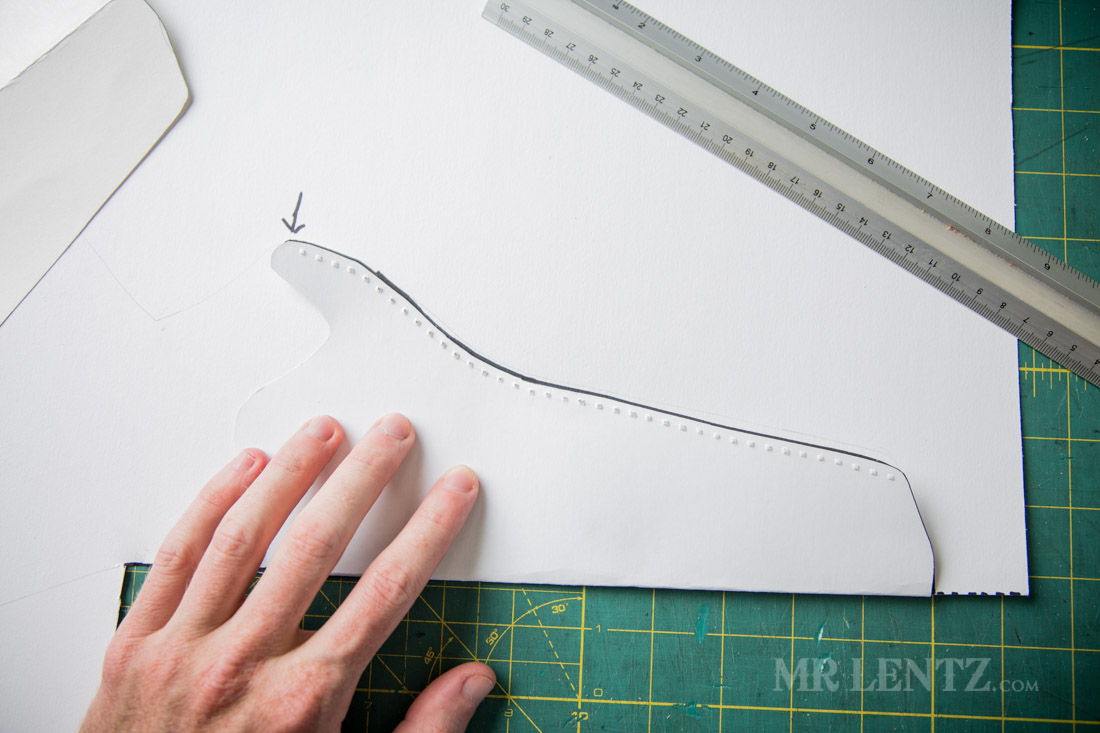
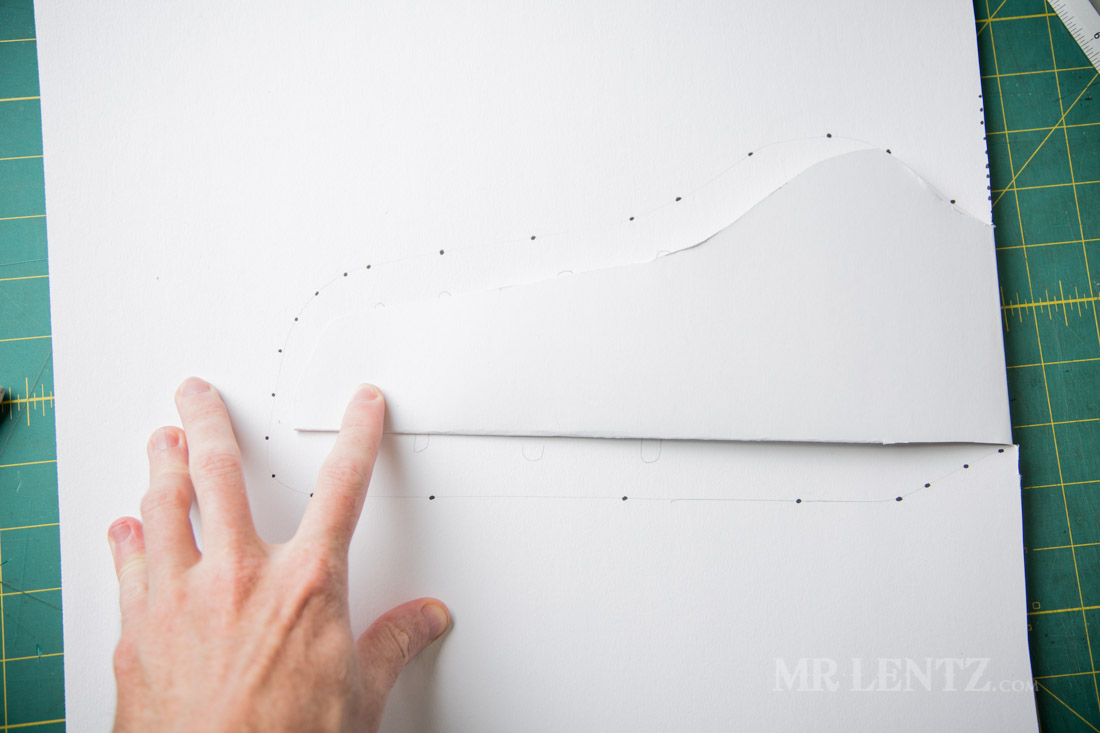
If you happen to have whats called a Bone Folder, you can use it to crease along that straight line we drew, otherwise – at this point I went ahead and folded the pattern up and over along that line, then traced the outline around the bottom of the holster up to the top just where it makes a sharp turn (noted by the arrow), you can stop there.
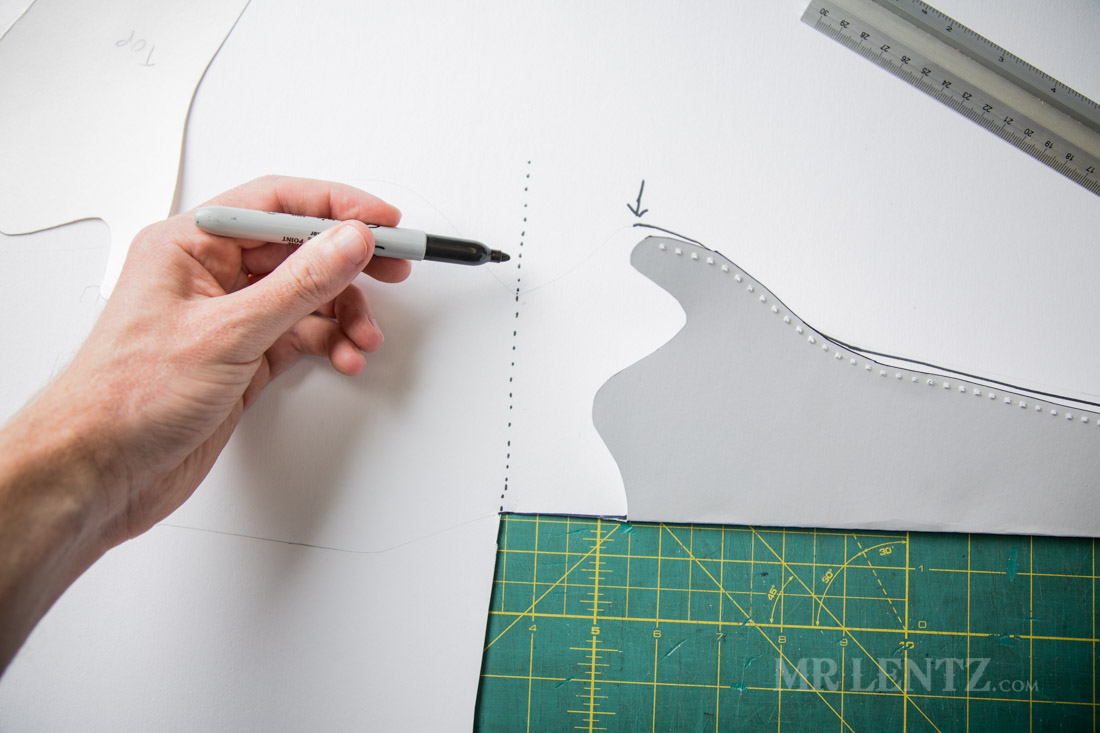
Take a look at the straight line you drew at the very beginning. I drew a dotted line so you can see how I am imagining an extension off of it. This line represents where the holster will bend again to make the back skirt that secures it around the belt. The angle of this line will affect how the gun will draw out of the holster.
How you connect to that line is up to you. I made a gentle inward curve.

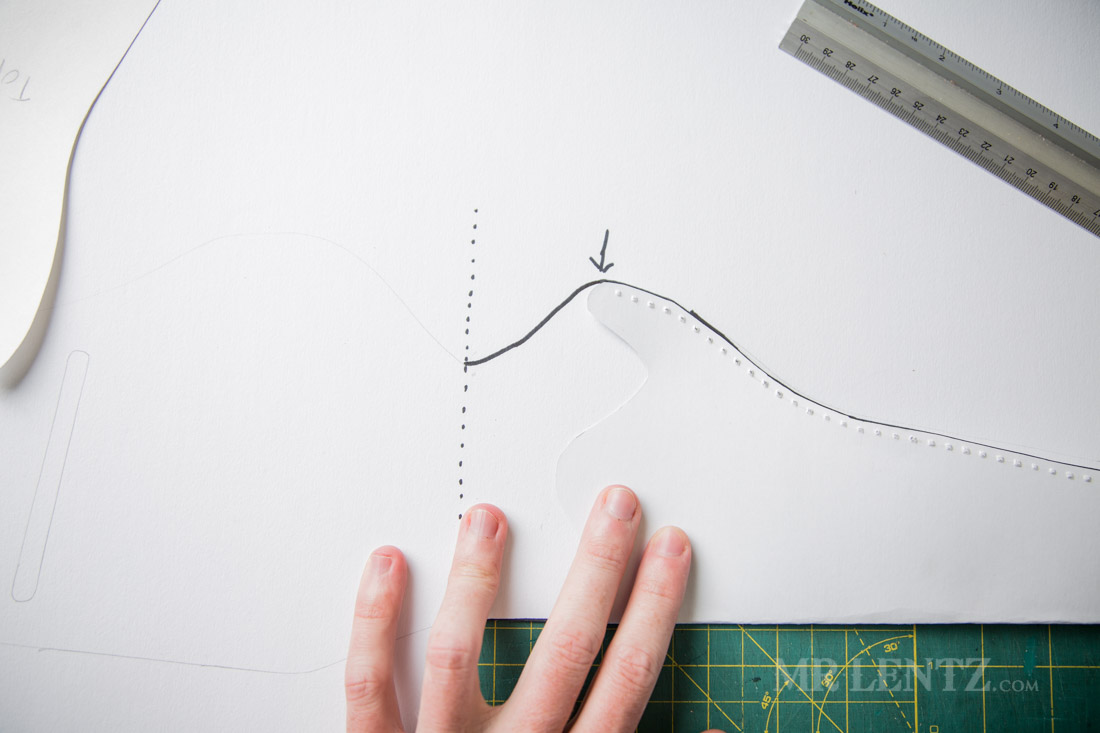
Go ahead and cut along the line you just traced, up to that dotted imaginary line.
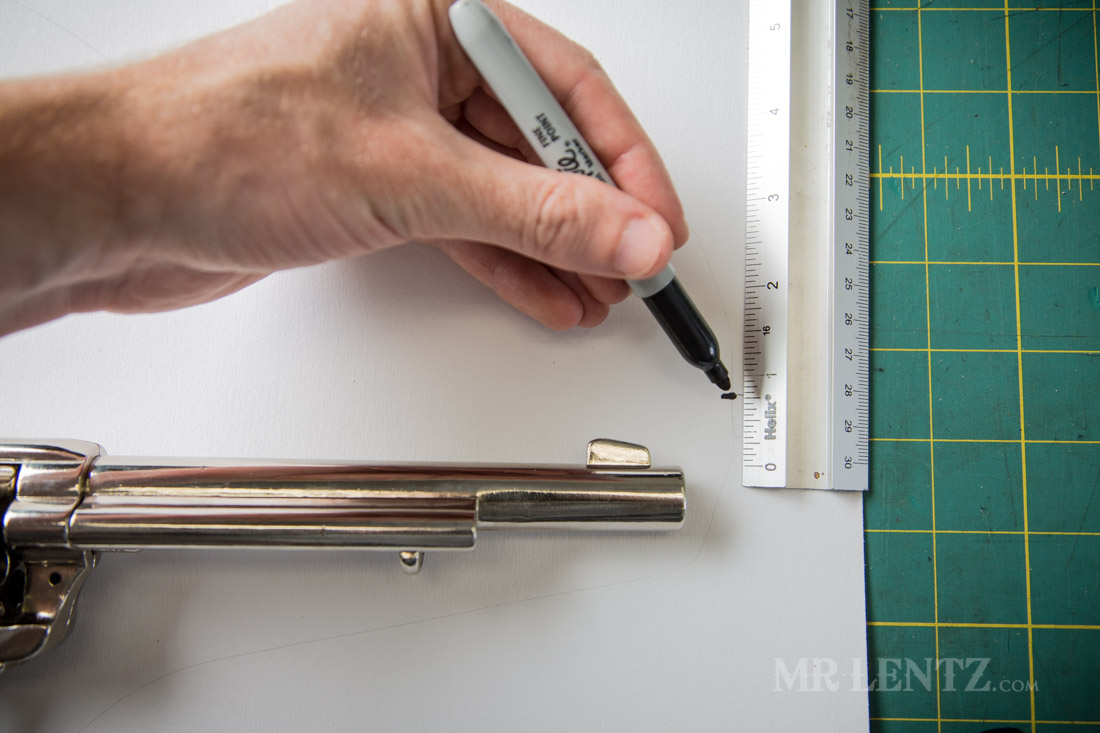
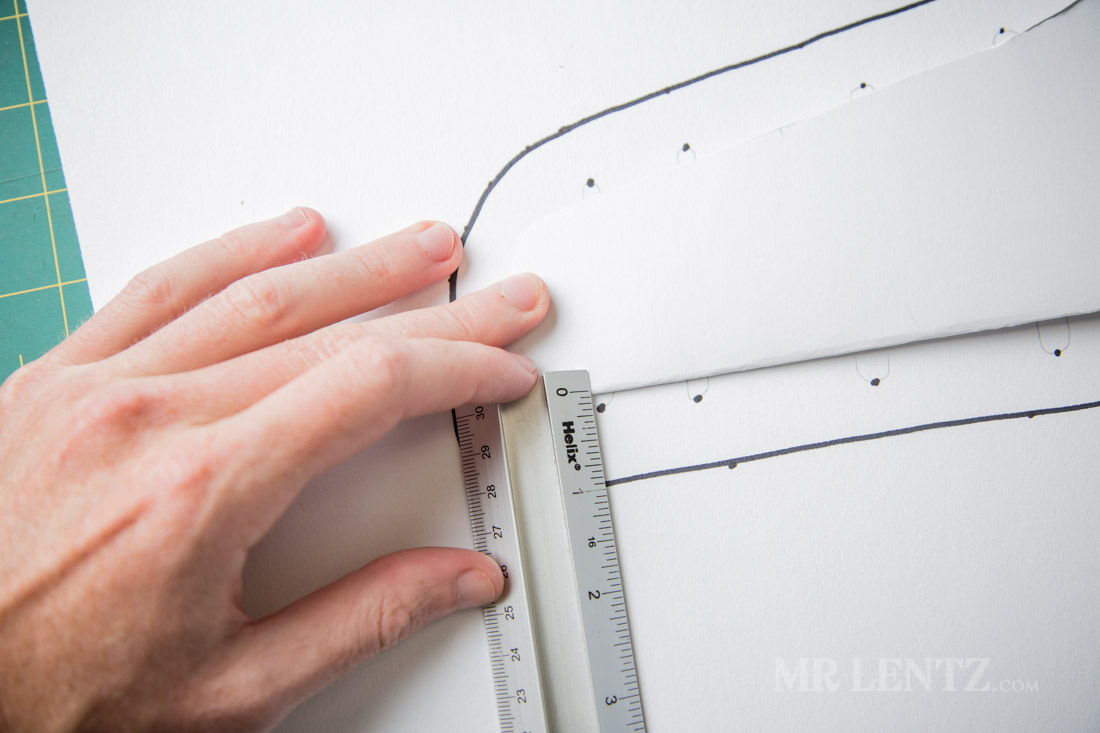
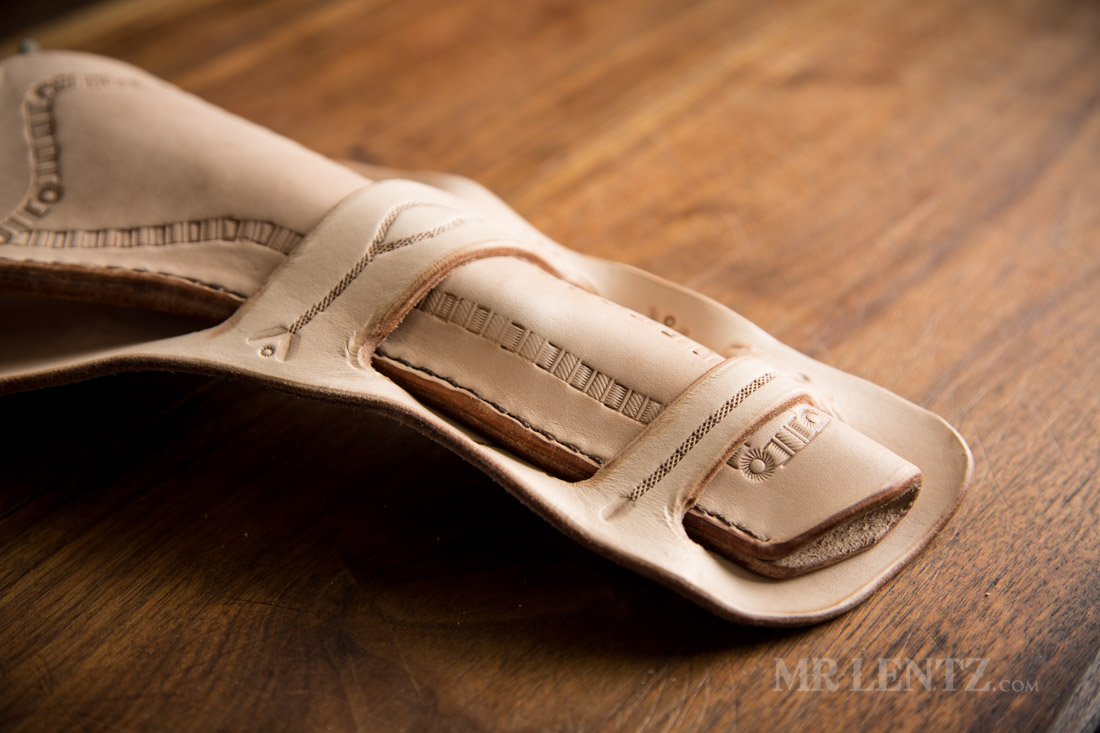
Then fold that piece up and over onto the left side of the sheet. Here I made dots around 7/8″ from the sides of the holster. Near the top (top right in photo) I faded closer in to the holster. At the bottom (bottom right in photo) I tightened it up to around 1/2″.
Then I traced the dots and made the outline of the skirt.
Next – time to mark the holes for the skirt – this is where the holster will slide into and become secured. This part can be kind of up to you but as a reference I made the first hole line 1 1/2″ from the bottom of the skirt, and about 1/4″ off of the side of the holster when overlapping as seen in the photo. The second hole would be placed 2 1/2″ up from the bottom of the skirt and 1/4 inch off of the side of the holster. The third hole is positioned 4 1/4″ from the bottom of the skirt and about 3/8″ from the side of the holster. The last hole is 6 1/4″ from the bottom of the skirt and 3/8″ from the side of the holster. Phewwww. That was rough.
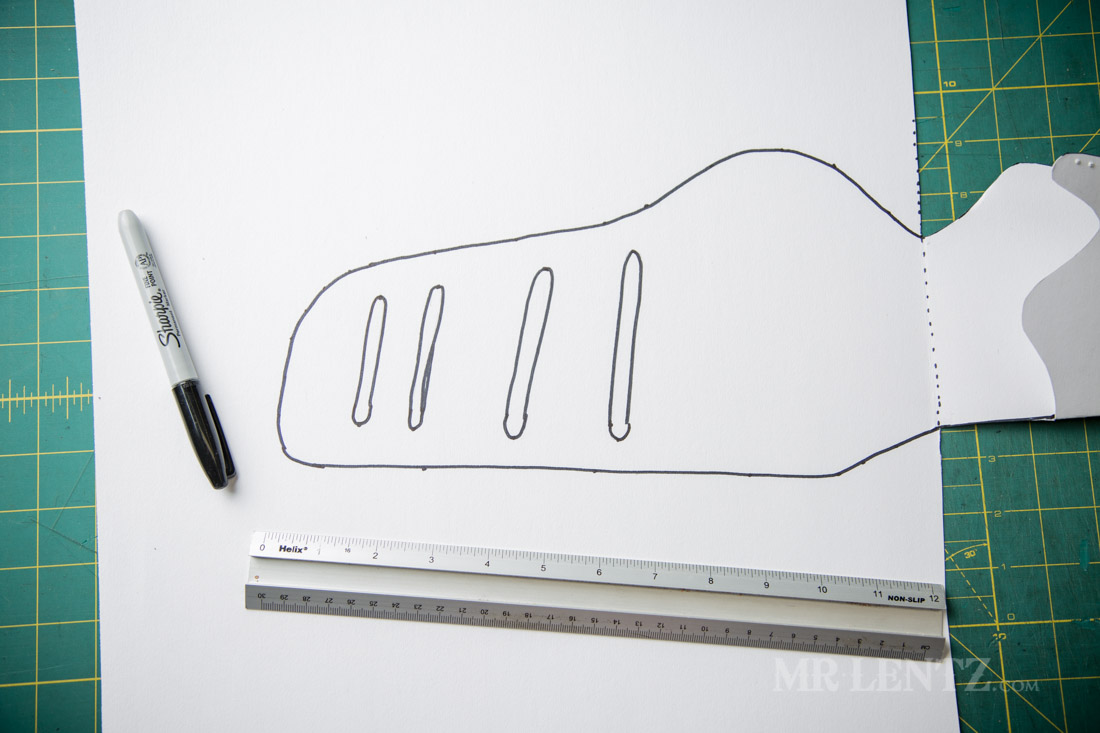
I then repeated that process on the other side of the skirt for the other end of those holes. However, I placed the dots slightly higher – to give the holes a bit of an angle – for looks of course! The holes can then be freehanded in place. Make the bottom two holes around 5/16″ wide and the top two around 3/8″ wide. Again, precision is not entirely necessary here.
Now do what you can to cut that entire piece out as well as the holes. The holes are easier to cut if you hole punch the ends, then use a razor and ruler to cut the straight lines between those holes.
PART 2: Cut the Leather
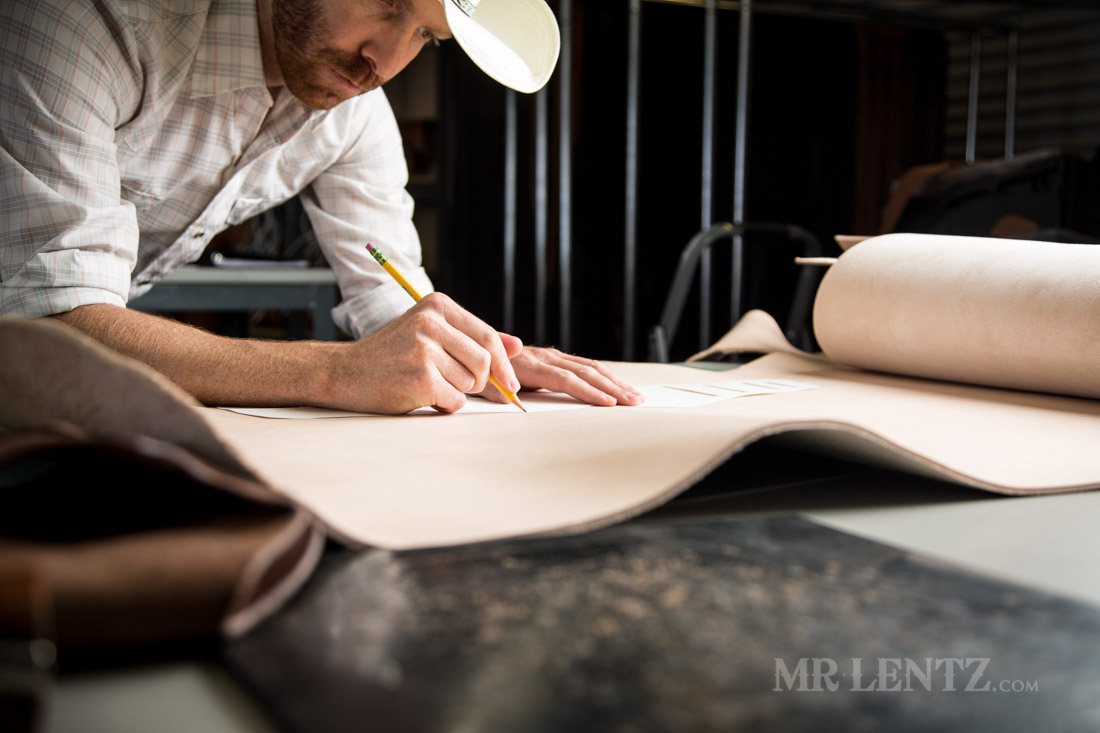
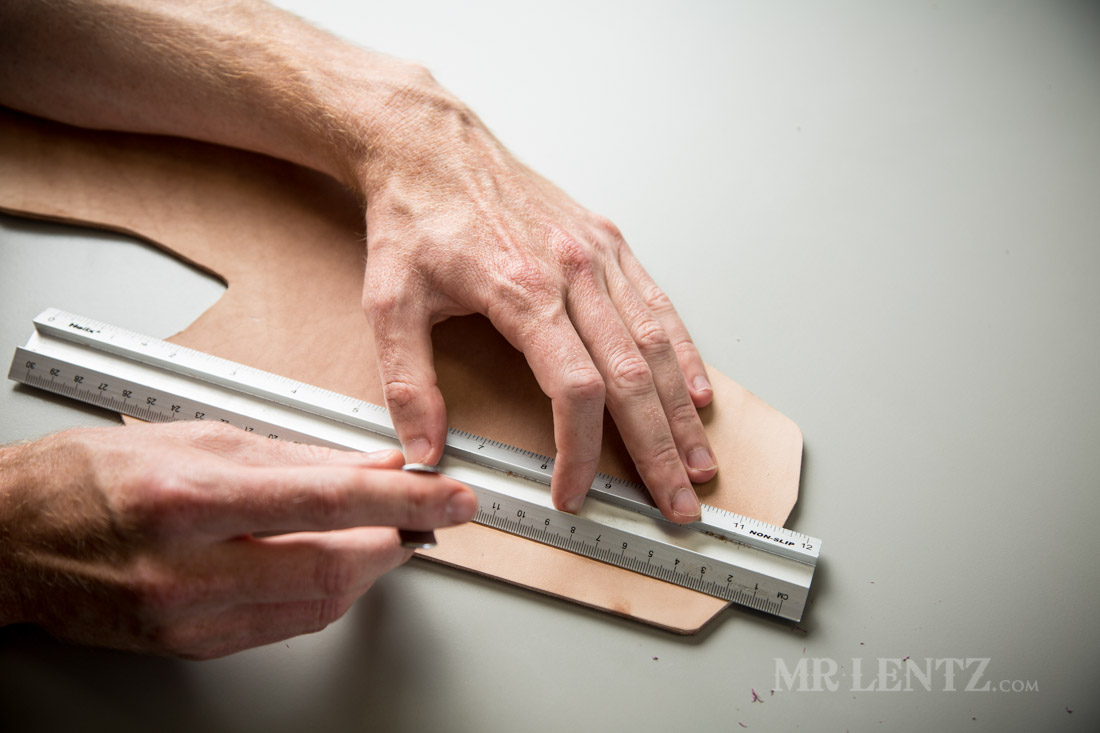
Ok – now that the boring part is over let’s get to the better stuff – leatherwork! Well in reality it’s all part of the process, if you take your time with templates, you will live an easier life my friend. Now that my pattern is made, it’s time to trace it onto the leather. For this I am using a fairly thick full-grain vegetable-tanned hide. It’s around 9 oz. thick, but you could go even thicker if you have 10 oz. or 11 oz. on hand.
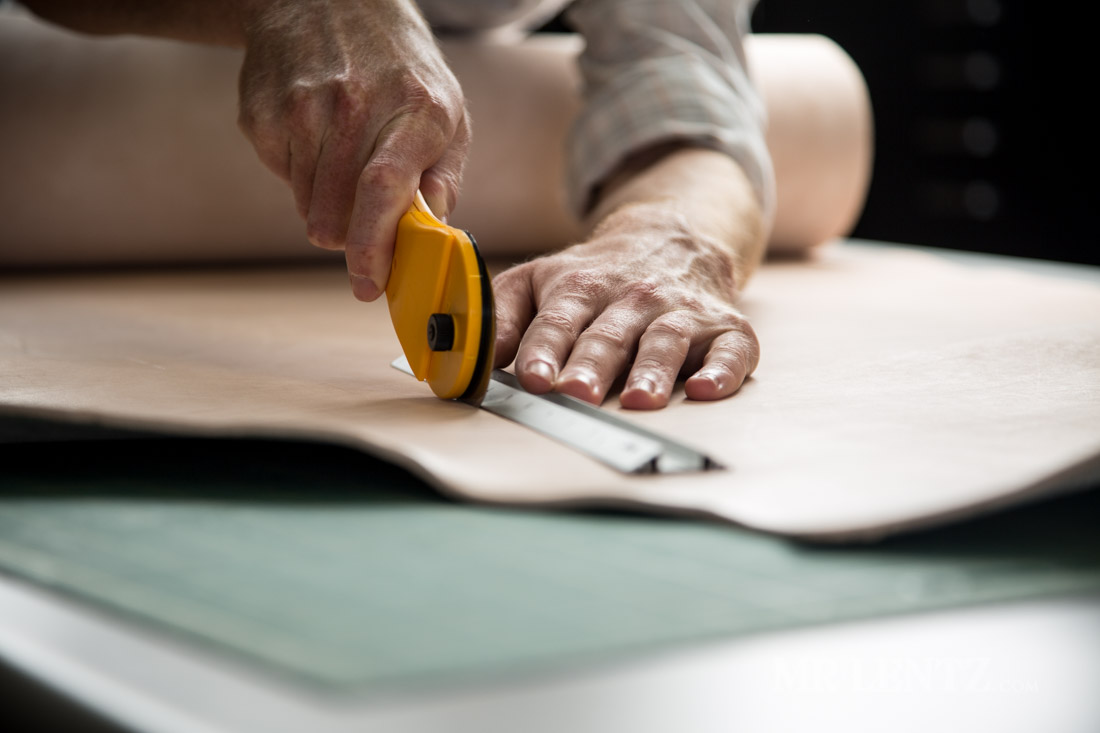
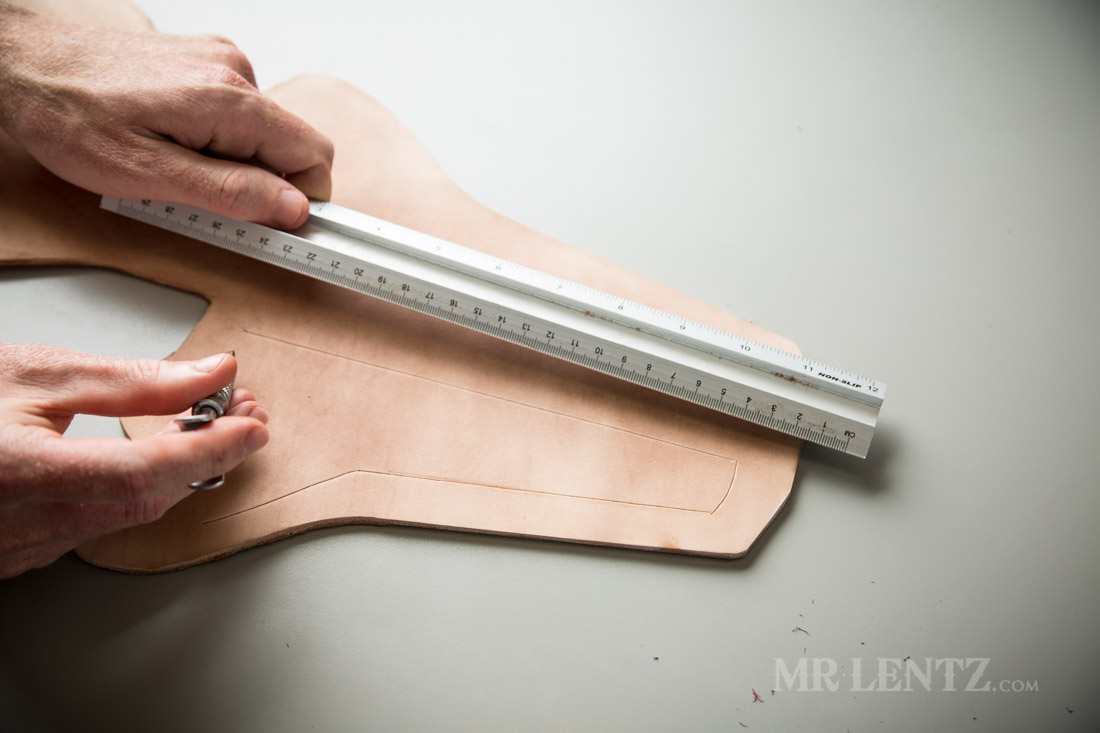
After it’s traced I begin cutting out the shape with a variety of tools. Usually I start with the rolling blade and a ruler for all the easy straight cuts. Careful not to over cut with the razor, as a nick in the leather here may turn into a tear a few years later.

Then I use a set of hole punches to punch out tight corners.

Then I alternate between a sharp pair of scissors and a rusty razor blade. I don’t intend for the blade to be rusty, but for some reason it always is. When cutting with the razor on this thick of leather it’s best to do each cut in two passes. One will kind of set the line you need and the other goes the rest of the way through. Keep those fingers out of the way, razors will occasionally jump like a bronco straight off the plains.
It’s good to get as close as you can to the traced line, but not the end of the world if it ain’t exact. If possible err on the side of not cutting enough off – as you can go in and sand things down in a later step.
At this point I am ready to dye the leather, oil it and stamp some designs in.
PART 3: Dye and Oil
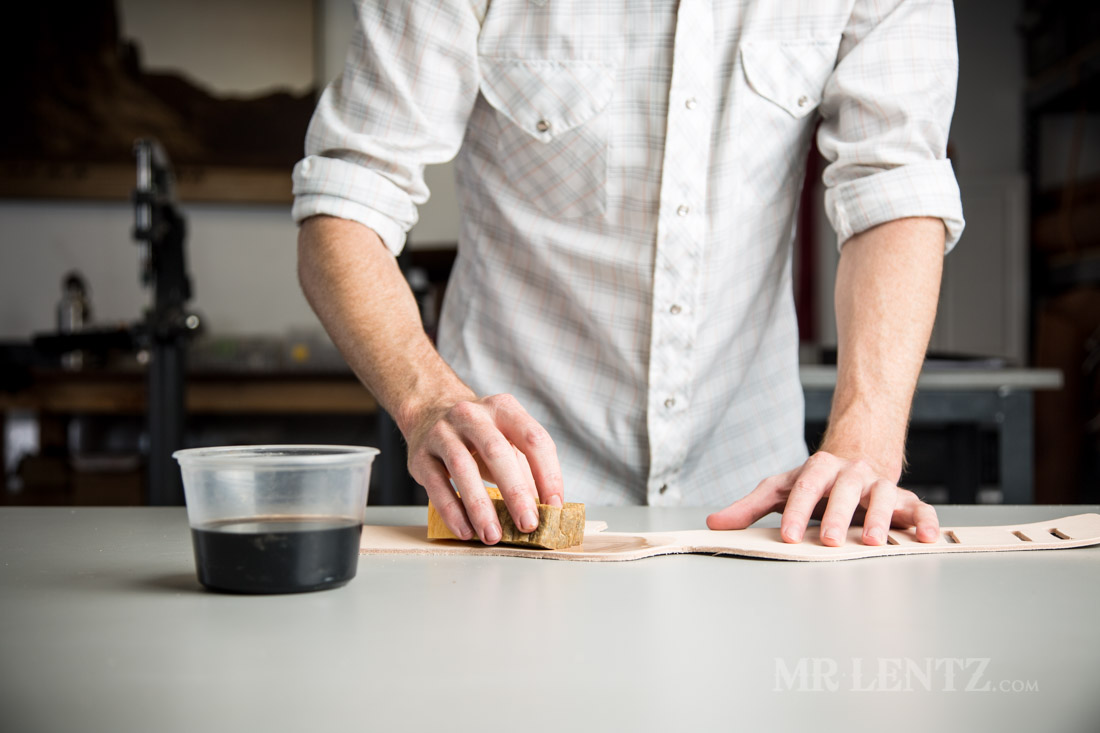
Here i’m using my natural in-house made dye mixture. This leather I chose for the holster, didn’t quite take it as well as my normal shop products, but that’s ok. It’ll darken with age, plus I can add a bit more oil to it later on.
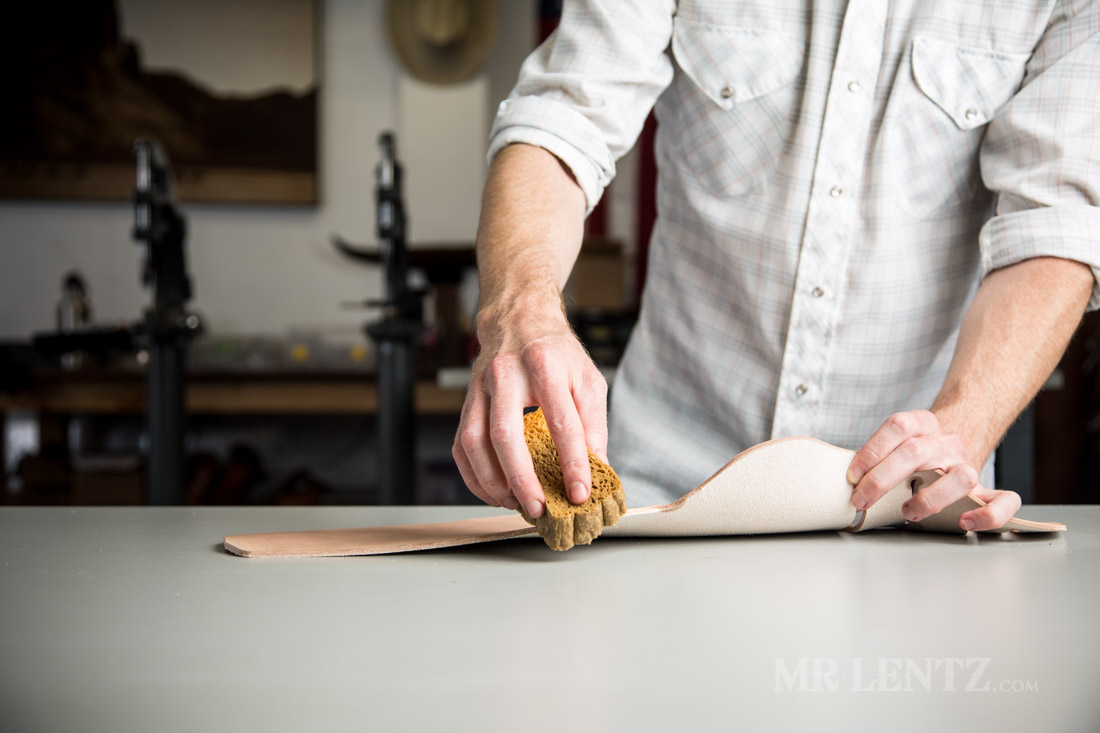
 After putting a layer of dye on the top side only, I flip the leather over and apply a medium-thin layer of oil to it. There are many types of oil you can use with vegetable tanned leather, though some do think that certain oils can go rancid, or possible degrade the leather over time. I urge you to experiment with this step and see what works for you. The idea of oiling leather is simply to replenish the oils that wash out of the leather when you dye it and work it. Oils help to lubricate the fibers and keep leather from cracking and breaking down. It’s also important to note that oiling should be done in a few thin layers vs one thick one. It can be easy to over-oil, and your piece will look soggy and gross. It’s a hard thing to fix too.
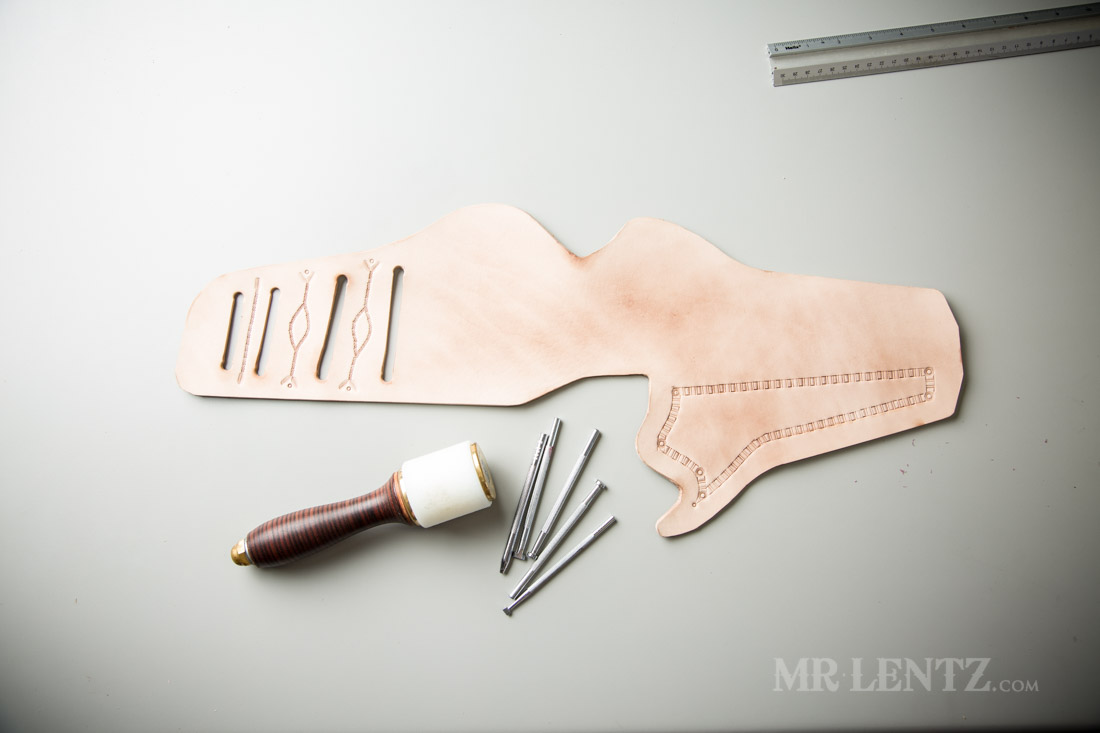
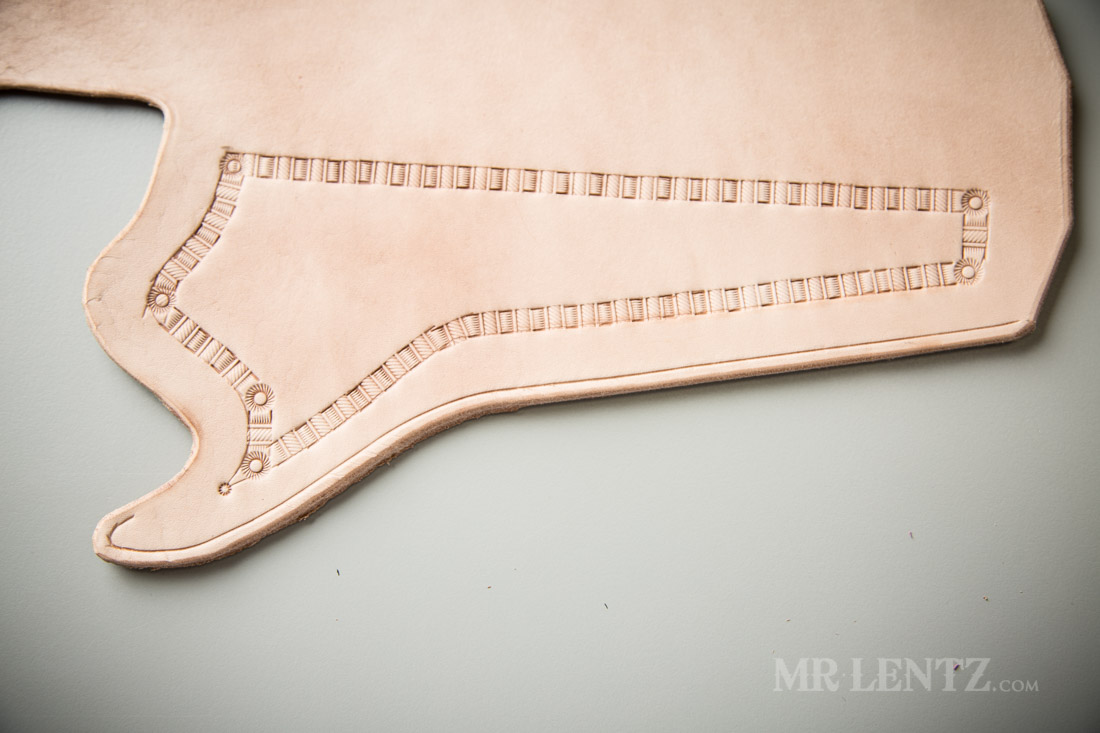
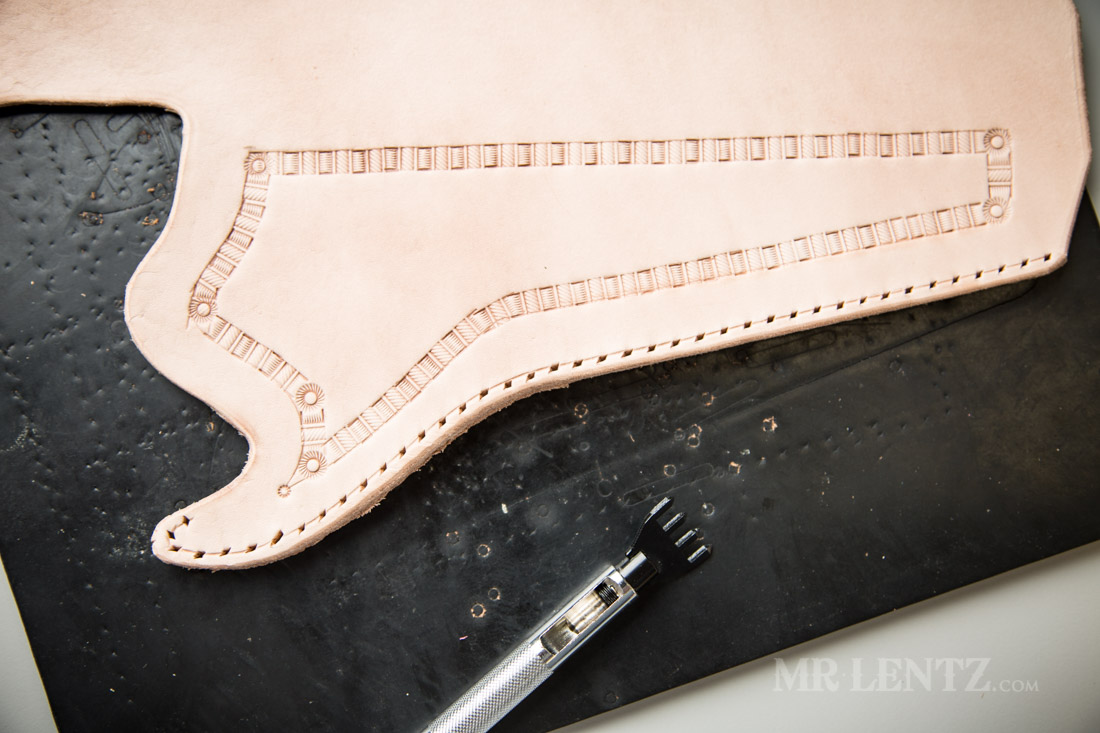
PART 4: Stamping, Beveling, Stitch Marking
To give the holster a bit more character I used the swivel knife and ruler to lay out reference lines I would the use to stamp designs along.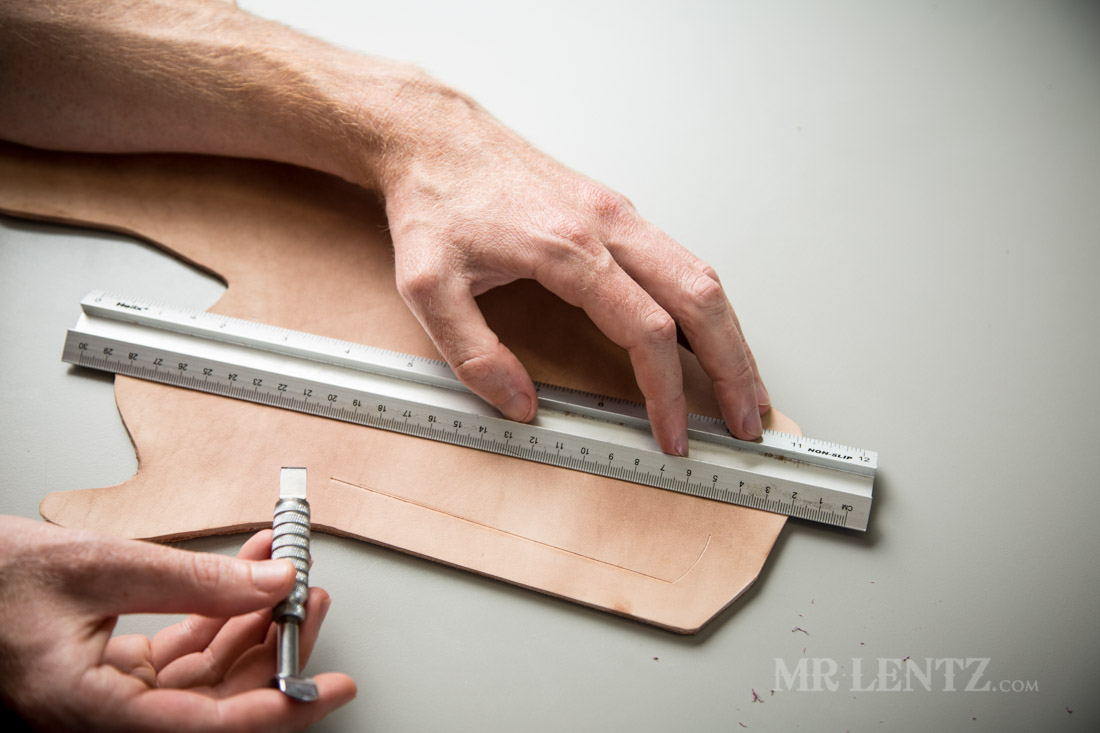

I put a few on the skirt as well – though keep in mind which part will show and which will be hidden behind the holster. Apparently I forgot.

Using the weighted mallet and some random stamps (one of which is the basket weave, but no matter!), I tried to keep things simple.
 Above you can see the entirety of my stamping efforts, though minimal – they will go a long way to giving the leather holster a bit more character. I will admit that my stamping skills are still in their infancy since I tend not to adorn my pieces too much.
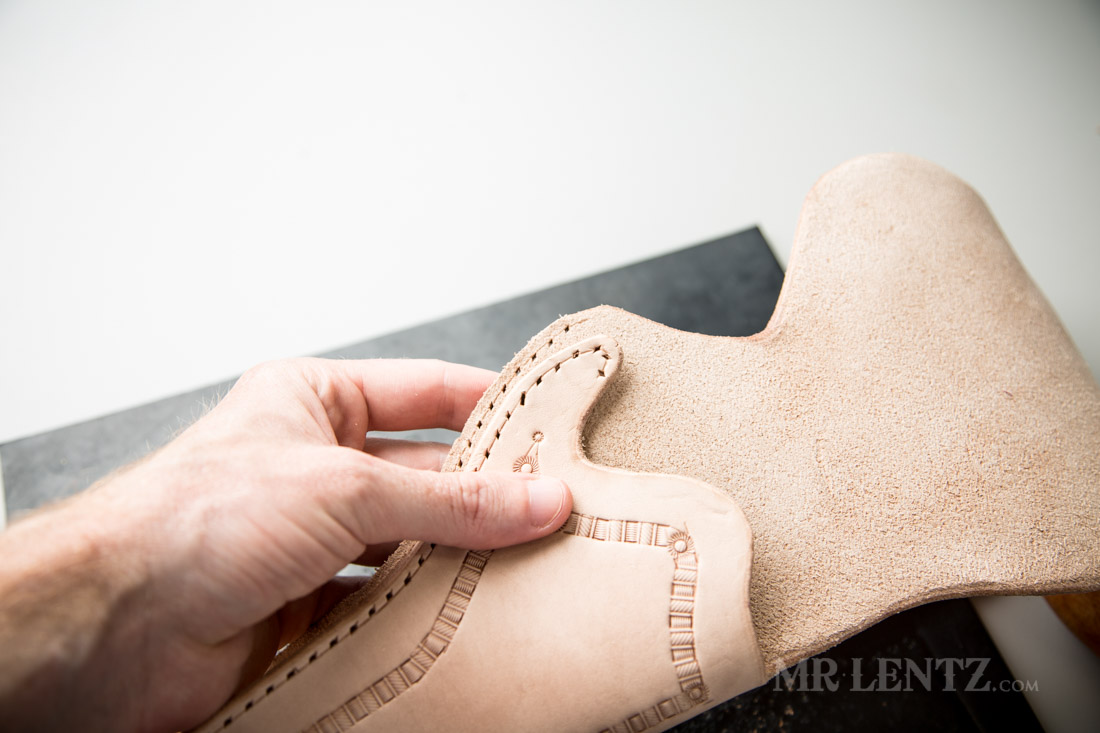
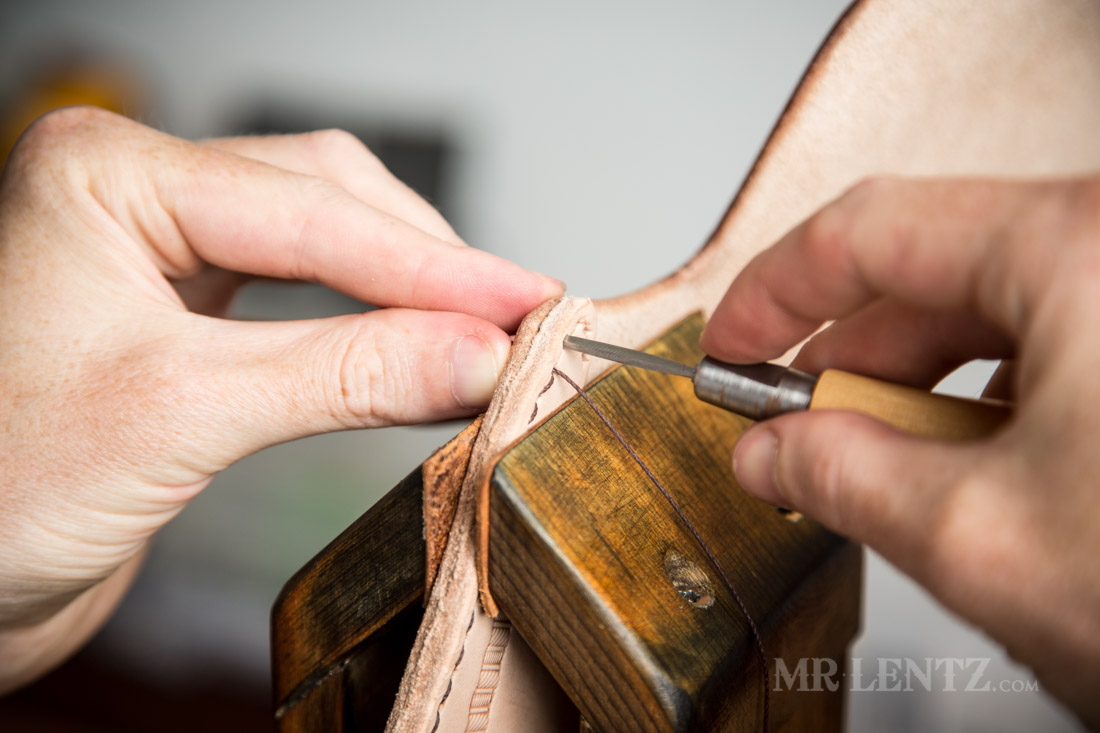
While it’s still damp – I bevel the edges, which is a huge leap towards making this start to look like a refined piece from a rough cut one. I beveled the top side completely, and the back side only in the areas where they will not be sewn together.
With the stitch line creaser I mark a line 3/16″ in from the edge. Now I really should have done this before beveling the edge as it is much easier to use the tool, but I’m always up for a good challenge.
You can see in the photo where I start and stop the line. I make sure to just round the top of the holster – this will give it extra strength at a place where it is likely to wear a lot.
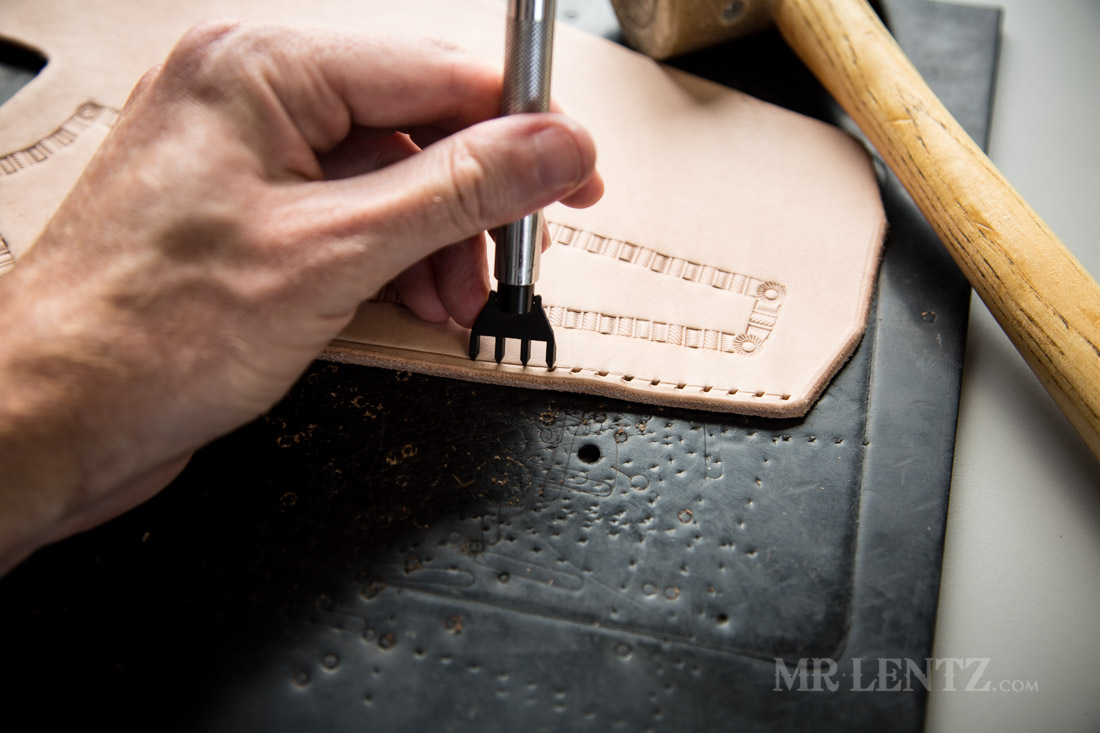

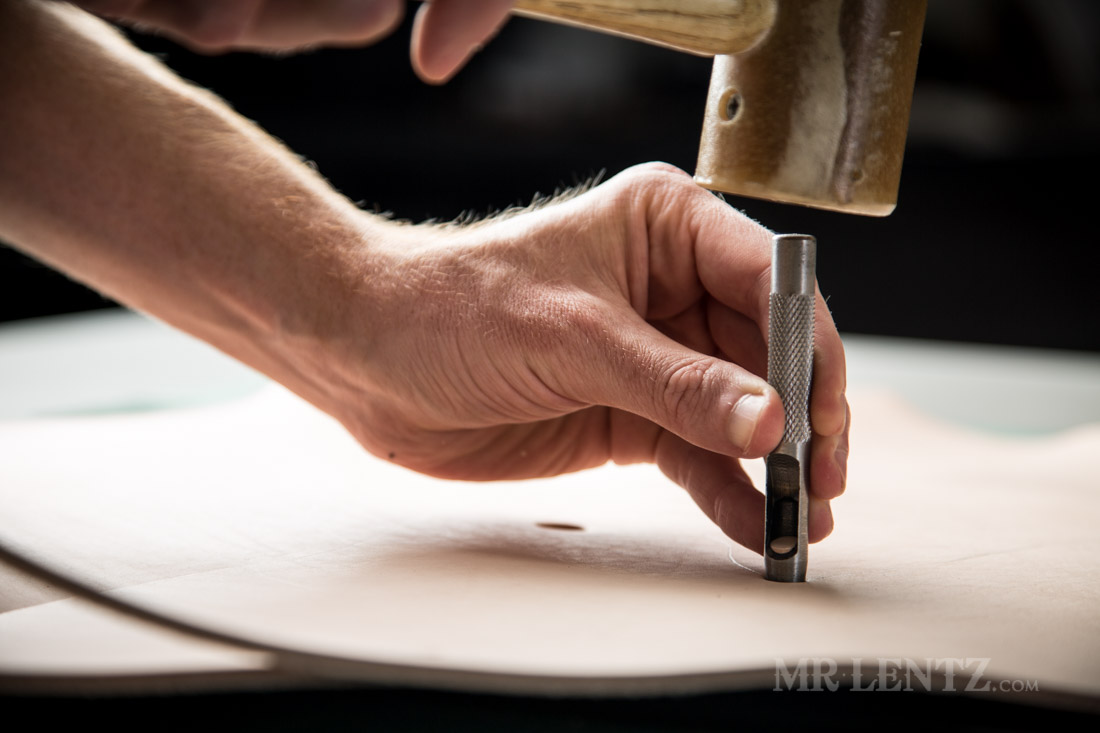
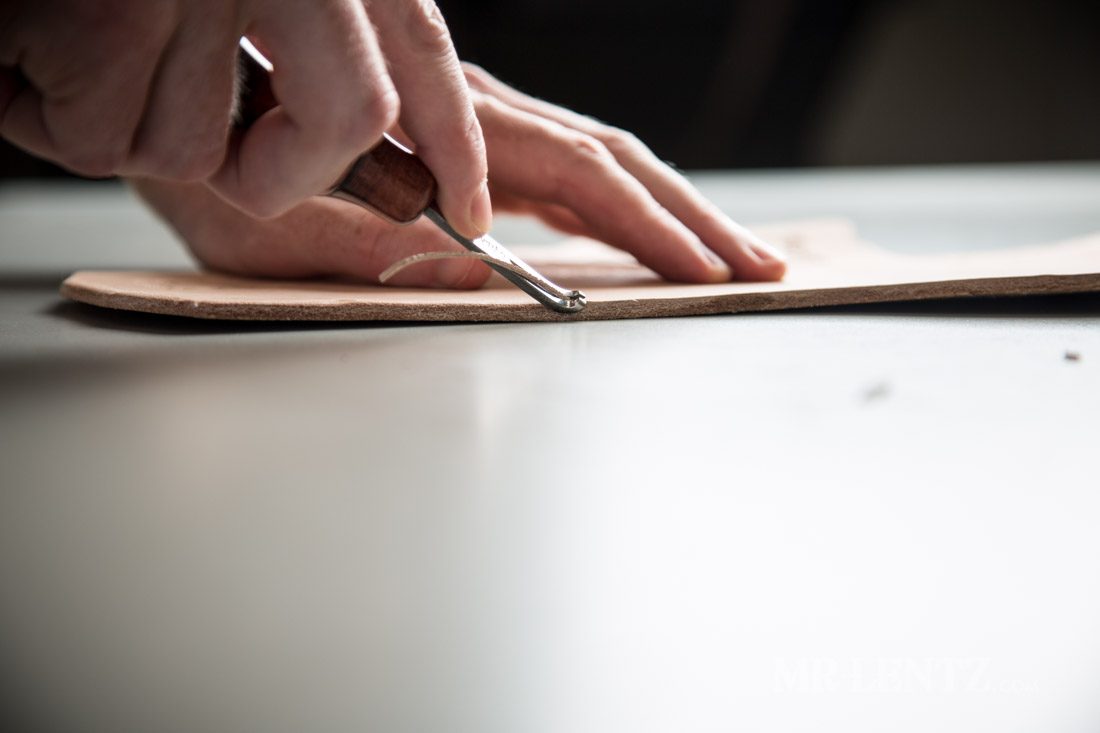
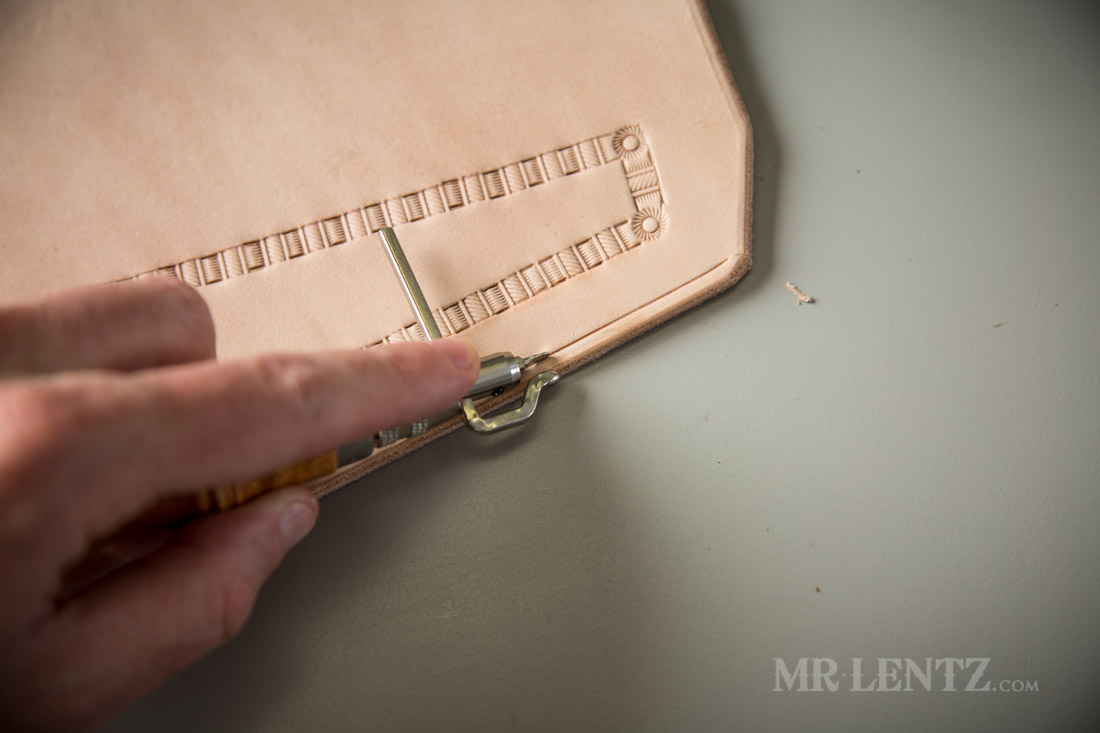
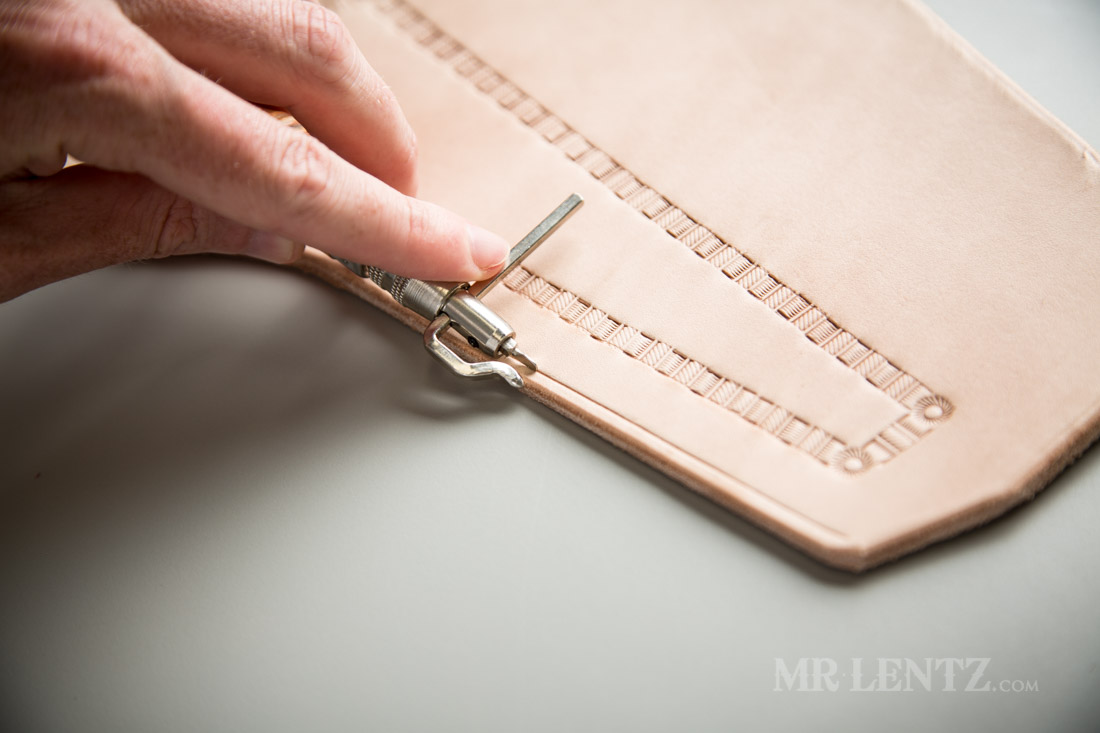
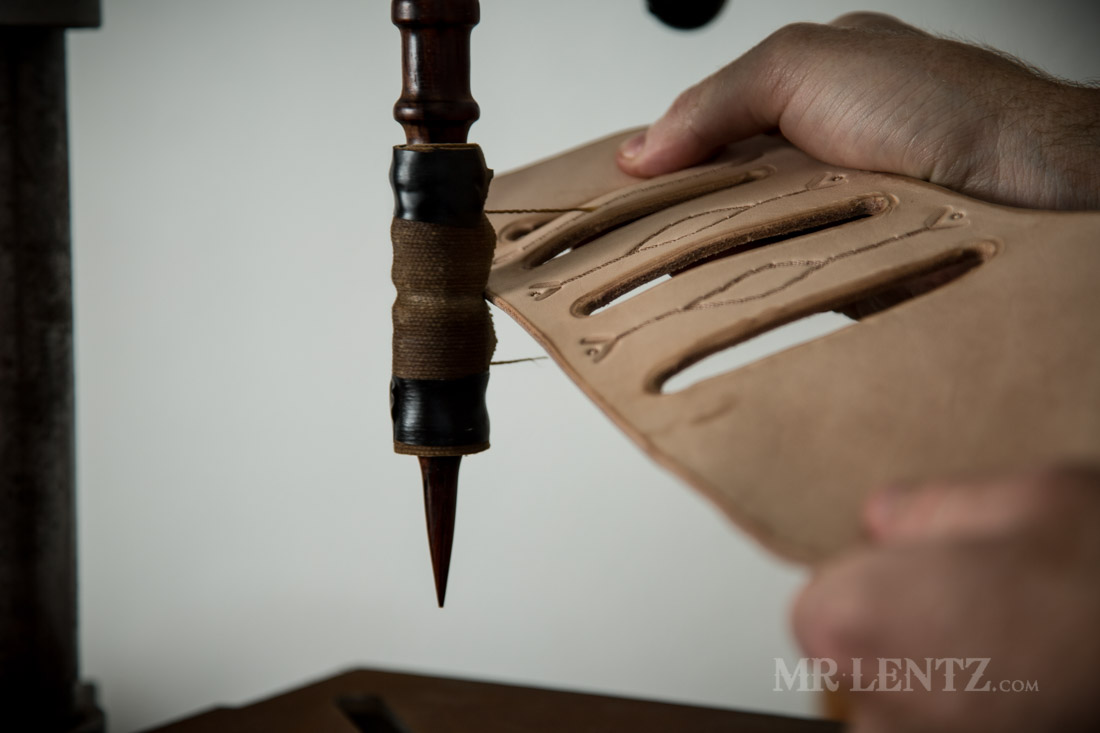
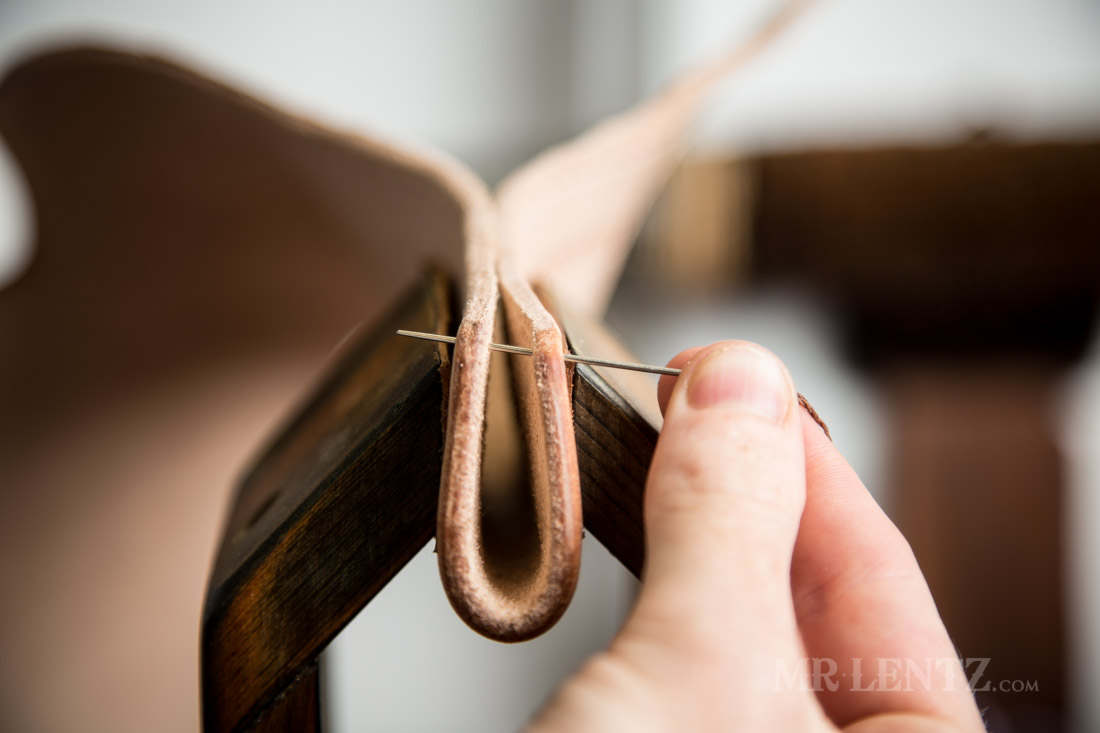
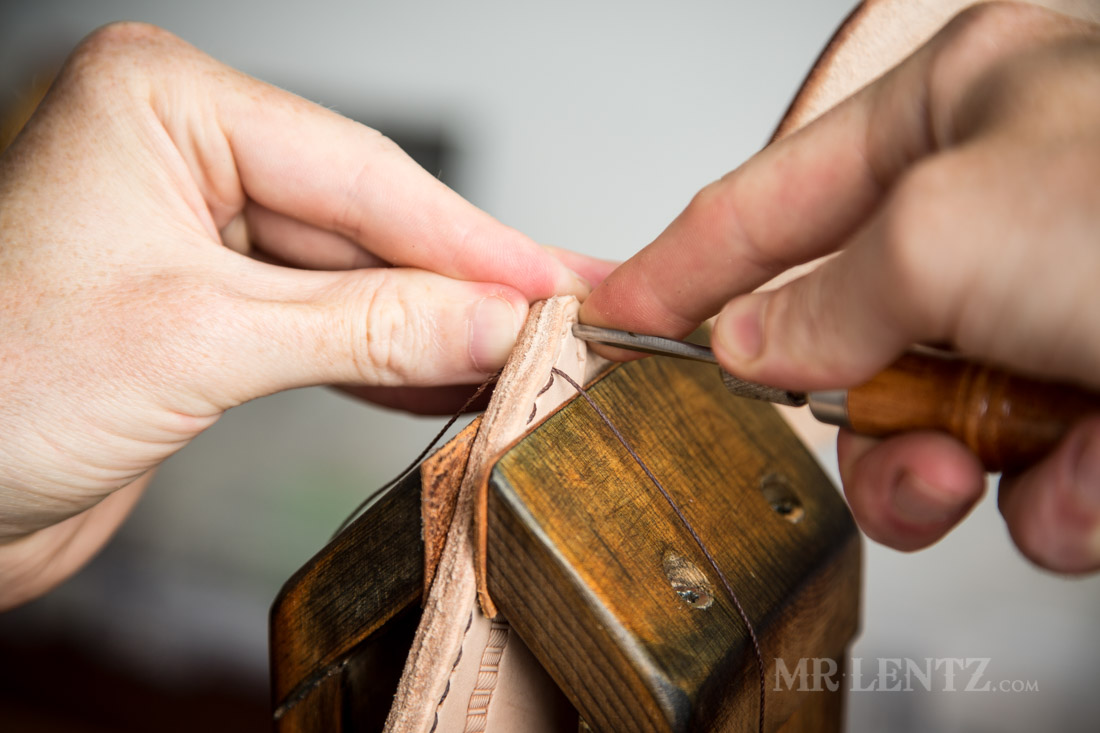
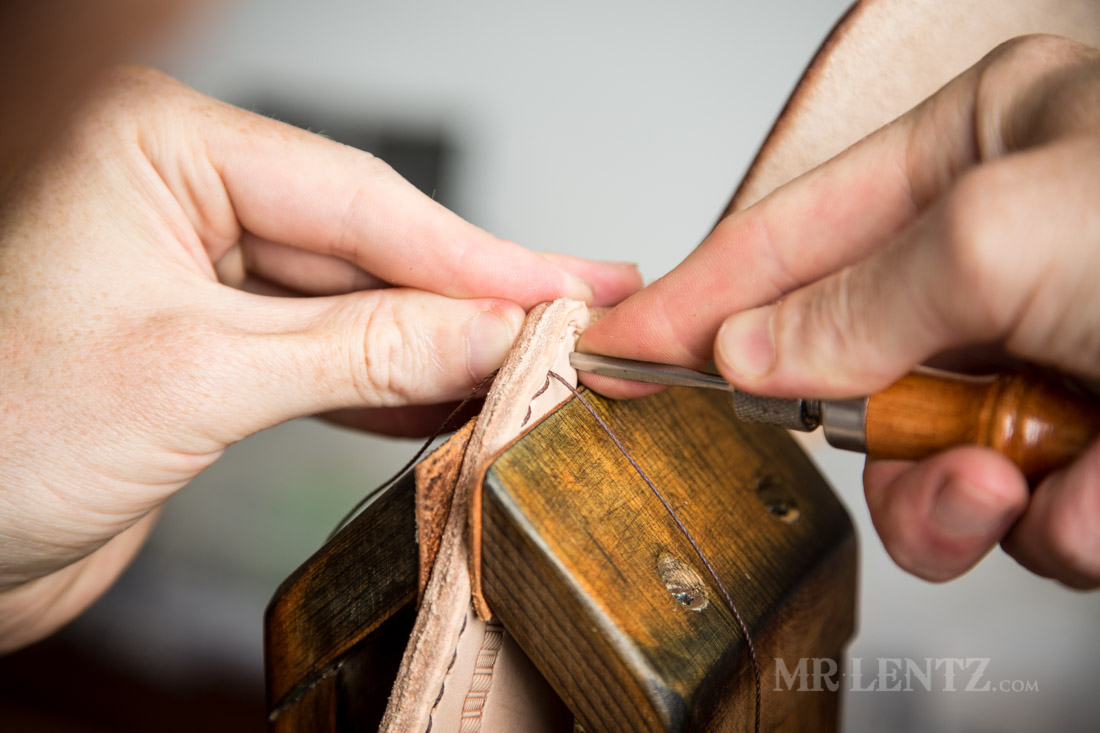
Going back along that line I use the diamond stitching punch and set all of the holes on one side. Each time I lift the punch – I set the last punch chisel into the previous hole – that way things are evenly spaced. Unfortunately for me I left the 1 prong and 2 prong punch at home…so I had to improvise on the tighter corners using a lacing chisel I had, that is similar, but not diamond shaped. And then… several minutes later I realized I had a traditional diamond awl sitting right next to me the whole time – darn!
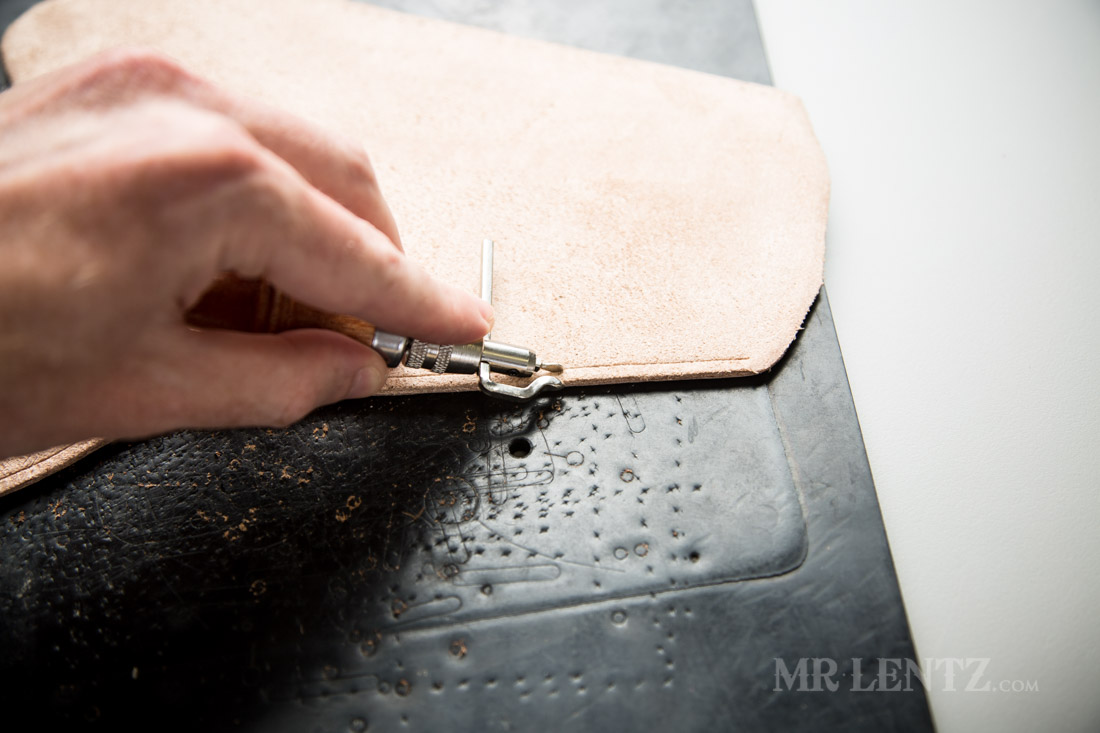
Now here’s a shortcut I mentioned I would use earlier. To get the holes on the other edge punched you need to flip the leather over, use the creaser again on the edge you have not already punched (while the leather is a bit damp), then start punching again. By flipping the leather over the diamond shapes will still align when pressed together to be sewn. It’s not the traditional way to do it, but a fairly easy way at least! Punching in this way may result in a messier looking stitch on the backside- but that’s ok in this case because you wont really see it. Also – here’s a pro tip, when you punch this side, angle your punches so the prongs dig more into the center of the piece rather than towards the edge (you’ll thank me later). Usually you would use a single diamond awl and punch the holes as you go – but for a lot of people this results in messy stitches, blood and a bit of pain as well…that is – at least until you get through that phase.
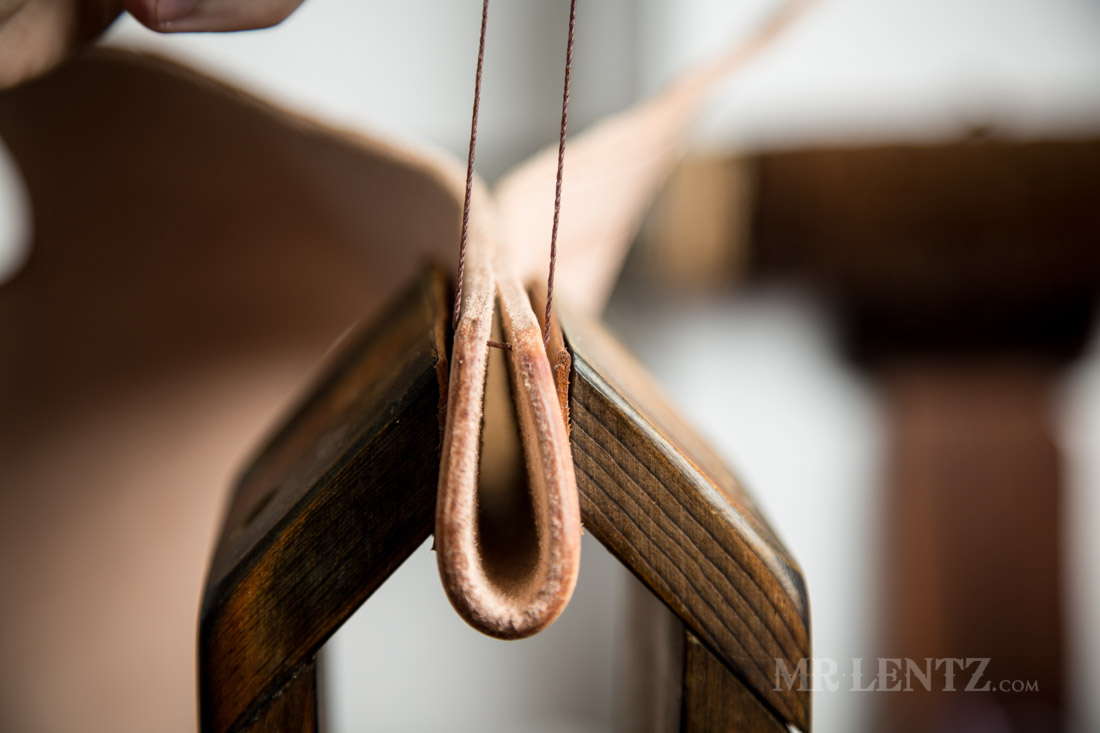
When you get near the end (top of the holster), you should stop at the peak of the curve. Leave things there for now, the last couple of holes are easier to predict once we stitch everything up to that point.
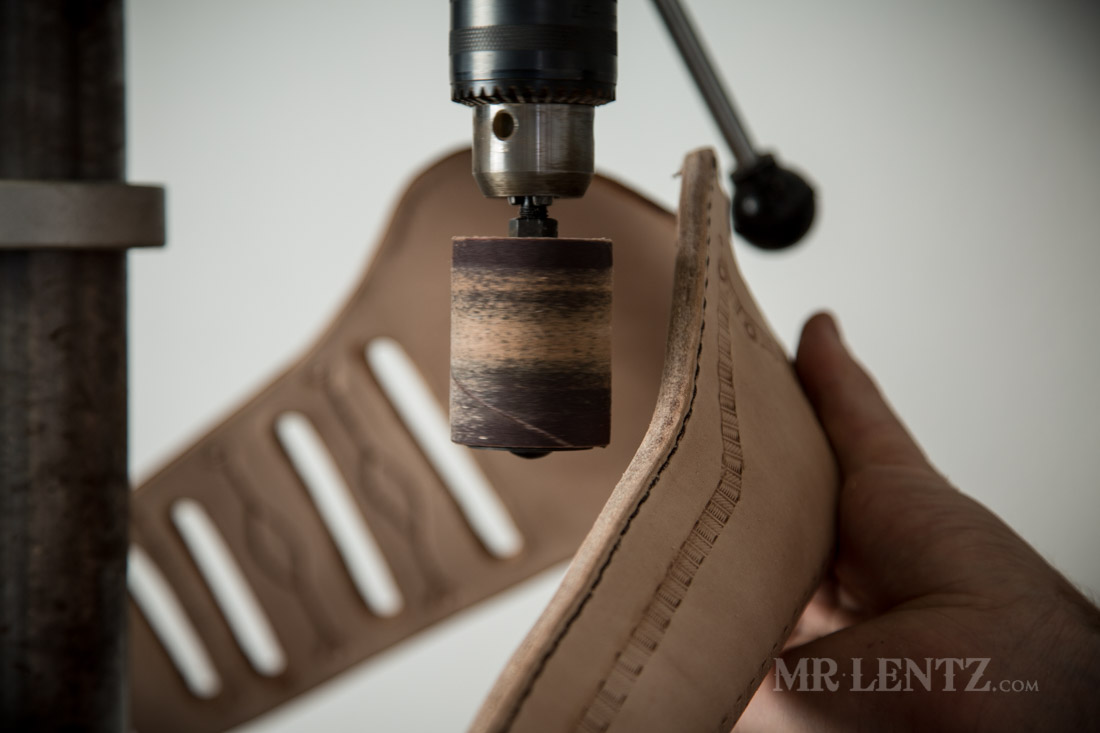
But before we jump to stitching we should burnish all of the edges except the side that is getting stitched. We’ll burnish that part later after it gets stitched, then sanded down. To really get a good edge, you should start with a medium-fine grit like 200 then work down to a fine grit sandpaper like a 600, sand down those edges as nice as possible.
Then wet just the edge of the leather slightly before taking it to the cocobolo burnisher. Mine has a piece of waxed canvas attached to speed up the process. The burnisher will spin in the drill press so everything can happen fairly quickly.
PART 5: Stitching
Time to get down to stitching. I like this part of projects most simply because it’s a simple repetitive task that has a zen-like meditation quality to it. If you’re into that sort of think you might also be into sewing an entire two layer belt…it takes a while and hundreds of stitches. I just might make a tutorial on that one day (for now I have this other belt tutorial).
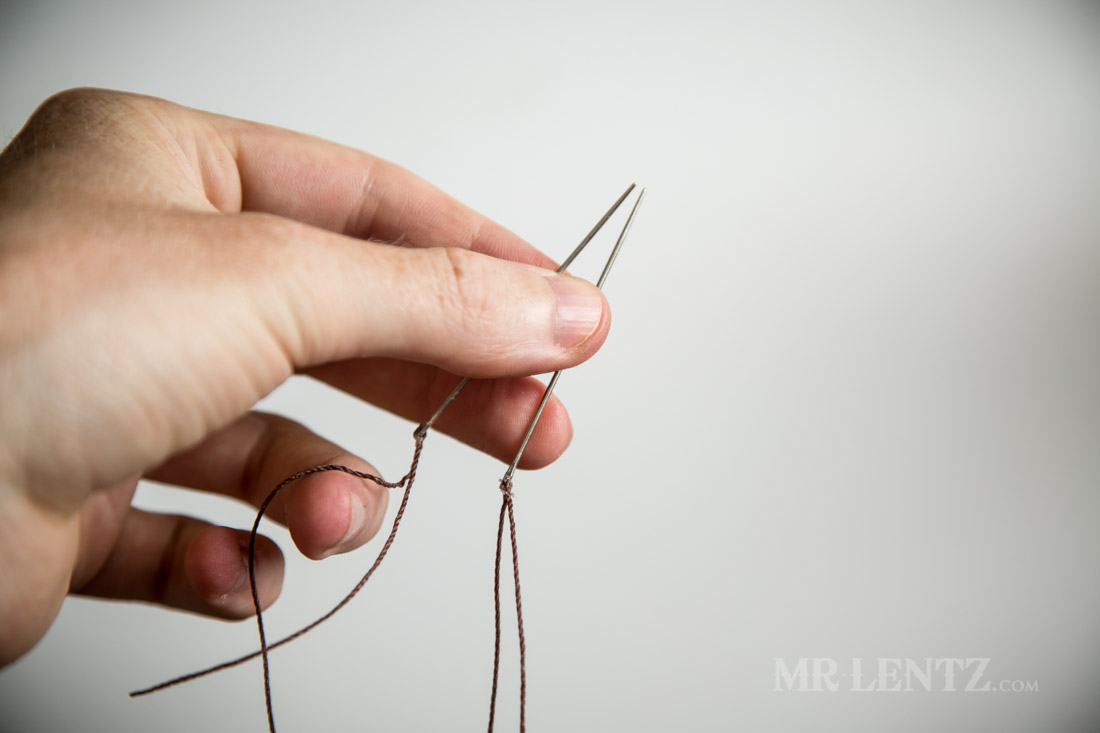
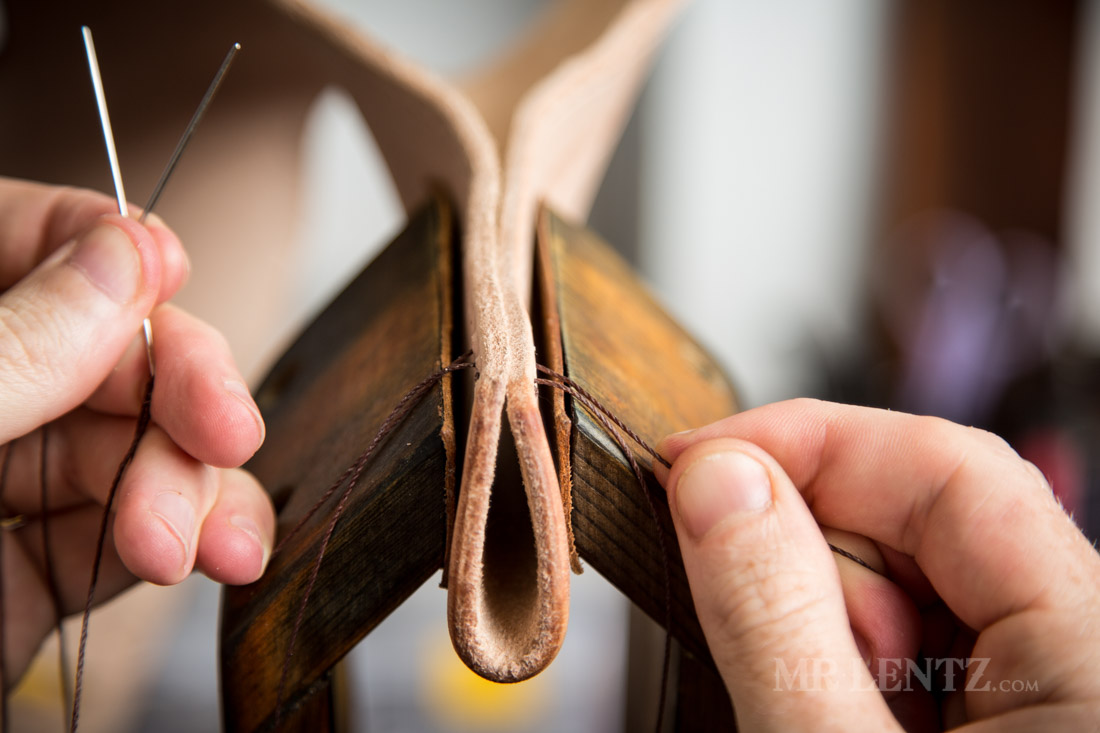
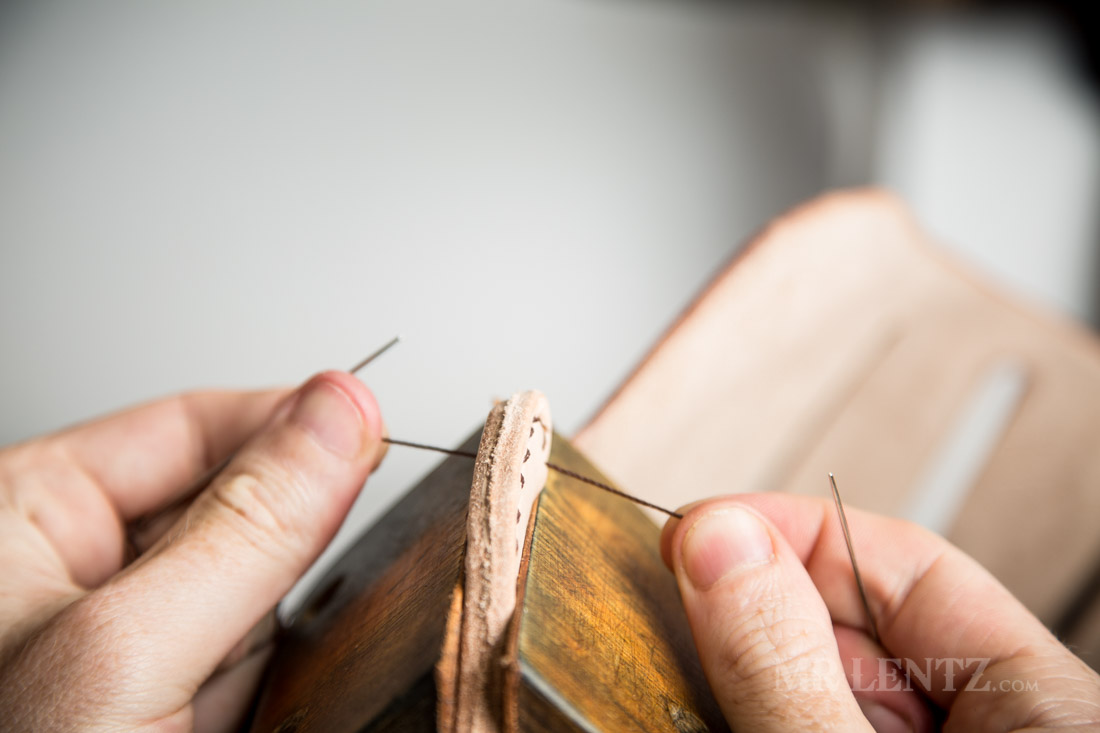
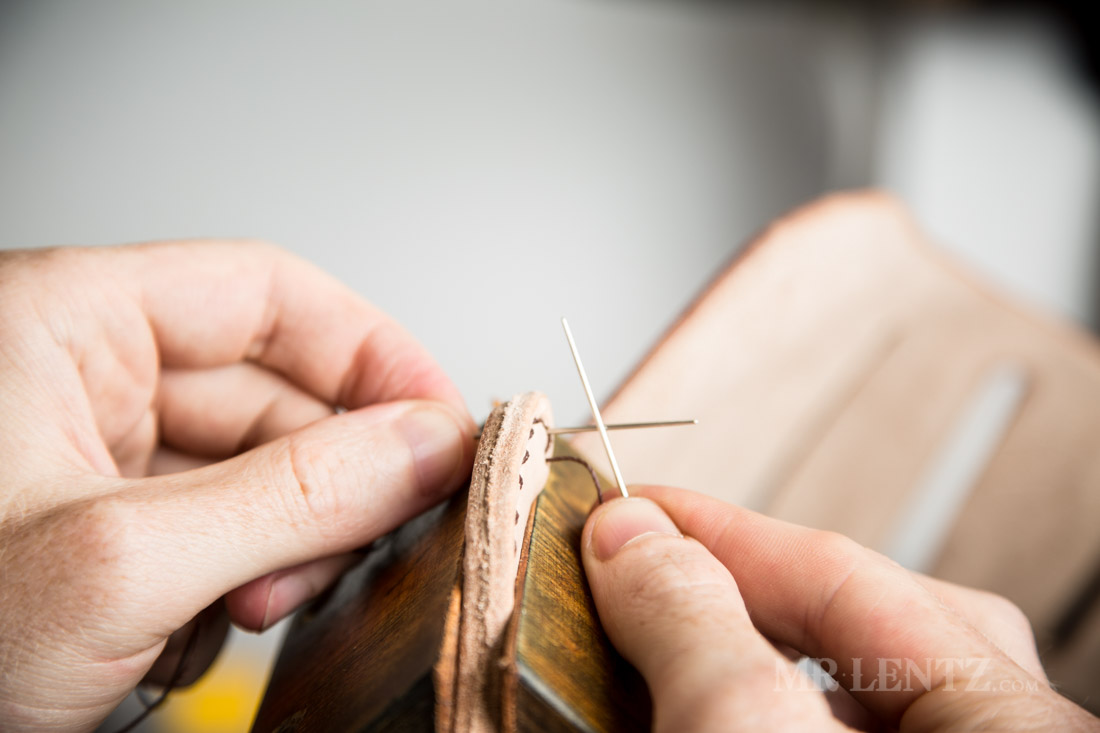
Set your piece up in the stitching pony so that the holes are just above the grips. It may be a bit awkward to get it into position, but do your best. Grab about a length of thread equal to both arms spread wide open, palm to palm, and add an extra foot or two for good measure. Even this short length of stitching requires a lot of thread.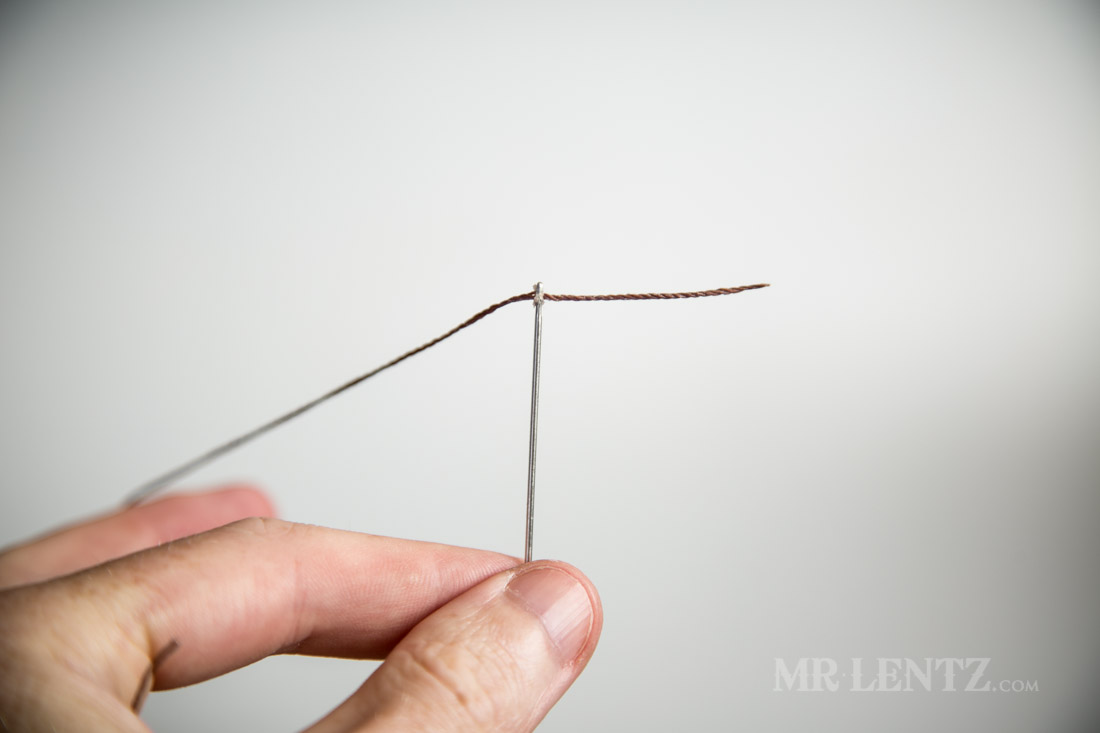
To fasten the thread on the needles I first run the thread through the eye hole…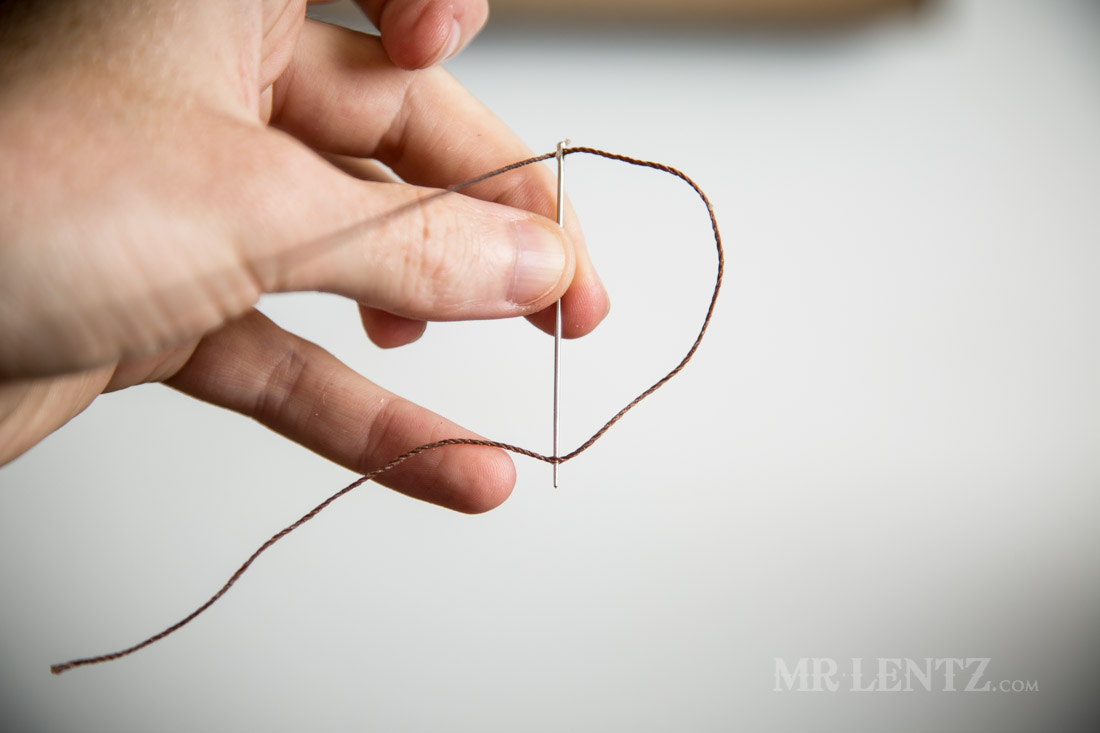
Then leaving about a 6 inch tail I pierce the thread with the needle…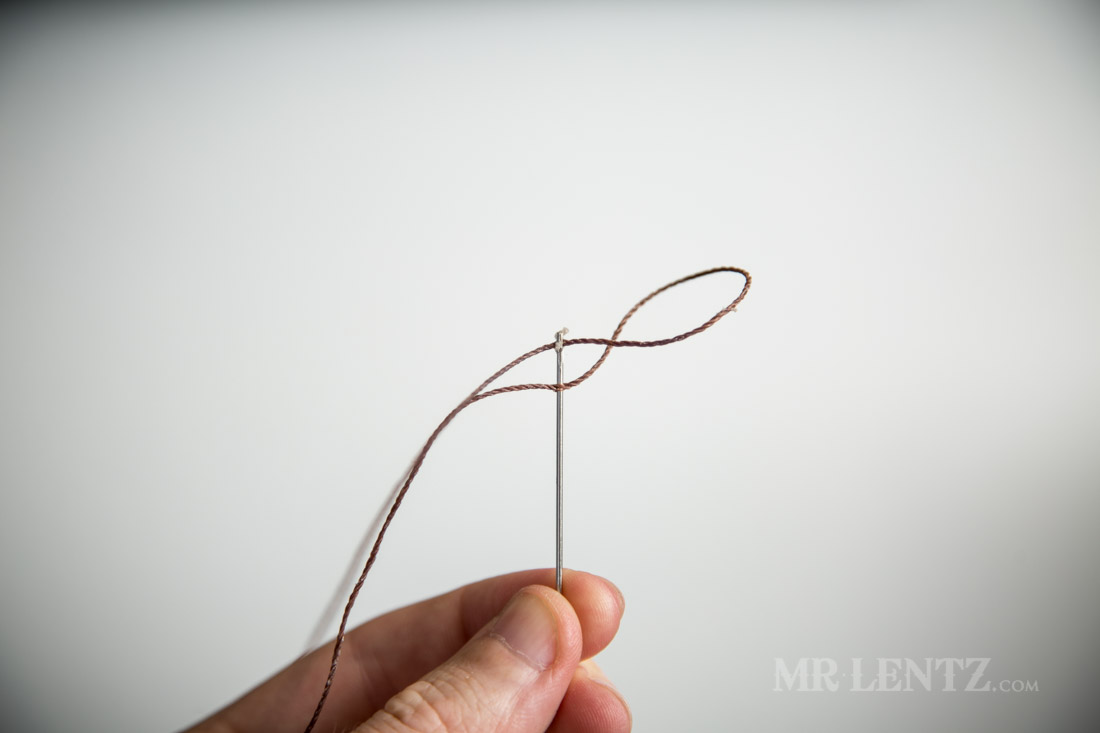
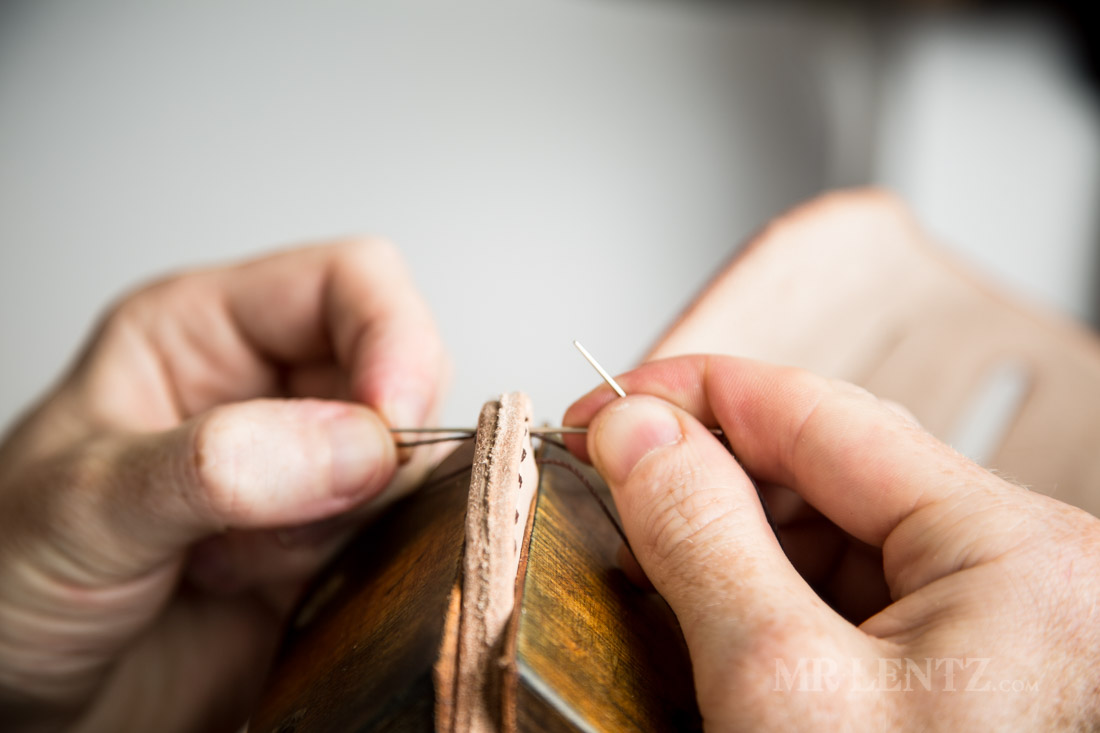
Pulling the pierced end up the length of the needle…
and further up above the eye hole.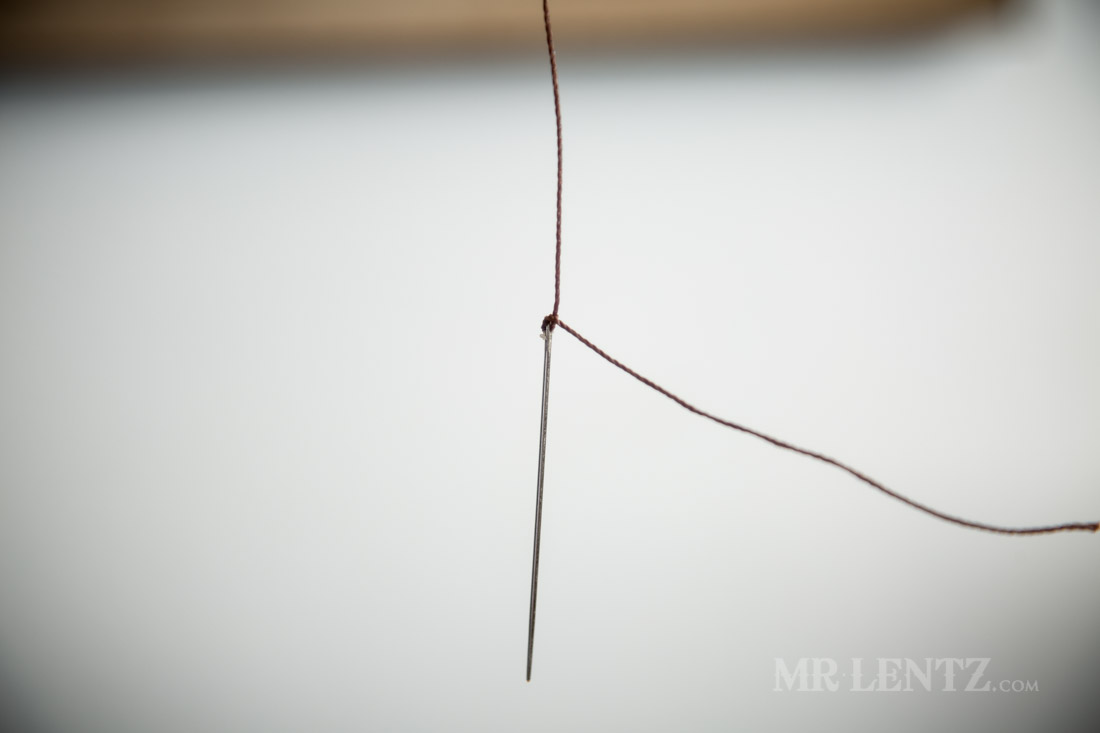
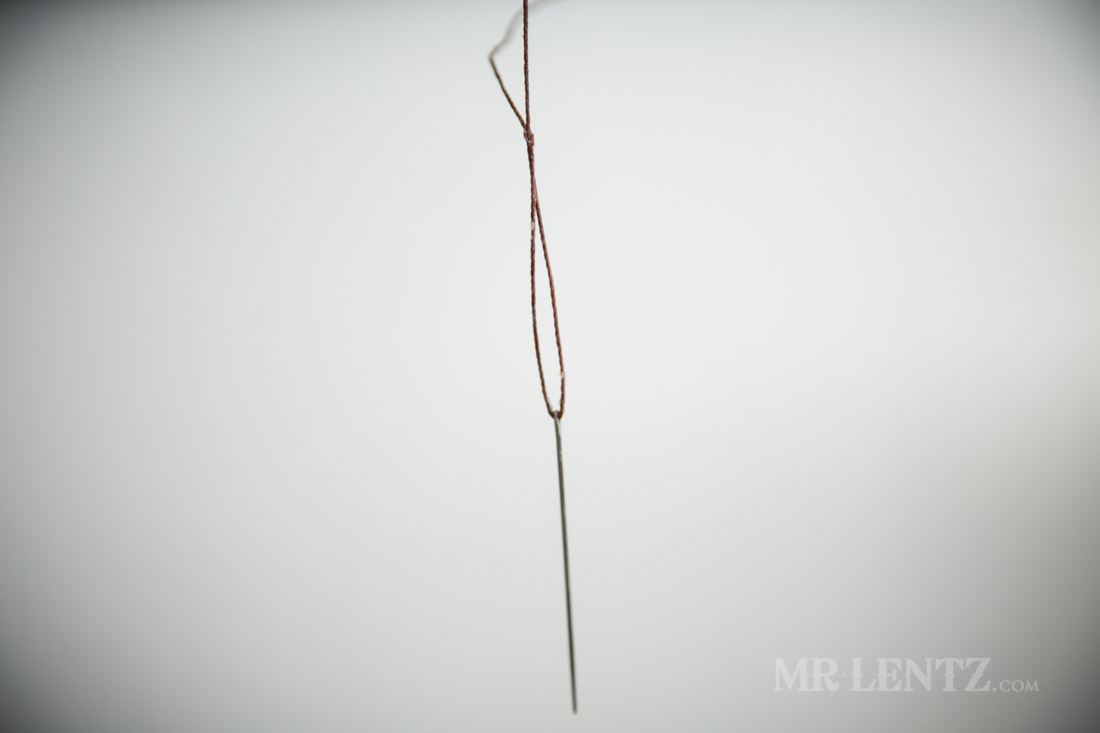
I then pull the thread to tighten the loop around the eye hole. This method keeps the thread as thin as possible, making it easier to pass through tight stitching holes.
Repeat the step on the other end of the thread, so that two needles are attached to one length or thread.
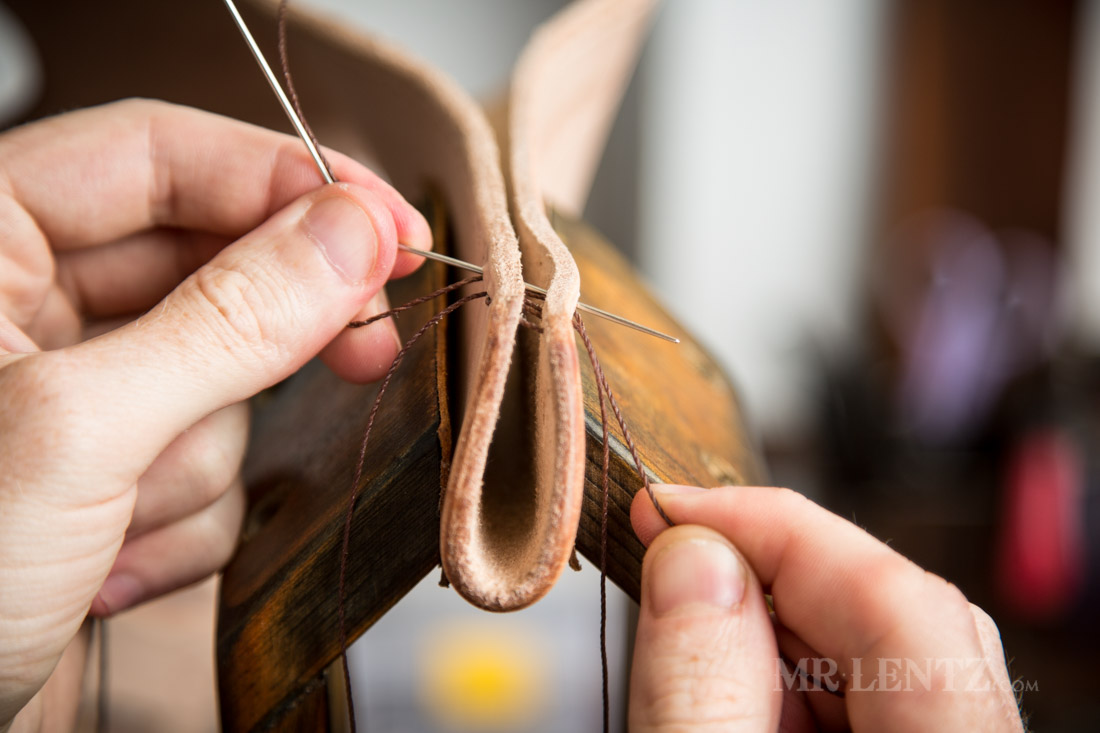
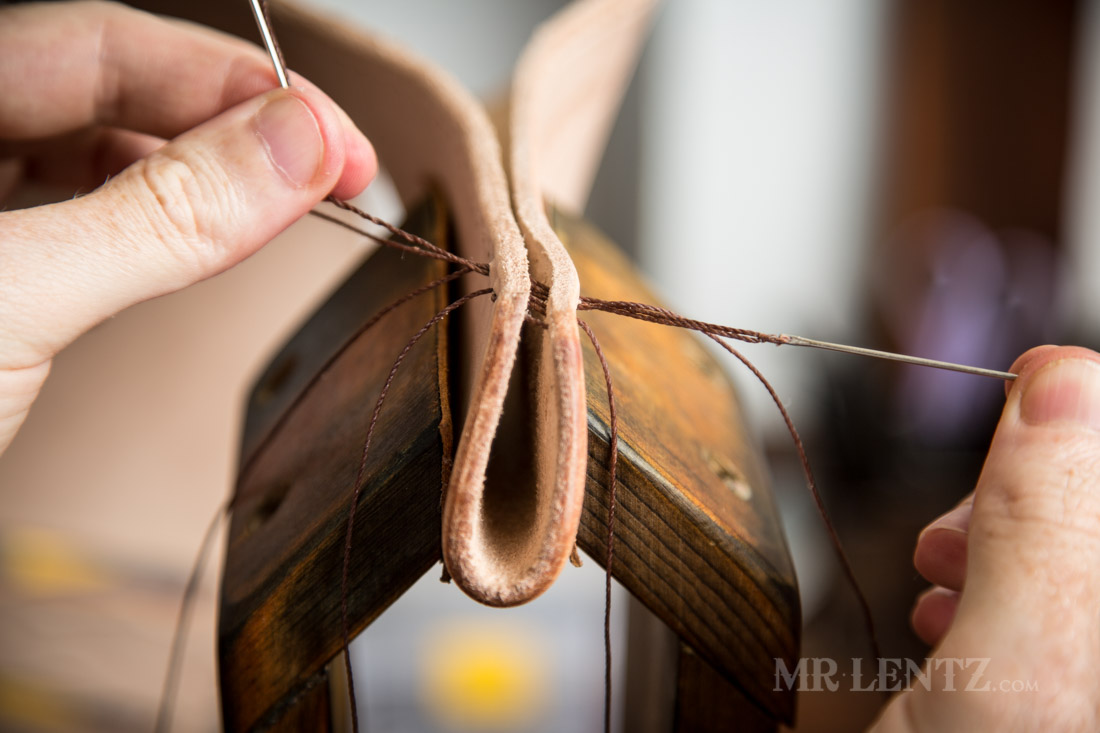
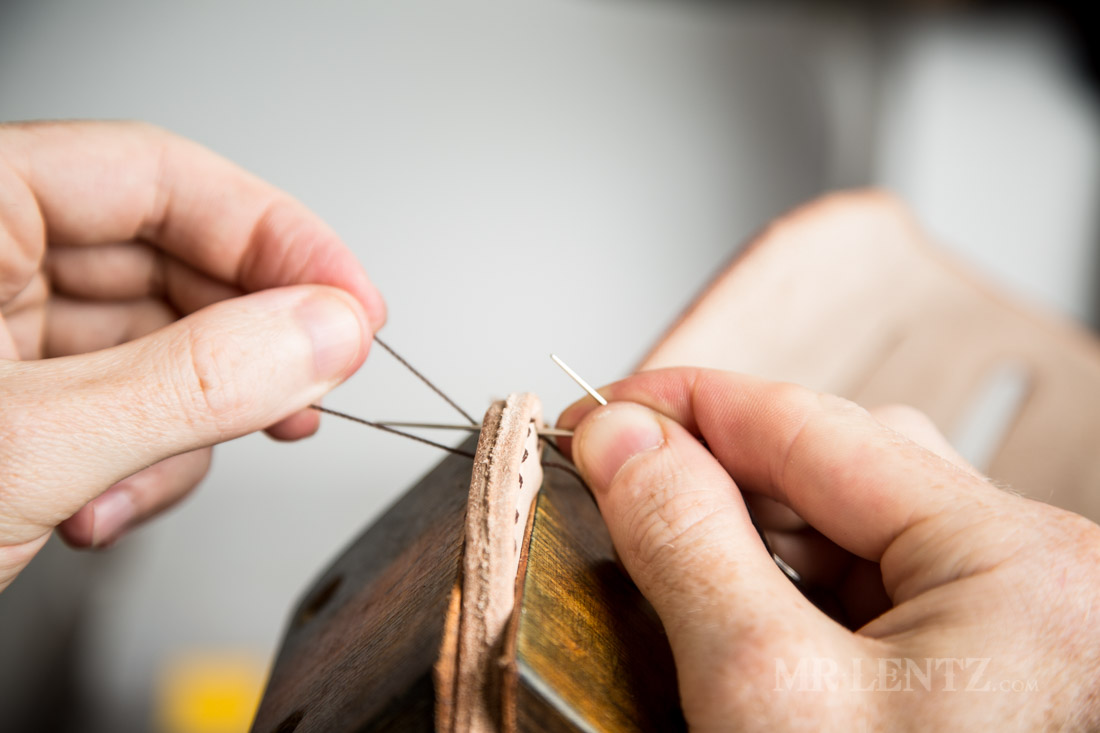
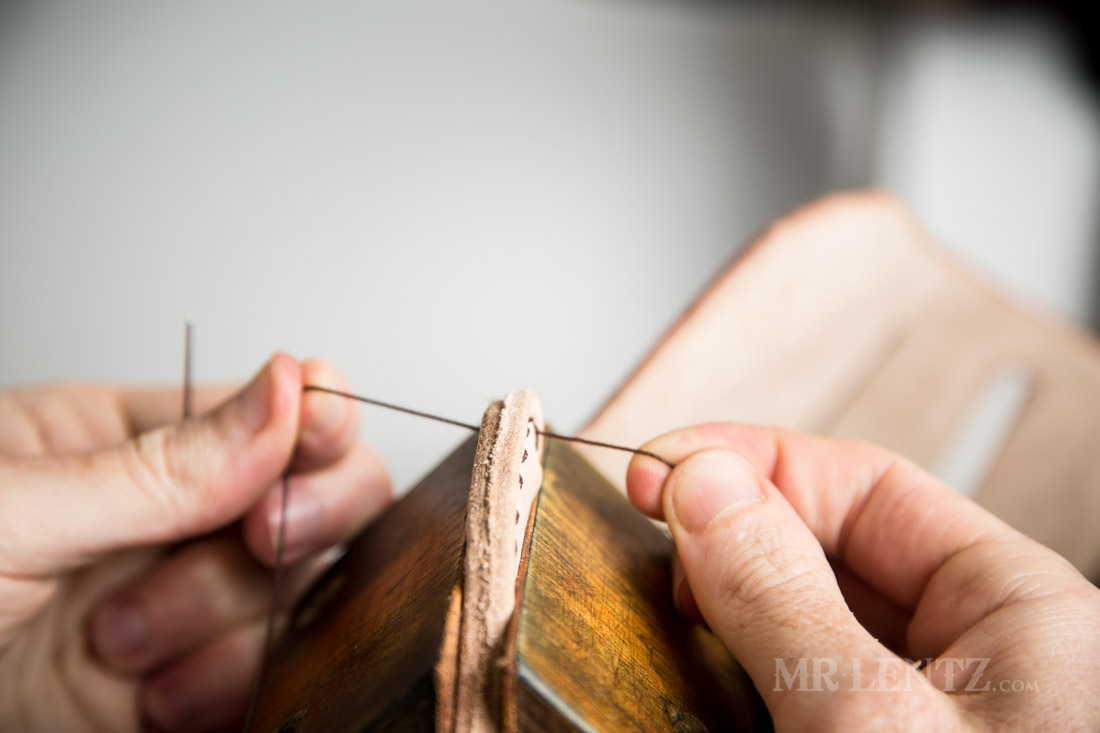
To start the saddle stitch I always start from the right hand side and make sure that side is also the top facing side of my project. Every step from here on out should be repeated exactly the same for each stitch…this is a good way to get your stitching up to a pretty good level of perfection.

Pass that needle all the way through from right to left.
Pull half of the thread through the hole so you have equal lengths on both sides.
Now the stitching begins, start with the next hole up and pass the right needle through the right side.
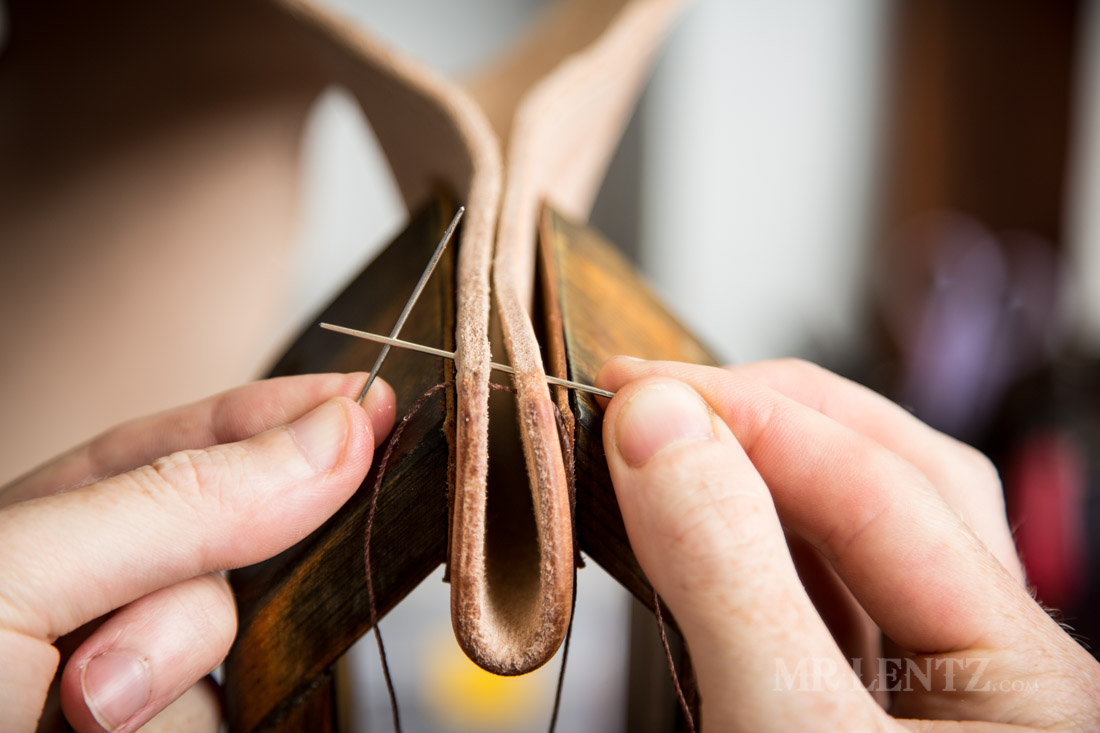
Take your left needle and place it behind the right one as it passes through, making a ‘T’.
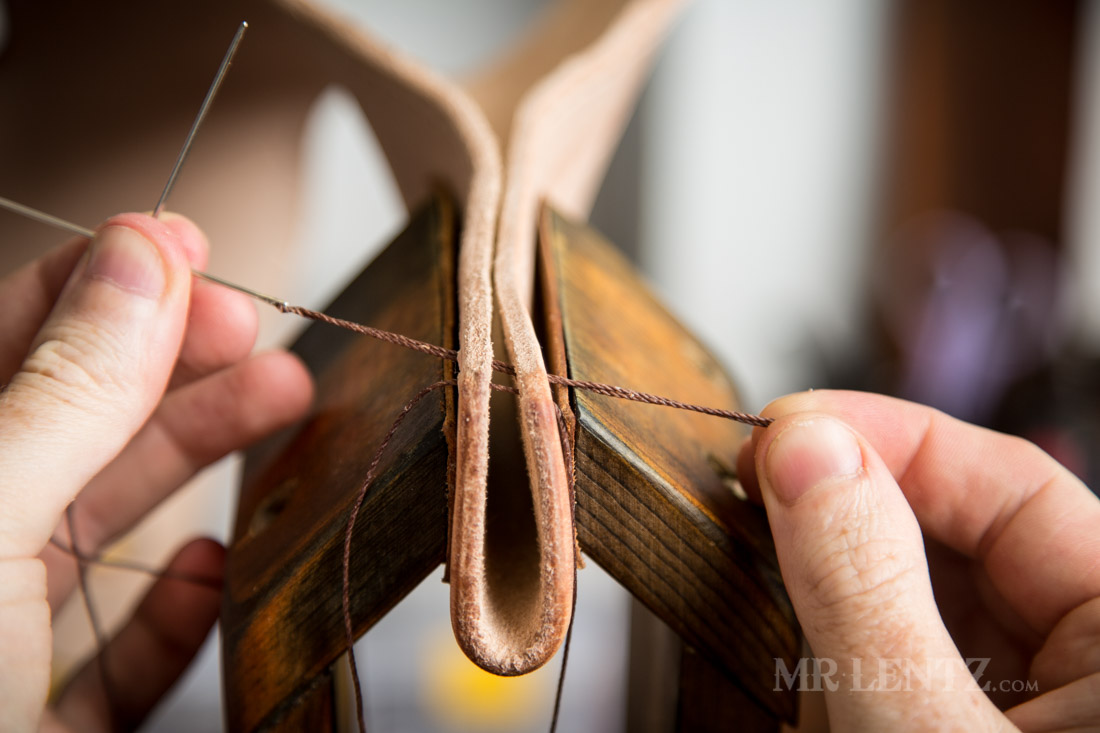
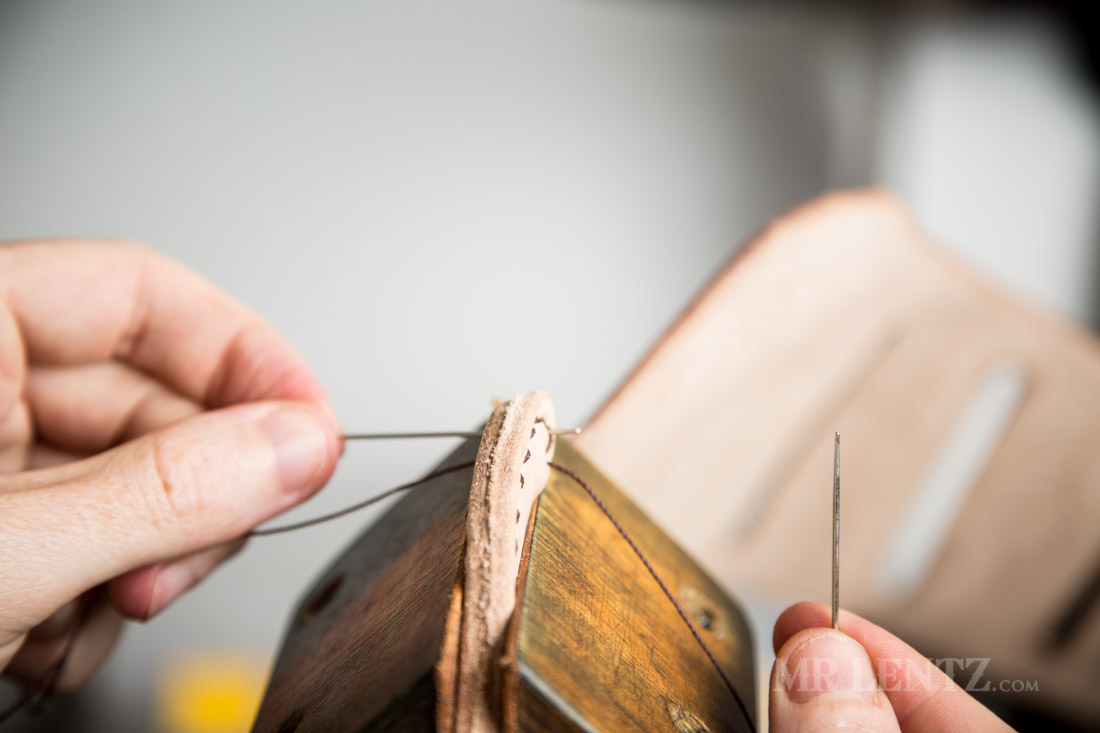
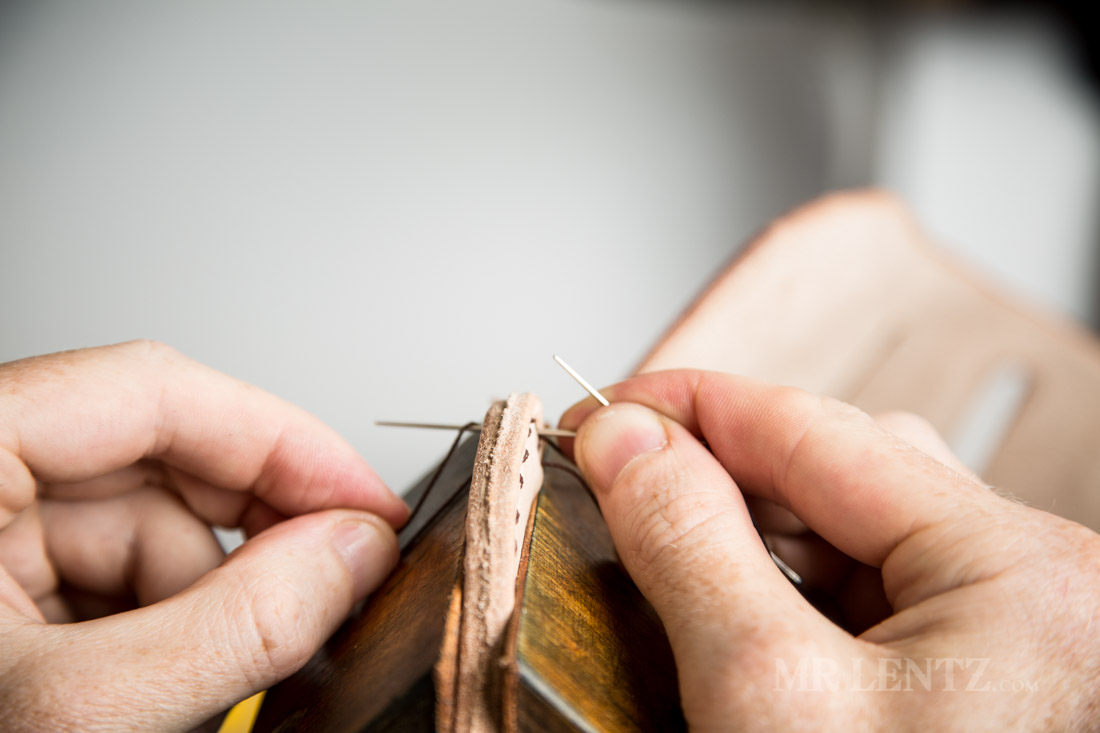
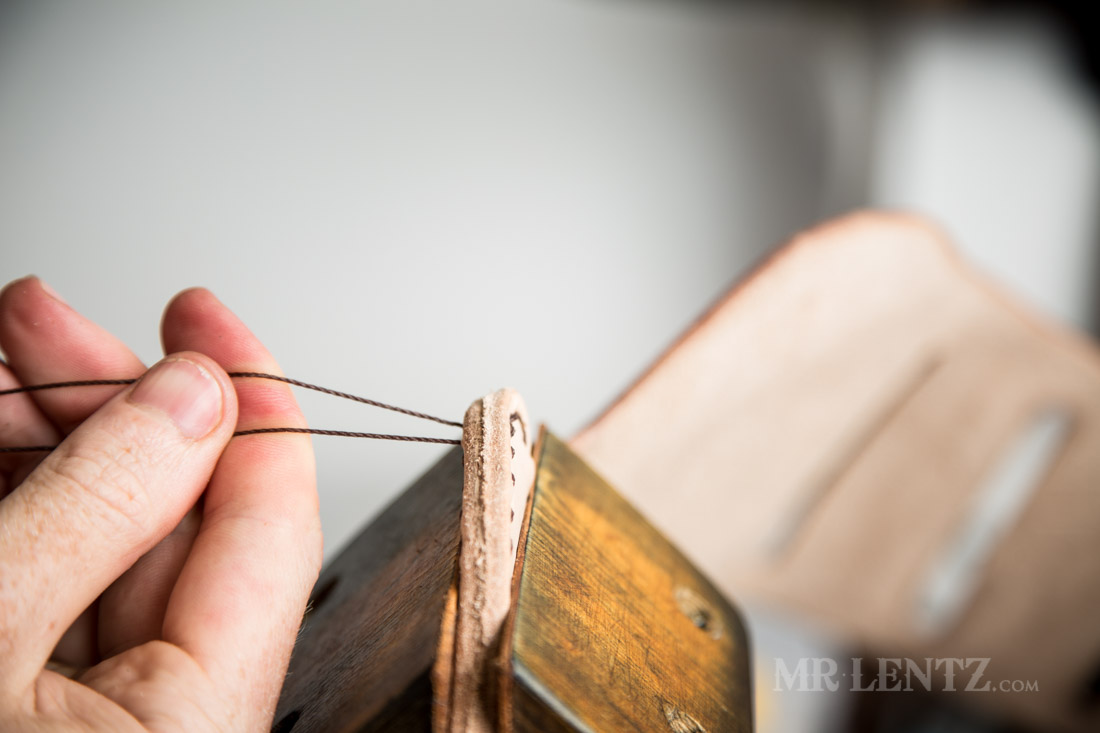
Pull the thread a few inches through…
Then pull down and towards you on both ends of the thread – this clears a path for the next needle to pass through without penetrating the thread. If you pierce the thread your stitching will come to a rapid halt and you will need to spend some minutes untangling it.
Keep that preasure on both threads as you pass the left needle through the same hole.
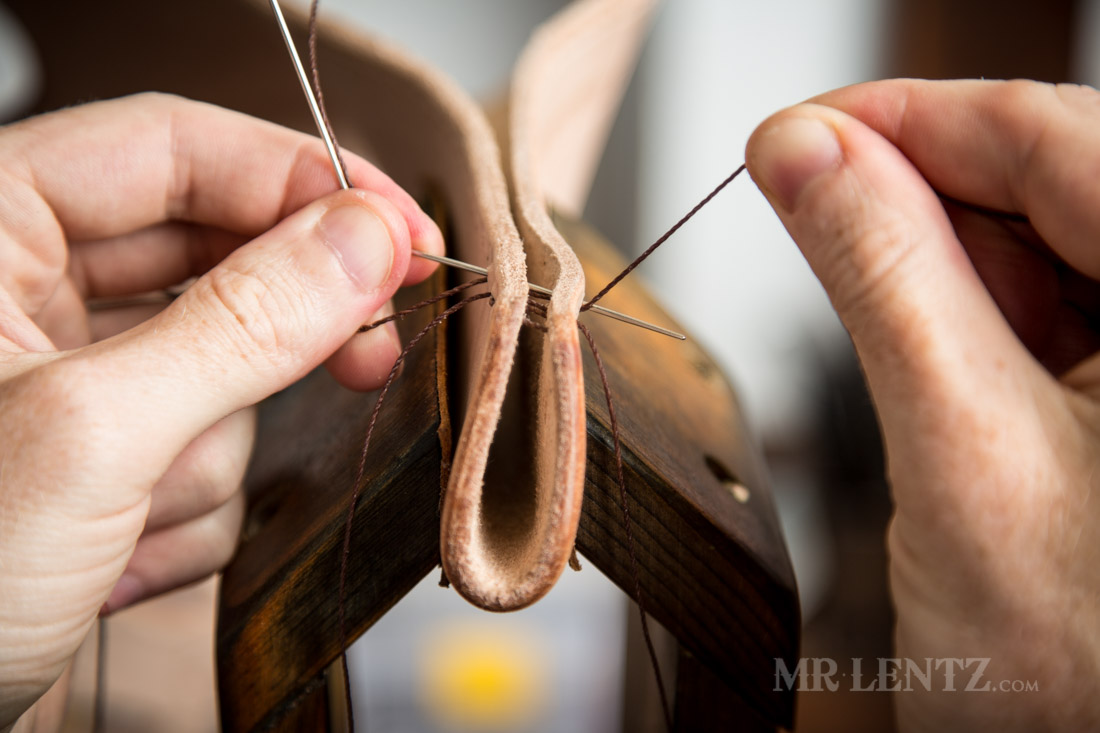
On the right hand side lift the thread up as the needle passes.
Then drop the thread up and over to the back side of the needle. This creates a loop the needle passes through and is what makes this a ‘saddle stitch’. The saddle stitch is the best stitch in this case due to the fact that if one stitch breaks, the others havea better chance of holding the piece together until you get it repaired.
Now pull both ends of the thread tight.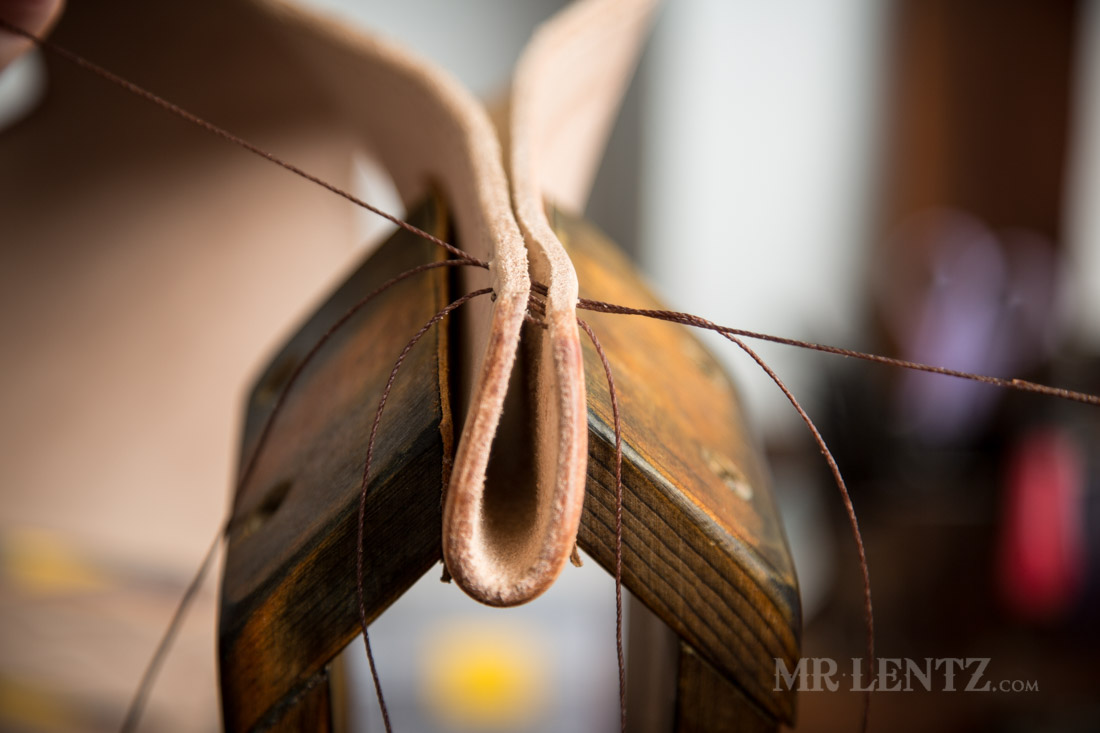
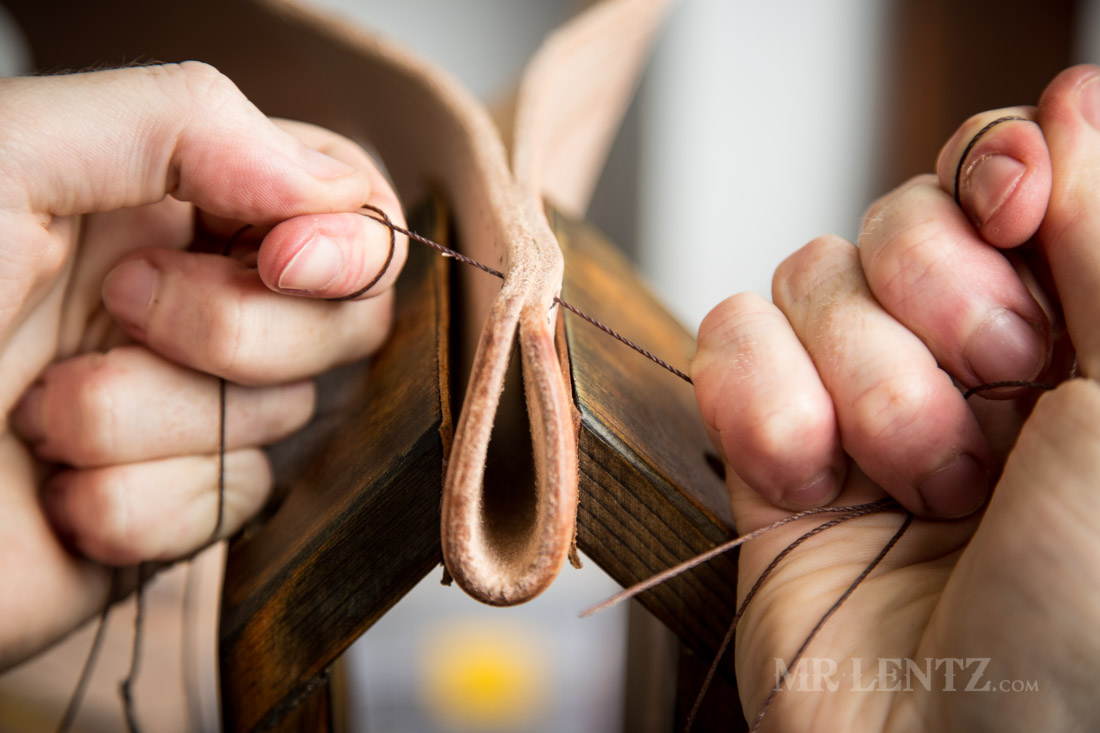
With a final tight pull once all thread is through. Then – continue those steps with each stitch hole until you get all the way to the top of the holster where we still have a few un-punched holes.
I waited to punch the last few holes on the back side because I wanted to make sure I didn’t punch too many…and that they would all line up. Here I take my diamond punch awl and carefully feed it into the top side hole, and push until I pierced the back side. Now – that’s in an ideal scenario when your tools are super sharp. Unfortunately mine was not, so what I did instead was used the diamond punch awl to make a mark int he back side at each hole. Then I tool the piece out of the stitching pony, over to my rubber mat, and laying the piece down with the back side exposed I forced the awl into each marking and made the punch. This helped avoid an inevitable bloody slip of a non-sharpened tool. Sharp tools can be dangerous, but sometimes dull ones are worse because you tend to use more force, and that’s when things can slip.
With all of the holes punched, I repeated the stitch all the way to the top of the holster. Now it’s time to finish up the stitches and lock them in.
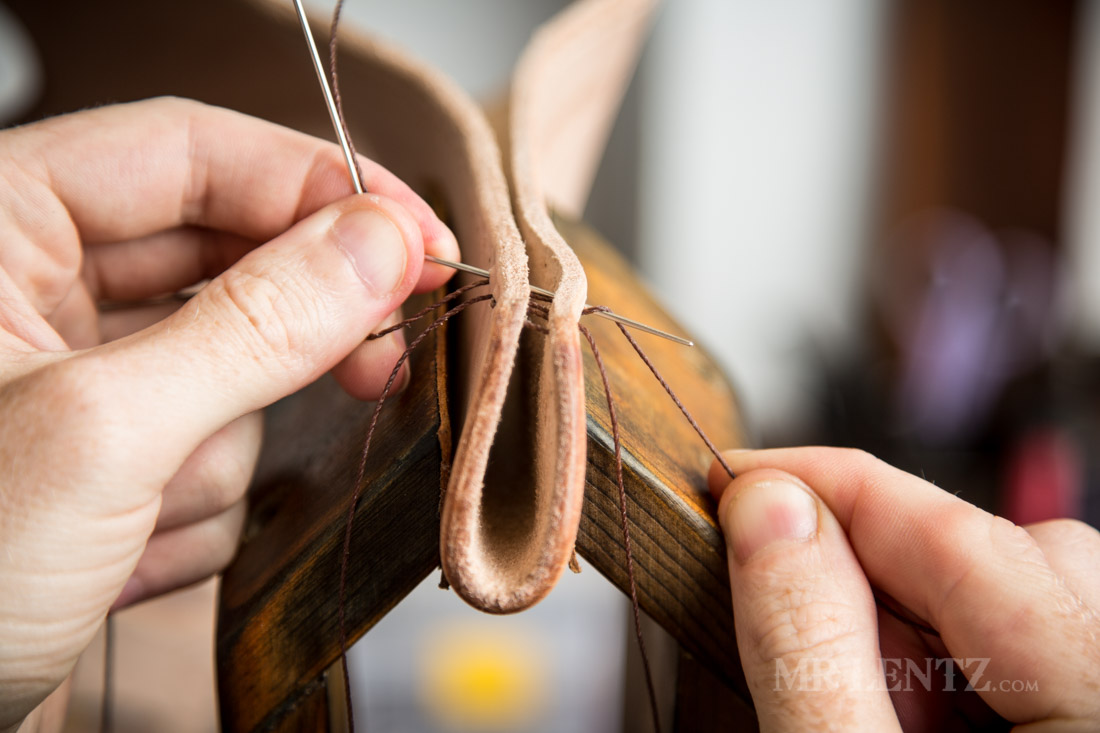
To finish the stitching, you literally stitch everything in reverse. On my first backstitch I now start with the left needle on the left side and pass it through one stitch hole back from the top.
The right needle is now in front of the other one that is passing through.

I pull a short length of thread through and apply pressure forward to create space for the needle.
Then I pass the right needle through the hole.
The thread is behind the needle and I pull it up and over…
and down in front of the needle creating a loop.
The thread is then pulled tight. Next – repeat these backstitches in two more holes. A total of three backstitches is usually plenty.
Once the last backstitch is done I pass the right needle through the next hole to the left side.
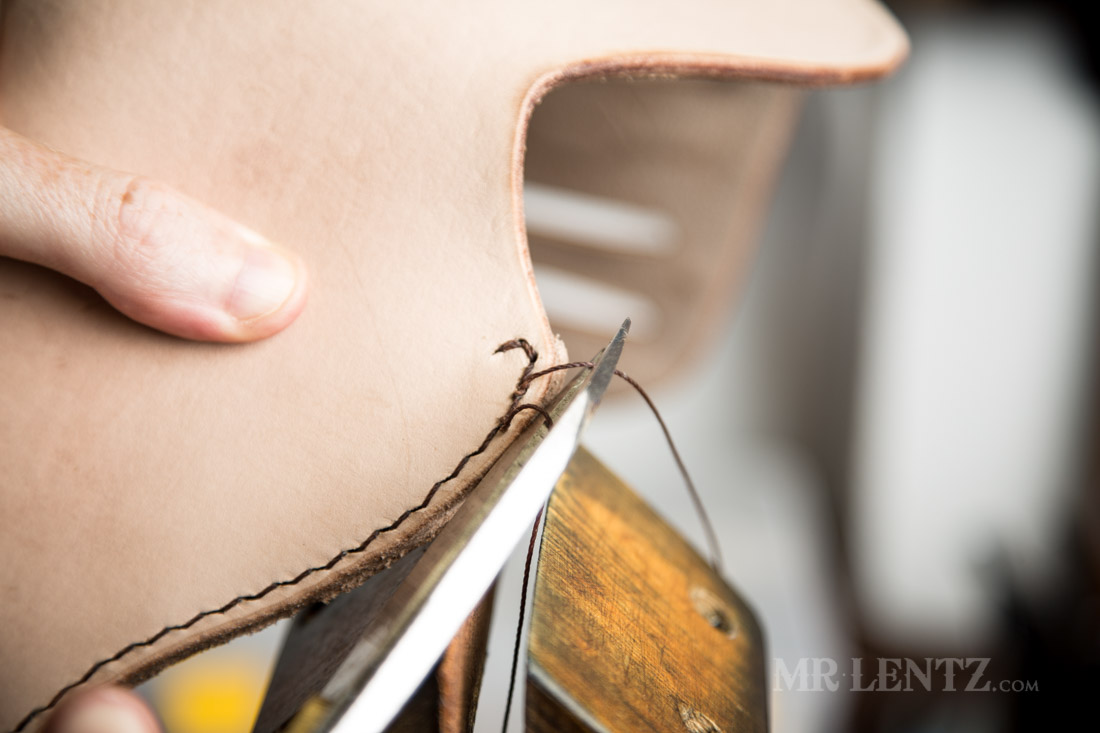
Now that both needles are on the back side of the holster I tie a simple knot behind one of the stitches and cut the thread off. You can then use a lighter to burn the tip so it doesn’t fray.
PART 6: Edge Burnishing and Finishing Touches
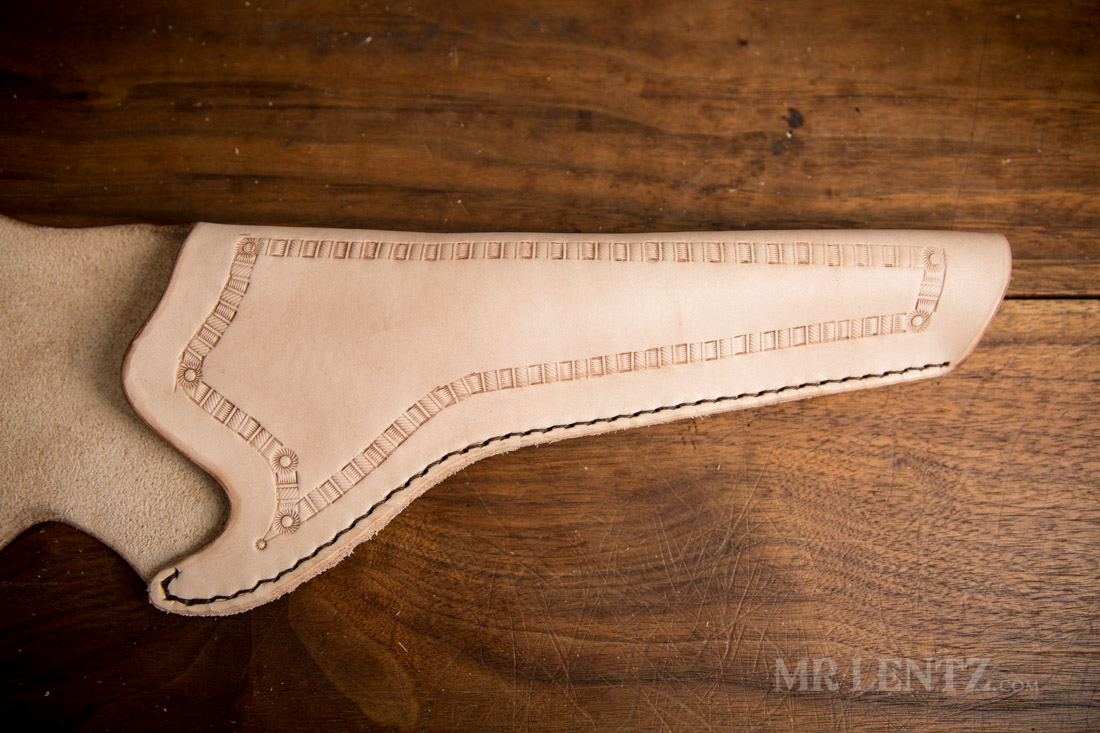
Laying the holster out on the table, it looks like it’s finally coming together. One critique I have at this point is to use a diamond punch set with closer spacing. The closer spaced ones have a more refined look.
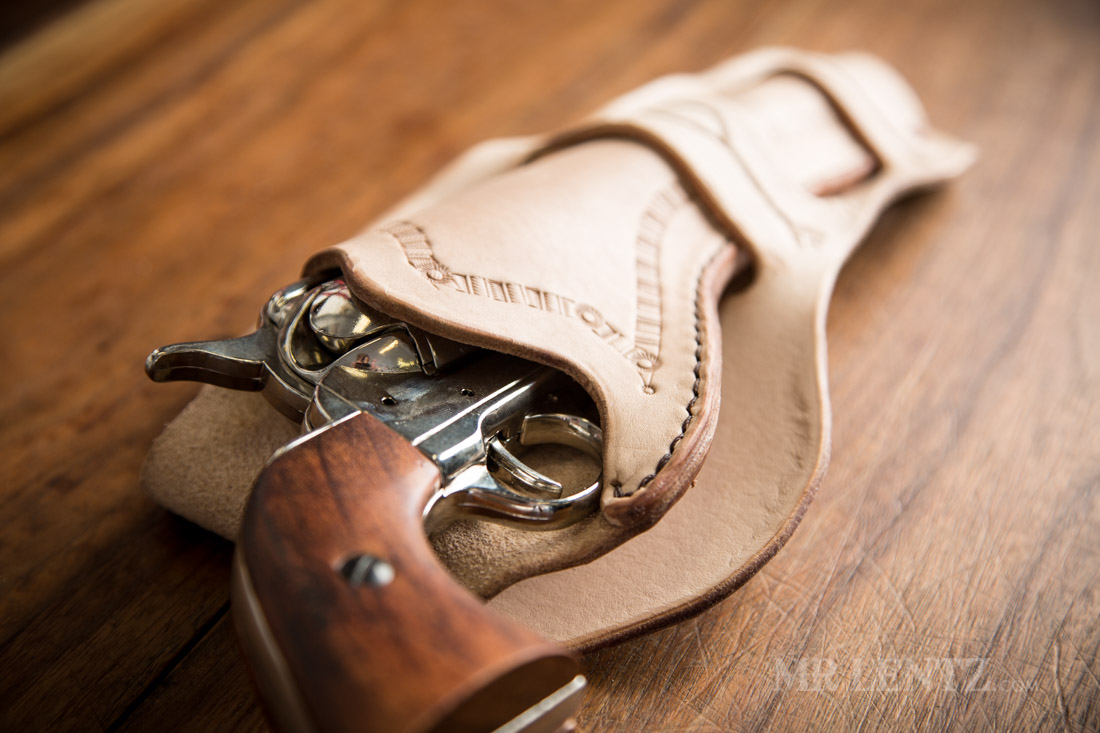
Time to test fit the gun into the holster. It’s a good idea to wrap your gun in plastic wrap before putting it into the holster in case there is still moisture in there. Leather can take days to fully dry.
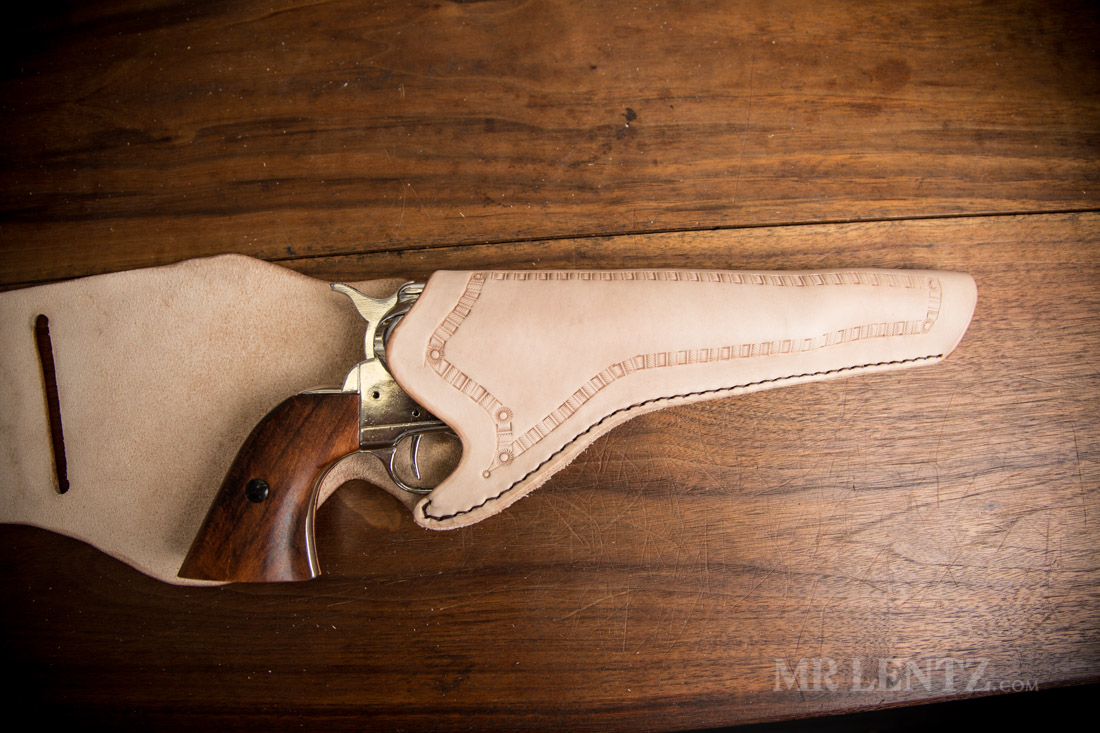
Everything seems to be fitting quite well. THe leather is nice and tight too – it’ll loosen up over time and with use.
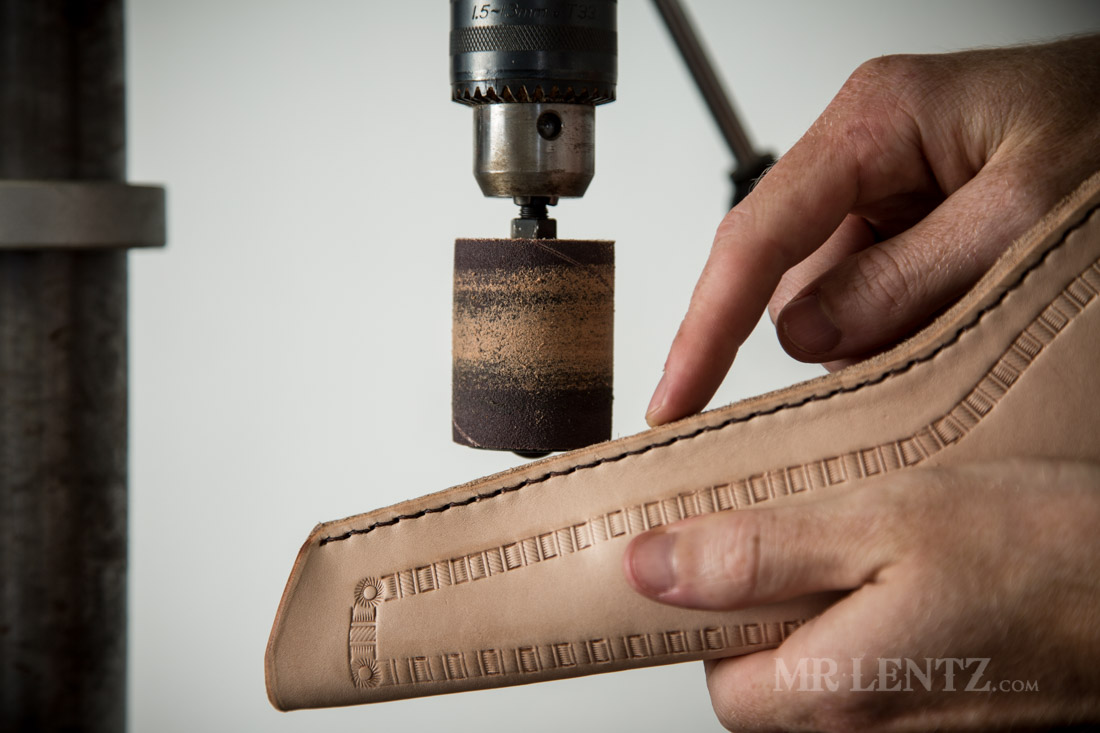
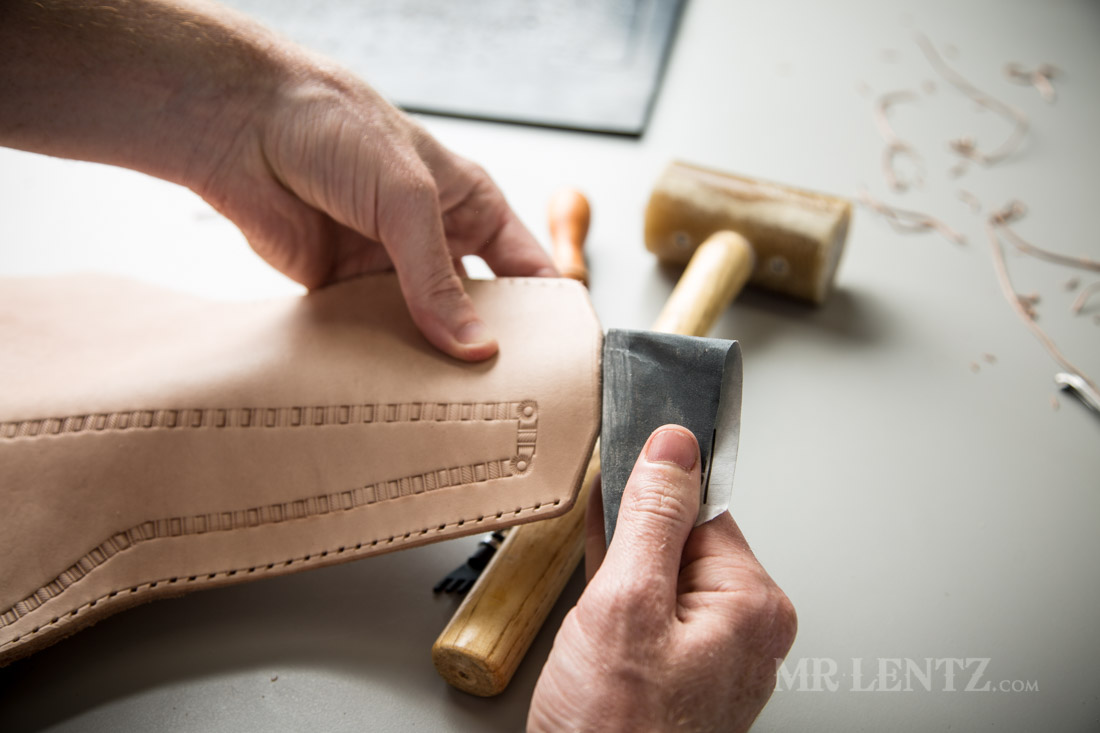
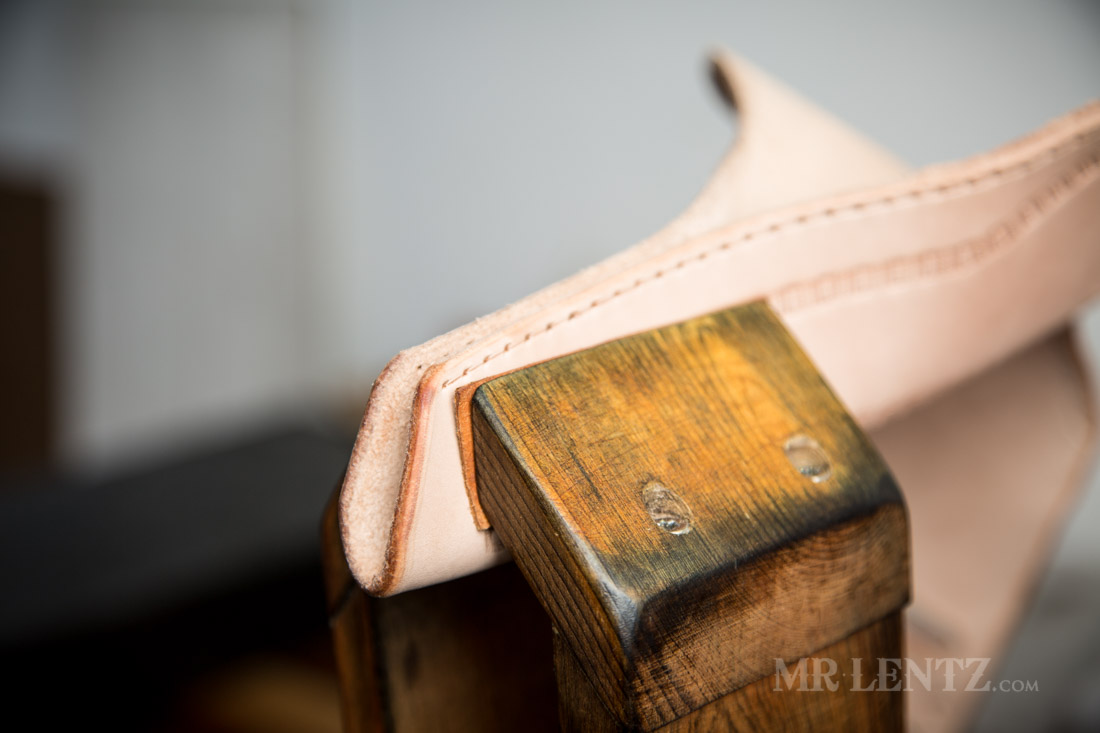
Now we had originally burnished the entire holster except for the stitched edge, and here’s why. The stitched edge sometimes is not perfectly cut or aligned. After stitching you can sand it down nicely with the drum sander.
Careful not to take too much off though – you can’t go back in time!
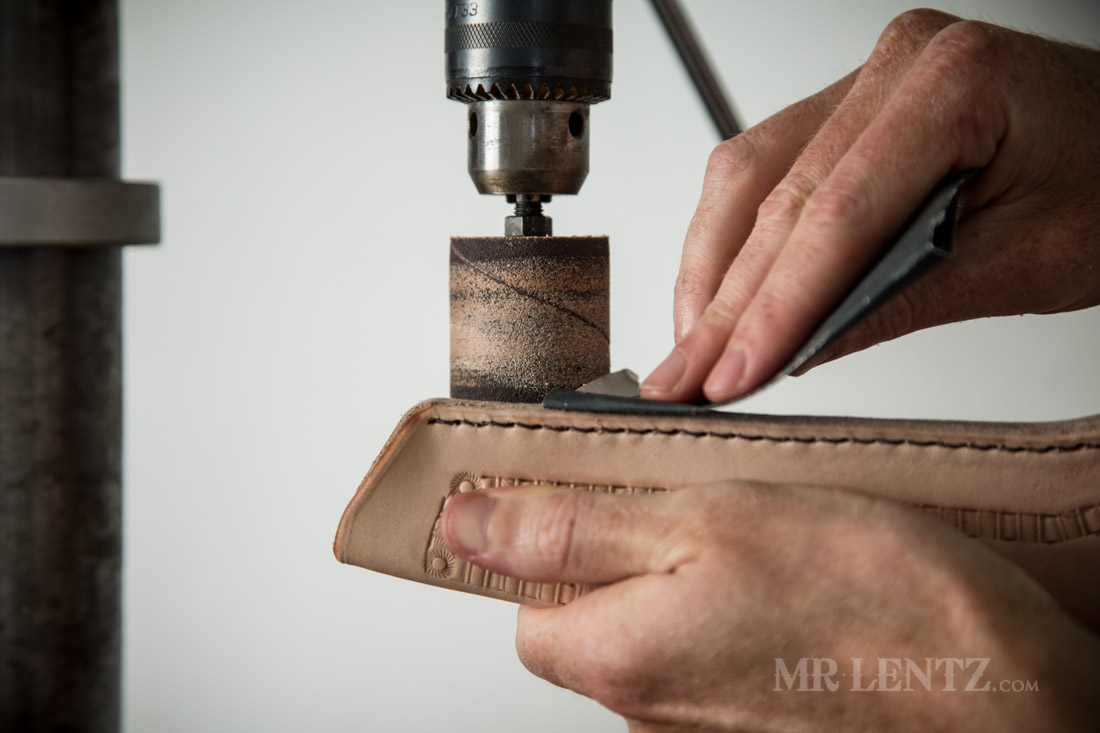
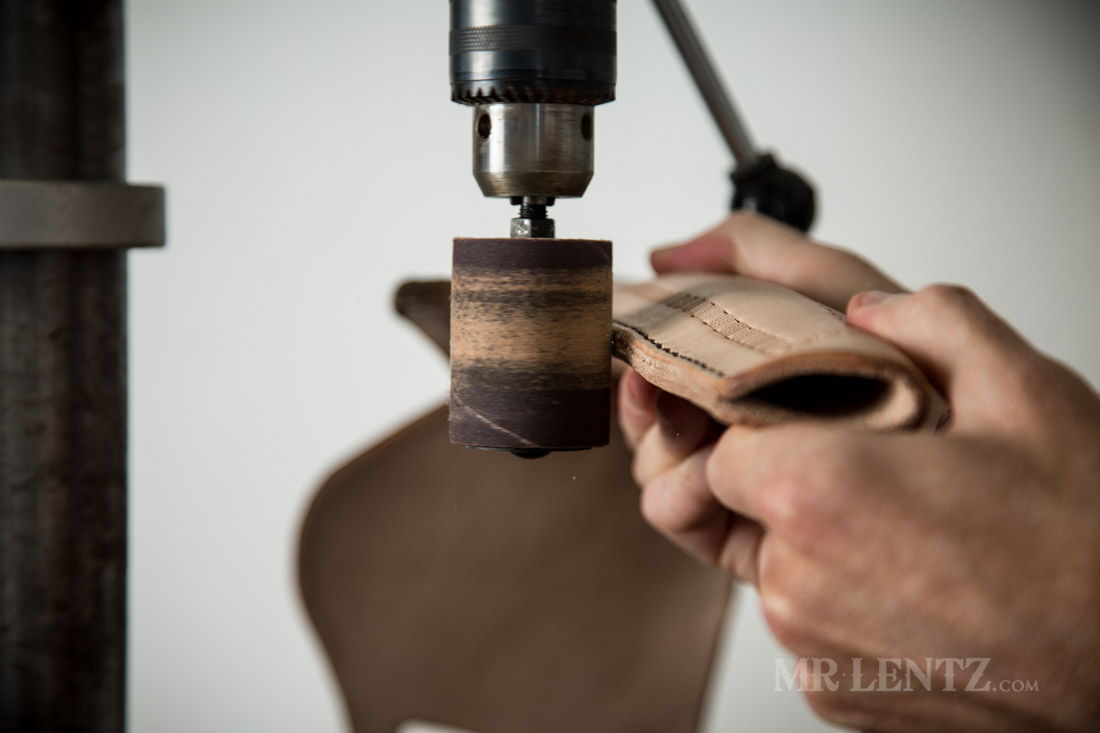
After drum sanding I usually jump down to a fine 600 grit paper and get that edge nice and smooth.

I then wet the edge of the leather only slightly and push it up against my cocobolo burnisher with the waxed canvas. It’s actually spinning in this photo, but the camera speed is to fast to tell. Edge burnishing in this way will produce a nice glassy edge. It won’t last forever though, but it sure does look nice to start out this way.
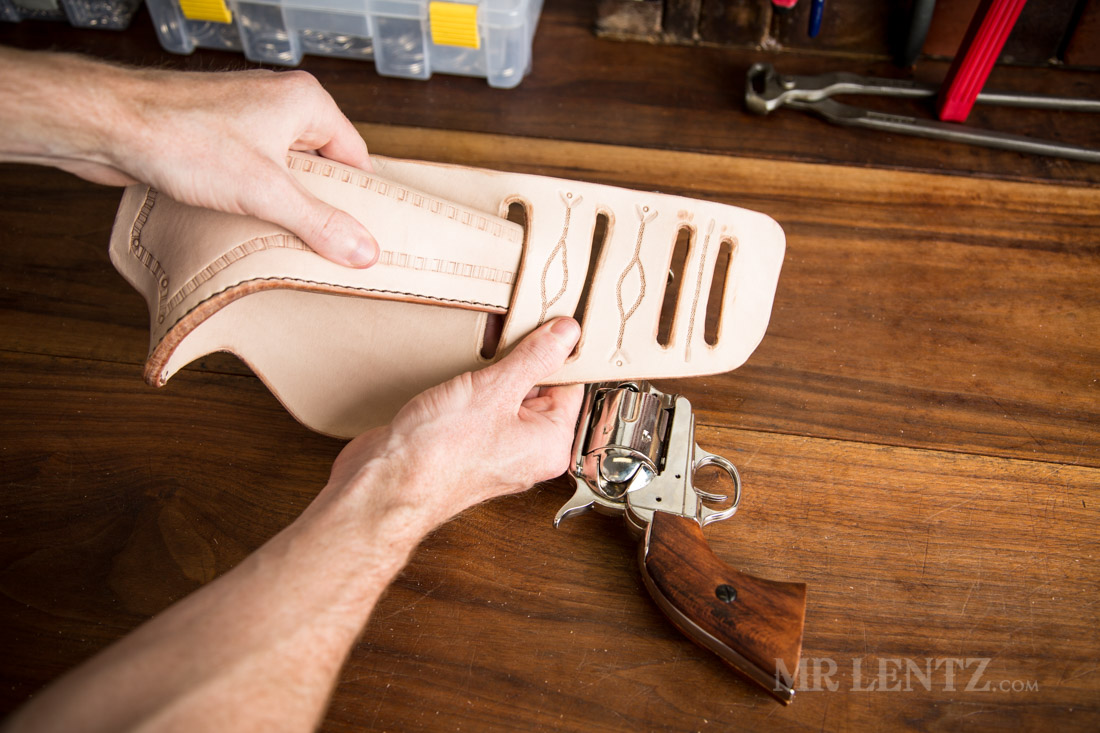
Ahhh, the final phase, fitting that holster through the skirt.
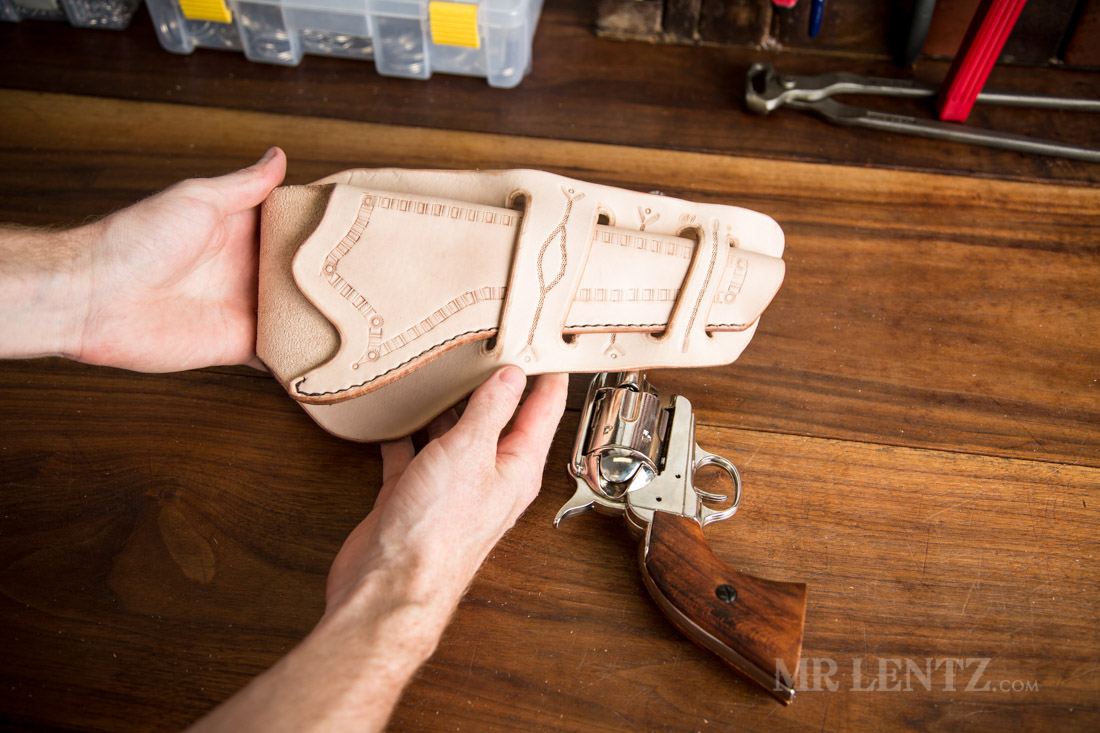
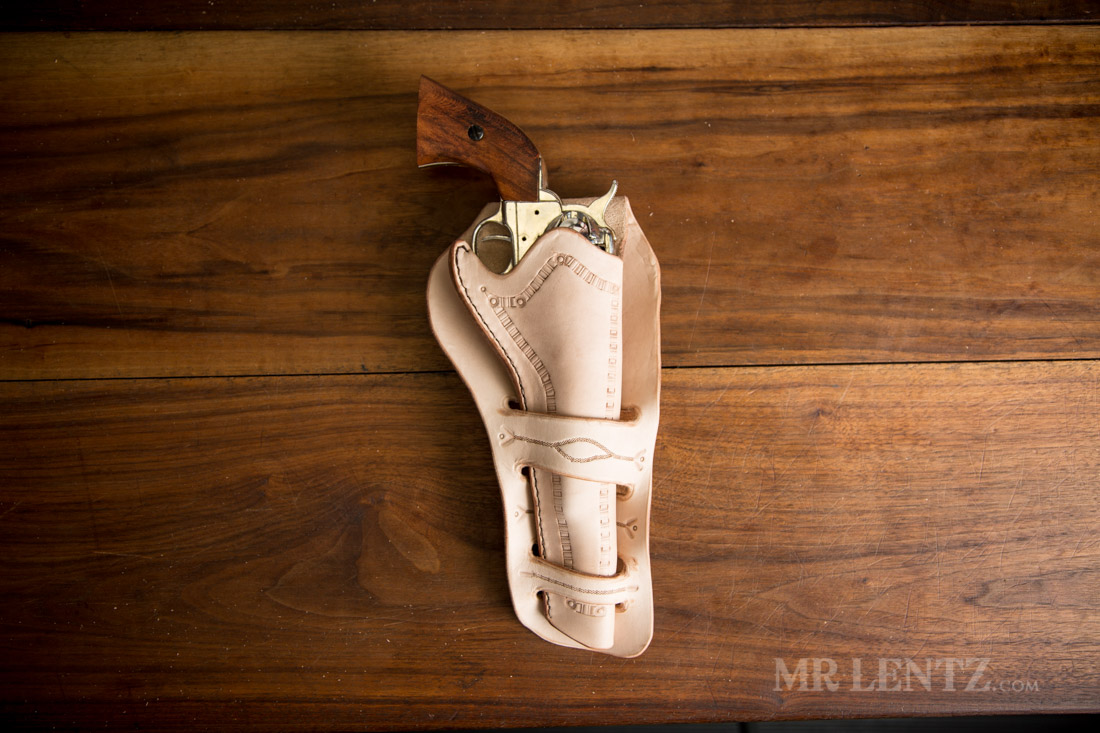
And there you have it, a simple half day project for most. I realized my dye never really set in the way I wanted it too. I can fix this to some extent by putting a few more coats of oil on the leather. I also know that vegetable-tanned leather earns a beautiful patina over time. While it may look very light colored now, within a few months of use it’ll be a light brown, after a year it can even become a dark rich brown just through handing it, sun exposure and any other item it comes into contact with. It truly is an amazing leather to work with.
I thought I’d throw in a few shots of my beginner level stamping, ha! A few months ago I made a stamped leather belt, check it out here.
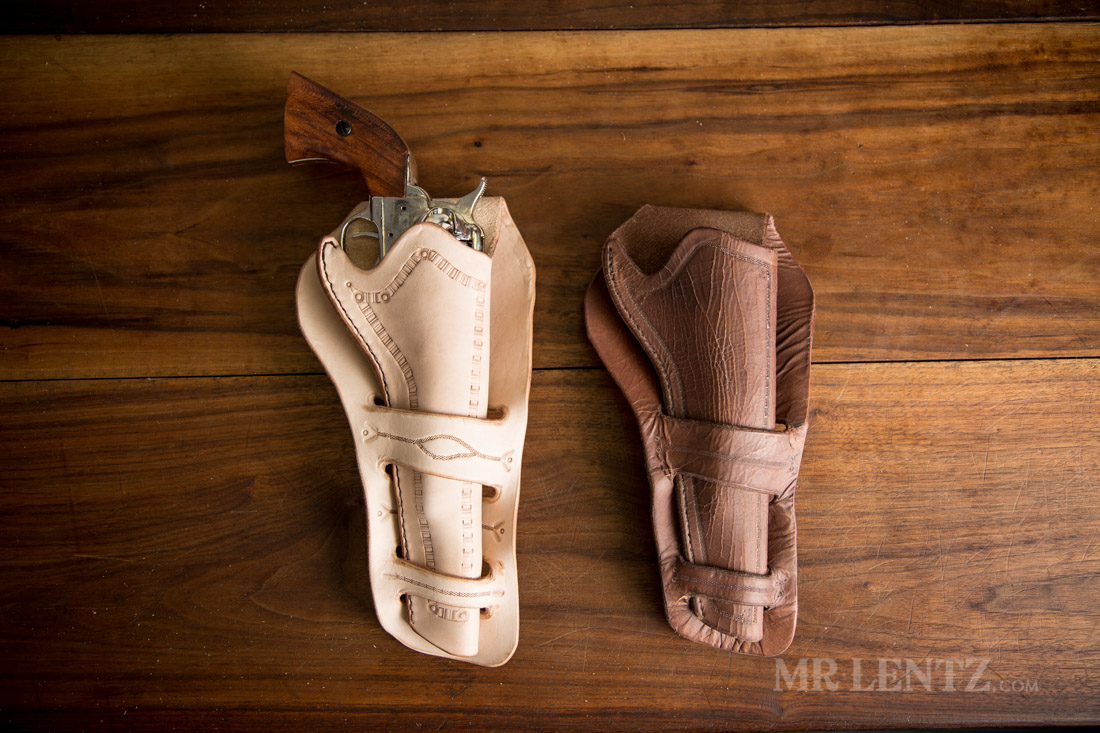
I’ve been working on a series of these holsters and testing out different ageing techniques. The holster on the right was a bit overkill, but it does have that old western dry desert look to it. The best part about making things with oyur hands is you can experiment and try new things, and the results will sometimes surprise you.
Hey – if you have any questions about this tutorial, please let me know by writing a comment below. I usually respond within a day or two max. Cheers!
READER'S FAVORITESVIEW ALL


Very beautiful work. Surprised there aren’t more comments. Keep up the good work!
thanks! maybe I answered all the questions, haha. Im sure there are thousands more.
How many sqft does it take to make a holster?
Well – that depends on the gun size really. Plus if you are just learning – I’d buy extra. 2 to 3 sq. ft. should do it for one.
Thank you for this tutorial. I have made 2 holsters now from direction. One lefty and one right hand. The most surprising thing to me is that you don’t sew the holster on. So I can make just a couple of belts and many holsters and interchange for what or where I’m going. Thank you for your help. I don’t sell my work, I only make things for me and mine. It’s fun and kinda relaxing.
Glad you found that useful! It’s an early tutorial of mine, so it may be a bit rugged but the end result is usually pretty nice. Just wait until they start ageing – the leather keeps looking better over time.
Hi! I’m really impressed with your overall work! I’ve been making kydex holsters for a while but I have always loved leather more. I’m getting ready to start getting into leather (for myself, as a hobby), any advice?
Thanks Sean, I can only imagine leather is more fun to work with than Kydex. With leather, there’s a lot of tools, a lot of techniques, and a lot to learn! I’d start with the simplest project out there and build your toolset from there. You may want to check out my tutorial on how to make a leather wallet here first.
Thanks!
I always wanted to know how a leather holster is made. Thank you Mr Lentz! When I understand how something is made, I appreciate it more.
I’m going to go out on a limb and assume to do a left handed version I just mirror it?
Hi Alexis – yep, just make sure as you go to mentally construct things. I think my first time around I made the template on the paper, but when I went to trace it on the leather I had flipped it upside down…thus making the left vs. the right. Cheers!
Great tutorial. Well done and much appreciated.
Hi! I have a question about leather thickness. Can you tell me how thick the leather is in metric system (in mm)
Hi – I’d say a 9 to 10 oz leather would work, so a 3.8mm to 4mm thickness.
Thanks!
What was the dimension on your diamond stitch punch? I have 4mm but yours looks bigger.
Jim – while I don’t remember the spacing on the one shown in the photos – I would recommend a 4mm spacing. It’ll make a nice looking stitch on a piece like this.
Mr. Lentz. Thank you for making this tutorial. First time attempting leathercraft, so far I I’ve made 2 holsters and would not have succeeded without your assistance. Thank you
Great Matt – glad I could help!
Thank you so much for posting these guides. I have followed them to learn the basic of leatherworking and am starting to produce some really beautiful work. Much appreciated!
I kinda confused (beginner here) about the part after you punched the first set of holes for stitching. It says “flip it over” and the next set of holes you punch will be aligned. Can you elaborate on this part? Thanks for a great tutorial.
Hi Don – Sure, basically you can see that you first mark a stitch line on the front side of the holster then use the diamond awl to punch the stitch holes. Because of the way the diamond holes are oriented…if you just slide the holster down and punch the other edge – when the holster is folded the diagonal holes will not match up. So to fix that, you need to flip the leather over and punch from the back side on that other edge. Thus when folded the two edge holes will line up. Hope that helps!
I just found your site this evening and cannot wait for tomorrow to get here, so I can start rounding up everything I need to make a holster for my tracker 992 .22 lr/22magnum revolver.
Have looked lots of places, but found nothing but high-dollar custom-made ones I cannot afford. I have worked with leather many years ago, so I am very happy to have found your template.
Thanks very much
Thanks Terry – the more you look into holster making it is quite the specialty trade. The tutorial I have here though should be manageable for most people to make. For daily use you may over time make thicker versions with a welt, and consider we forming over the gun for a nicer fit.
Hi I am looking for a leather left handed 4 inch holster that covers the trigger guard and which fits on a belt for a Smith and Wesson 586 revolver. What would it cost to make one for me. I am left handed and carry a 44 special .ca on my right Side and a 38 Smith and Wesson on my left side. I like revolvers rather than semi. But I would carry the 357 if I could find a good leather holster for it
Hi Ron, As of right now we aren’t making custom holsters – sorry! I might introduce custom knife sheaths soon so keep an eye on the shop.
I was looking to find the best thickness for holsters when I found your site. I’ve made three with 7/8 oz ( working in the third one now). I also made a pancake holster for a friend. Seeing your tutorial has helped me very much. I always have a problem with the measurements and the trivger. I’ve made a few other things but holsters are what I really want to make. Thanks for making it easier for me. My next one I’ll pull up your tutorial again and follow along. You’ve been a great help to me. Thanks
Hi Jeff – glad you liked the tutorial. Technically this is a very beginners version to get people going in the right direction. At some point you may want to look into adding a welt to your holster if needed, as well as hardening the leather a bit with heat. Good luck!
Awesome holster! What do you use to seal the exterior of the leather without softening? Thanks!
Hi Rick, I typically just oil and wax it since that’s the traditional way to finish. Hot Wax dipping is another very good way to finish vegetable tanned leather goods if you are looking to go chemical free. I used that technique on this knife sheath:
https://www.mrlentz.com/2019/03/knife-sheath-build-part-1/ If you want to seal using chemicals there are a wide variety of options out there that’ll need researching. To make the leather harder before sealing you can use a method called Cuir Boilli, which is basically leather quickly dipped in boiling water to harden it like armor.
Such excellent clear instructions! Very well explained. I’m new to this and want to make a holster for a gift for my son. I did a practice one first and it turned out very nice. Thank you for this well written, clear, easy to follow tutorial!
Thanks L, glad you liked the tutorial!
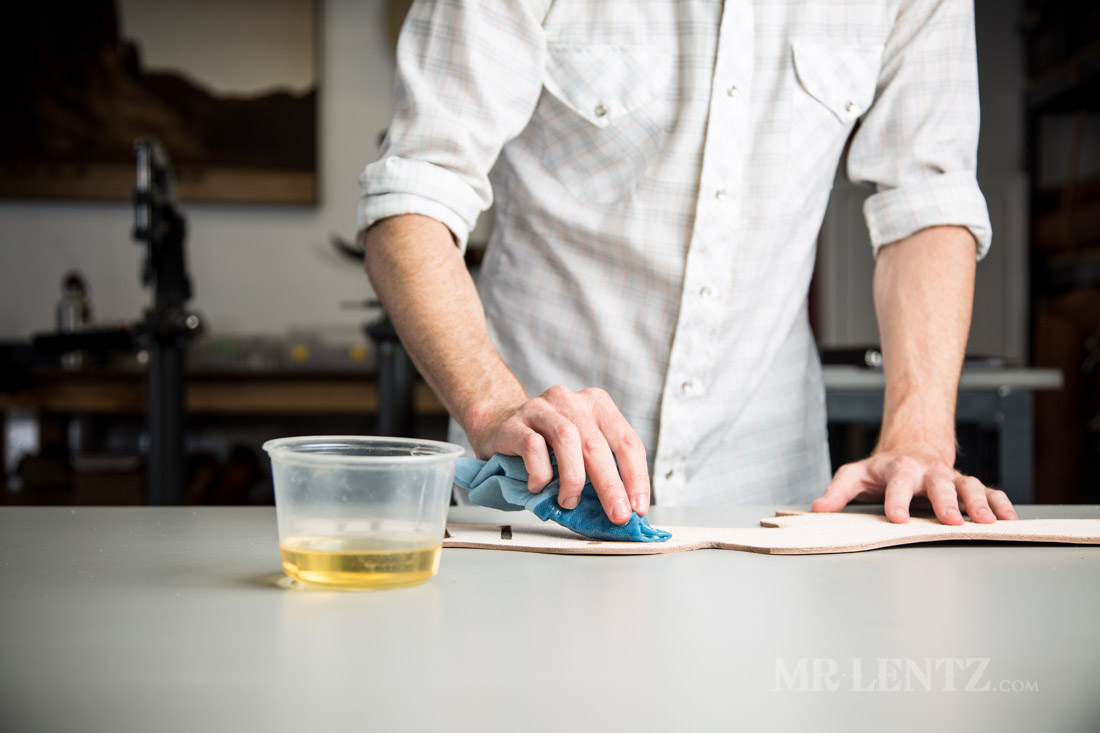
I’m a first time holster maker and enjoyed your tutorial a lot. One thing that I didn’t understand under Part 3 (Dye and Oil) is that you dyed the face side and oiled the back side. Why weren’t both sides dyed and oiled?
Hi Robert, this is kind of a shortcut to help speed things up. Since I applied a water based shop-made dye to the grain side, it would be damp for a while. If I applied the oil to the same side, it simply would not soak in or do so in a blotchy manner. So the trick is to apply the oil to the backside that is still dry. You have to be careful though – the flesh side can really soak it up quickly and lead to over-oiling. If you have more time, just let things dry first, then apply to the grain side. Further – if you are using an alcohol based dye, you have a much shorter dry time and can oil it on the grain side too. Thanks again!
Thank you for this Tutorial Mr. Lentz, this is the best and most simple tutorial I have found to date and It left me with a very nice product. I chose to tool a basket weave pattern on to my holster complete with a dark brown dye to match my belt. Thanks again for the tutorial!
Glad you found it easy Luke! I wish I had more skills in tooling when I made this tutorial a while back. A basket weave is a great choice and would look nice on this style of holster.
Very nice work?
What size thread and needles do you usually use?
Thanks Jeff – if you are hand sewing I would use a 5 cord linen thread or a Ritza 25 1.2mm and pair that with a John James Saddle Harness Needle #002. Note this holster tutorial is for a looser fit, unlike the wet-formed version. Good luck!
This was a great tutorial! Just perfect for what I need!
For deer hunting I need a plain, western-style left-handed cross draw holster that partially conceals the trigger, with a hammer thong, for a large-frame double-action Ruger revolver. I have shopped and shopped, but I can’t ever seem to find what I want so I will have to make my own.
My only suggestion is if you could explain in a little more detail about that fork-looking tool that you use to punch the holes for the stitching – diamond punch awl? Are there different sizes for different size thread? If so, what size prongs should we use for holster thread?
Thanks,
John in Va Beach, VA
Hi John, glad you found it useful! This tutorial should get you started in the right direction, as you may find out – the more you dig into holster making, the more there is to learn. The fork thing is a pricking iron and there are two versions. I use the kind tha make a diamond shape used for stitching leather. There are various sizes, spreads, etc and I can point you to this page for more detailed info on when to use what: https://www.ianatkinson.net/leather/leatherguide.htm#stitching
Good luck!
Thank you for the tutorial. I am working on my own version. Your work has been very helpful. js
Mr. Lentz, I want to thank you as well. This was a real treat for me to read as I am new to all leather work, and have ran into a few of the errors you mentioned above. I can say I had had stitches because of dull and sharp and I do prefer the sharp ones. (Haha) I started with making a knife sheath. Now I would consider it a cheat though as I had a pattern to follow from the one on it. That made me want more though and now this is a sickness for me. I only want to add to your recommendations and say practice your craft and it becomes great, you will get the same return from your craft! Thanks again, I am inspired for great things now and can start my day.
Sincerely,
Walter
Hi Walter – happy to hear you found this one challenging and fun too. Careful – leatherwork can be addictive! If you are ready for a slightly more advanced tutorial, I would recommend my axe sheath tutorial here: How to Make an Axe Sheath.
Thanks and have fun!
Thank you for this tutorial. I found it extremely helpful. Since you asked if someone knows what the “body” of the gun is called to chime in. It is called the frame.
Thanks Frank! Actually – since I wrote this article a few years back I have learned quite a bit more about the terminology. I am hoping to also update with a more modern holster tutorial too.
Please do a pancake holster tutorial
Next
I’ll put it on the list!
I’ve been wanting to make a holster for my 1875 Outlaw. Didn’t know quite where to start…
I do a lot of leather and rawhide work, but mostly mountain man and Native American stuff. All of my work is softer leather.
This has helped me a lot!!! THANKS
Hi Ron – Glad this tutorial helped you. It’s a good starter holster how-to and things can certainly get more complex from there. I think this style is probably well suited for the mountain man type of gear though.
Just completed the holster!! Very happy with the outcome.
I didn’t have the proper saddle leather, so as always, I improvised…
I used contact cement and glued two pieces of leather front to back, just big enough for the pattern that you laid out in your tutorial.
It is an Antiqued Pattern leather. it looks like it came out of the wild west.
I cant thank you enough!!! I wish you could see a pic of it…
That’s great Ron! I am glad it all worked out. Cementing the two flimsy pieces of leather together is a great way to get a stiffer overall form. In many cases these holsters would be made of vegetable tanned leather with a liner glued in – so they become extremely durable and fairly rigid.
And for the novice beginner, that doesn’t”t have all the tools you used, do you have any advice?
You may be able to google alternatives depending on the technique used. However – basic leatherwork will require at least a small investment in some simple tools. You can get a lot of them cheaply online…but I always caution to get the best you can afford or you’ll end up replacing them fairly soon.
Do you have any advice if I was to make a Doc Holliday version with this kind of holster? I am on a limb trying to create my own pattern to design a holster for a friend of mine. Thanks in advance!
Hi Cassie – a few tips that may help (they also may seem obvious as you tackle the design). The holster should be attached to a backing piece of leather before you sew the holster closed. The backing piece of leather will form the ‘structure’ that sits against the body. From there you would just need to measure out straps around the body and connecting to the backing plate. Cut them longer than needed so you have some fudge factor. I would also rivet the strap to the backing plate to make things easier, especially if you need to change things up later. But breaking it down into three pieces – holster, backing piece, and straps, it will be easier to design I think.
Thank you VERY much! I particularly appreciated the detailed pattern designing and layout. That helps tendentiously!